2. Creating and Building a Project
Please navigate to the section related to target use:
Renesas RA: Please refer to section Using Smart Configurator for RA Projects (RA SC) for creating RA project from scratch using Smart Configurator and building the project.
Renesas RH850: Please refer to section Using Smart Configurator for RH850 Projects (RH850 SC) for creating RH850 project from scratch using Smart Configurator.
Renesas RISC-V MCU: Please refer to section Using Smart Configurator for RISC-V MCU Projects (RISC-V MCU SC) for creating RISC-V MCU project from scratch using Smart Configurator.
Renesas RL78: Please refer to section Using Smart Configurator for RL78 Projects (RL78 SC) for creating RL78 project from scratch using Smart Configurator.
Renesas RX: Please refer to section Using Smart Configurator for RX Projects (RX SC) for creating RX project from scratch using Smart Configurator.
Renesas RZ/N: Please refer to section Using Smart Configurator for RZ/N Projects (RZ/N SC) for creating RZ/N project from scratch using Smart Configurator and building the project.
Dialog DA148xx: Please refer to section Using Audio Development Platform (ADP) for Dialog DA148xx device family for working on Dialog148xx family devices.
For RH850, RL78, RX, RZ, R-Car projects which are previously generated by e 2 studio, please follow the instructions in section Using CMake Toolchain Scripts to create and configure the CMake Build Scripts.
Please also refer to Introductory Videos for C++ in Visual Studio Code documents for handling projects and working with CMake.
2.1. Using Smart Configurator for RA Projects (RA SC)
For RA device family projects, it is recommended to use RA Smart Configurator to create a project for VS Code. Please follow the following instructions to create and build a project for RA device family.
2.1.1. Creating an RA Project with Smart Configurator
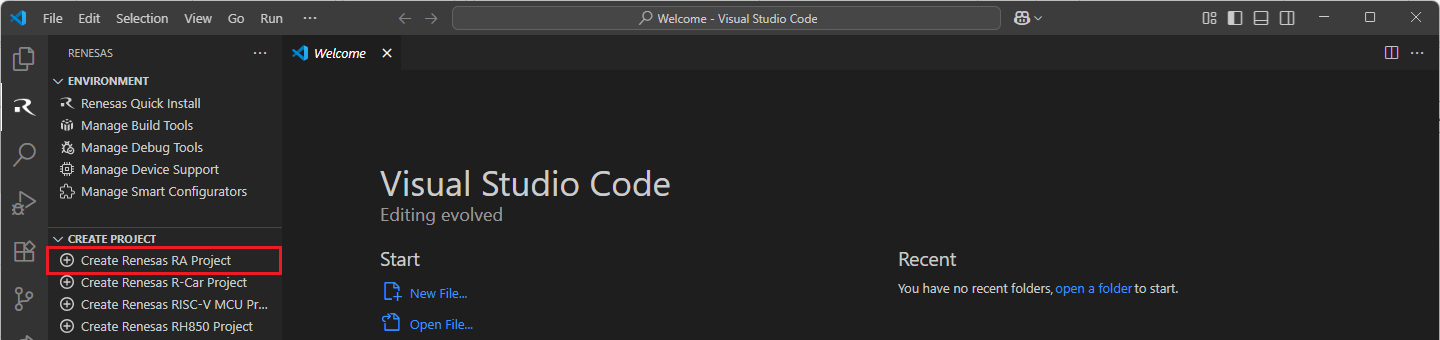
For RA device family projects, it is recommended to use RA Smart Configurator to create a project for VS Code. Smart Configurator can be accessed via the “Create Project” view in the “Renesas” tab. Please use the following instructions to create and build a project for RA device family.
Navigate to “Renesas” and click [Create Renesas RA project] from the commands.
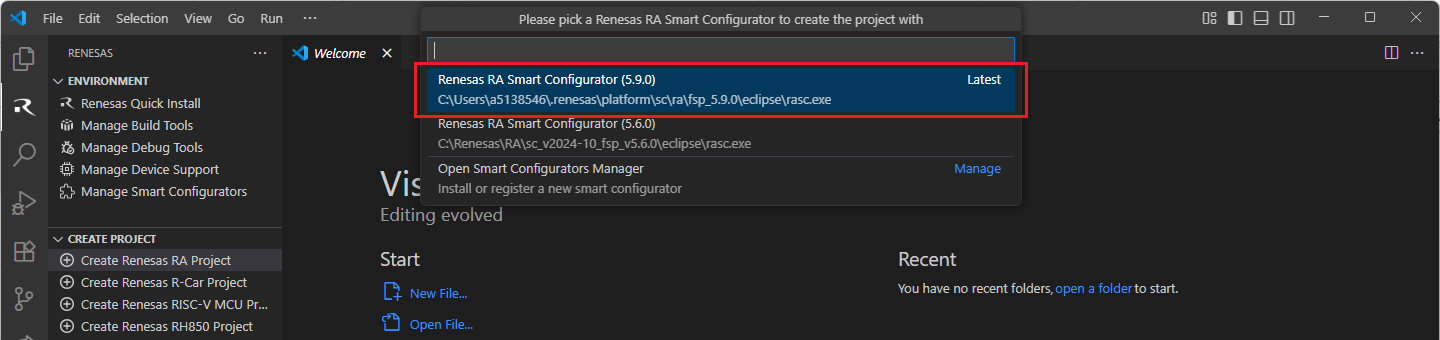
VSCode will show installed [RA Smart Configurator] list, select a [Smart Configurator] from the list.
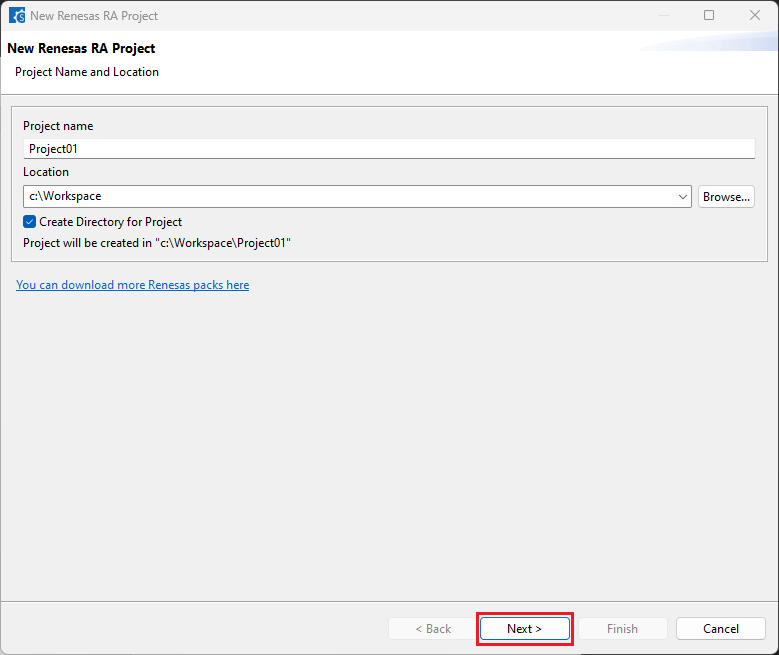
Select a [Folder] to create the project.

Keep the [Project name] and click [Next].
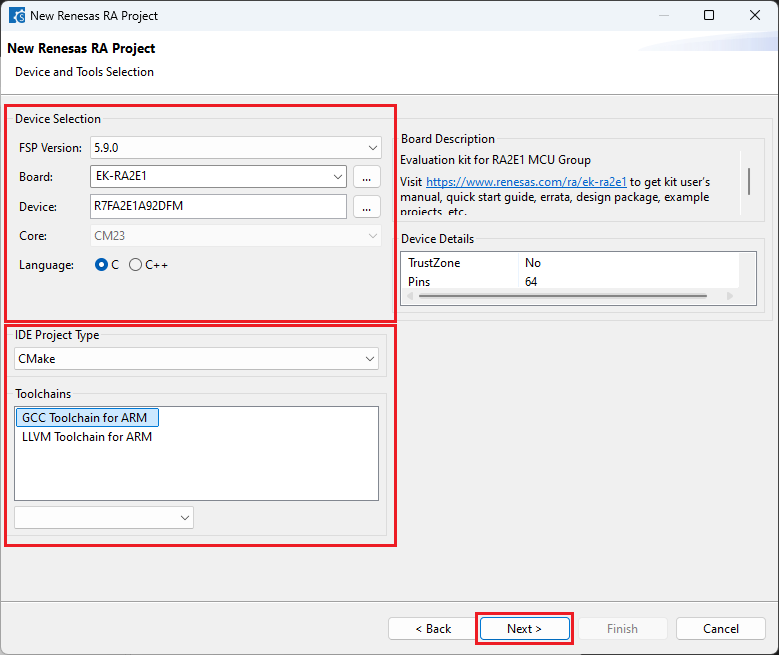
Configure your board, device type and preferred toolchain from the toolchains list, then click [Next].
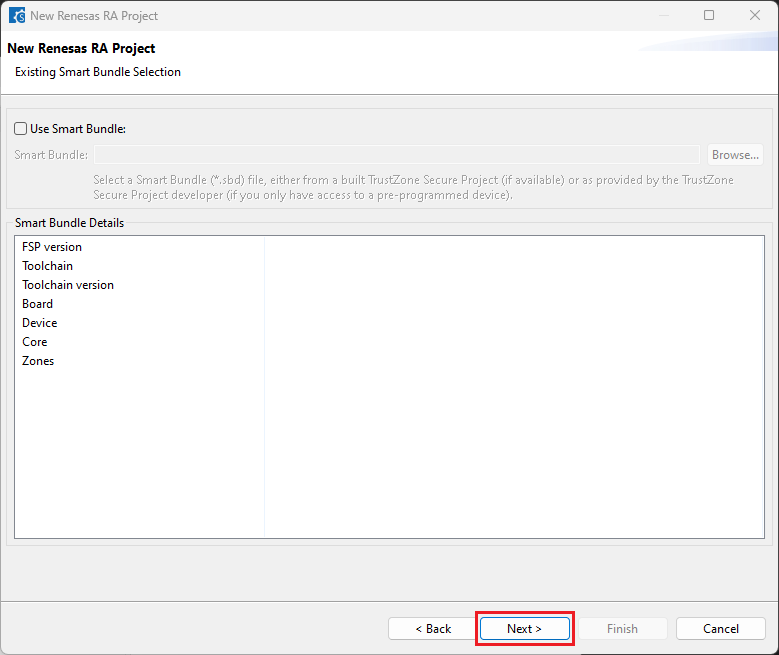
Choose the “Smart Bundle” configuration and continue by clicking [Next] (Skip choosing the Smart Bundle selection for the sample project).
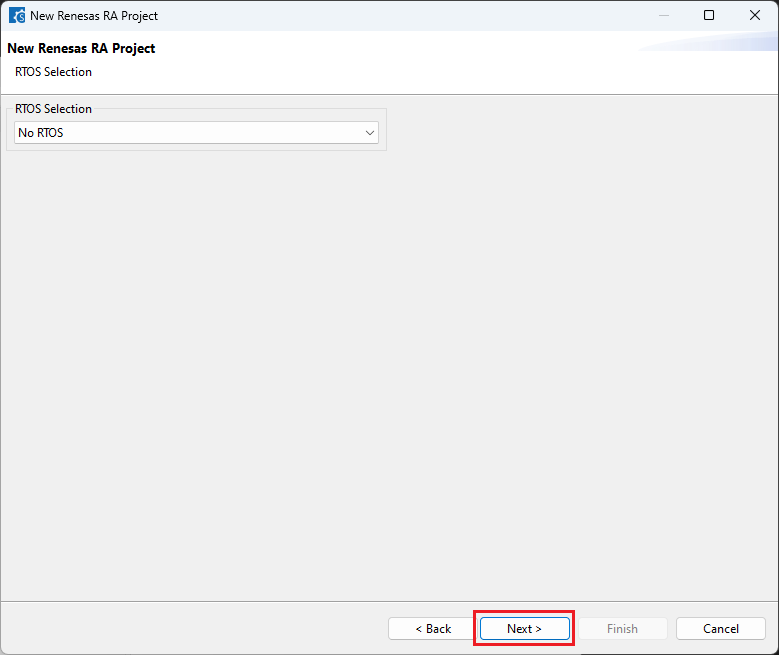
Choose the “RTOS” configuration and continue by clicking [Next] (Continue with “No RTOS” for the sample project).
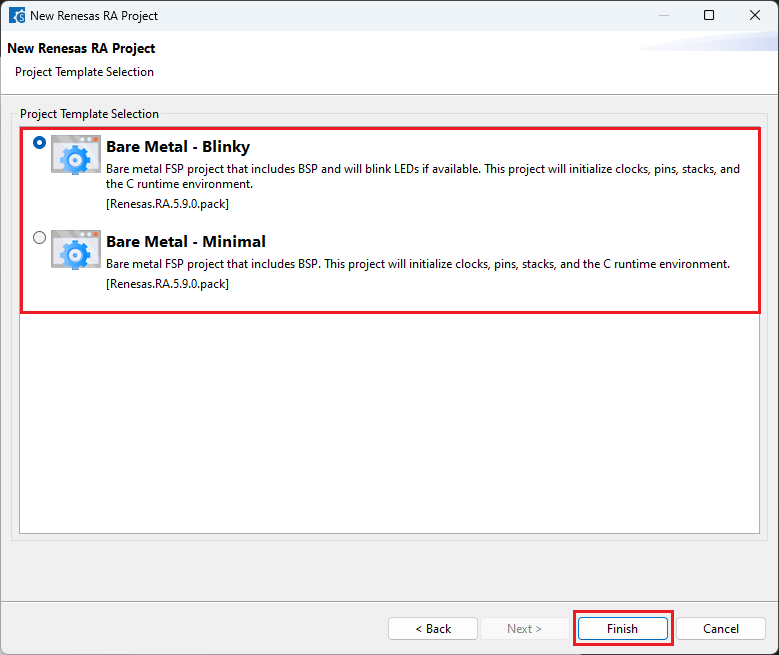
Choose one of the project templates then click [Finish] to complete the project creation steps.
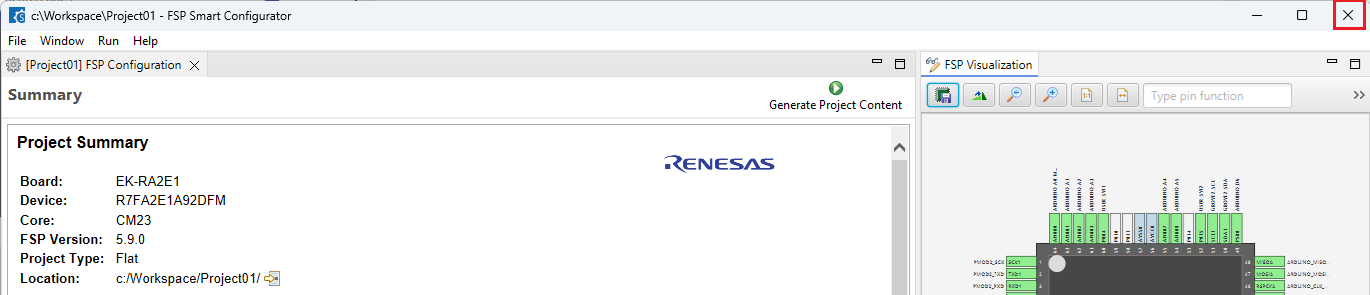
Close [RA Smart Configurator] after generation of the project files completed.
2.1.2. Building an RA Project created in Smart Configurator
For building a project, which has been created with RA Smart Configurator, please follow the steps below:
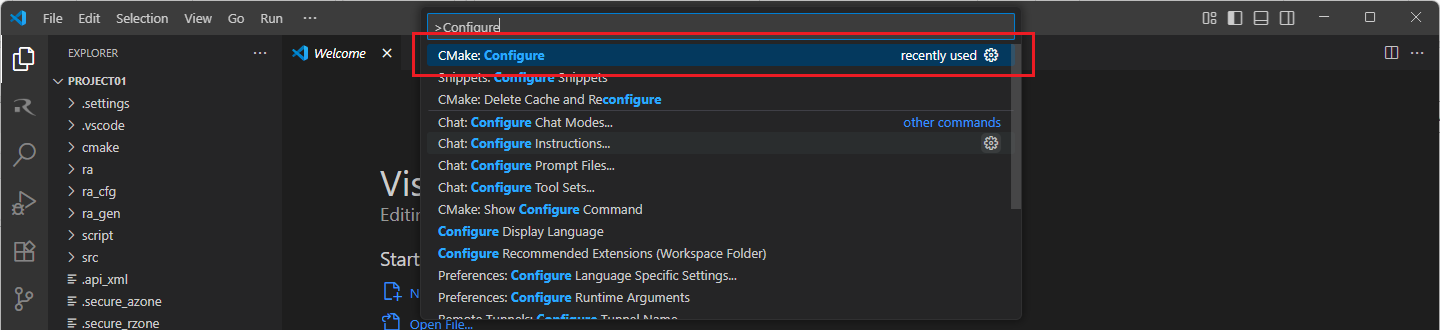
When the project is opened for the first time, CMake configure and the CMake Kit selection operations must be performed. In order to do these operations, open the “Command Palette” in VSCode and select “CMake: Configure” from the commands.
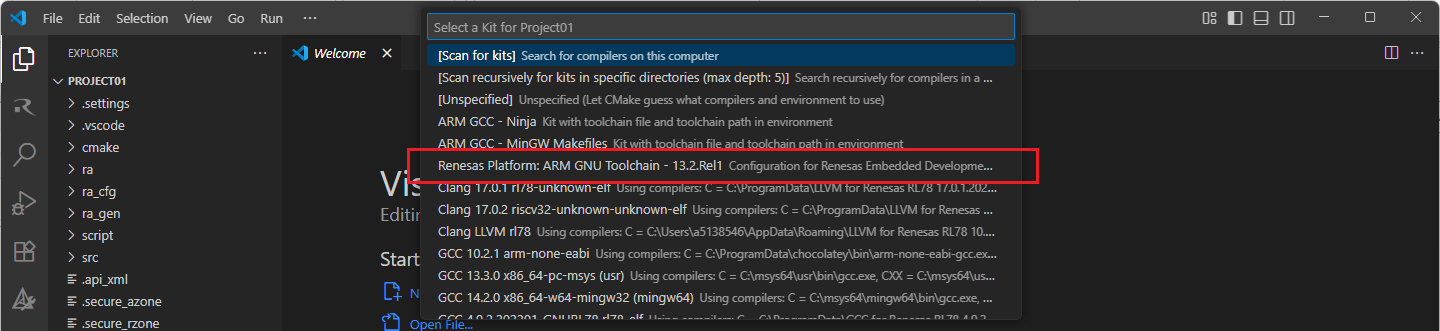
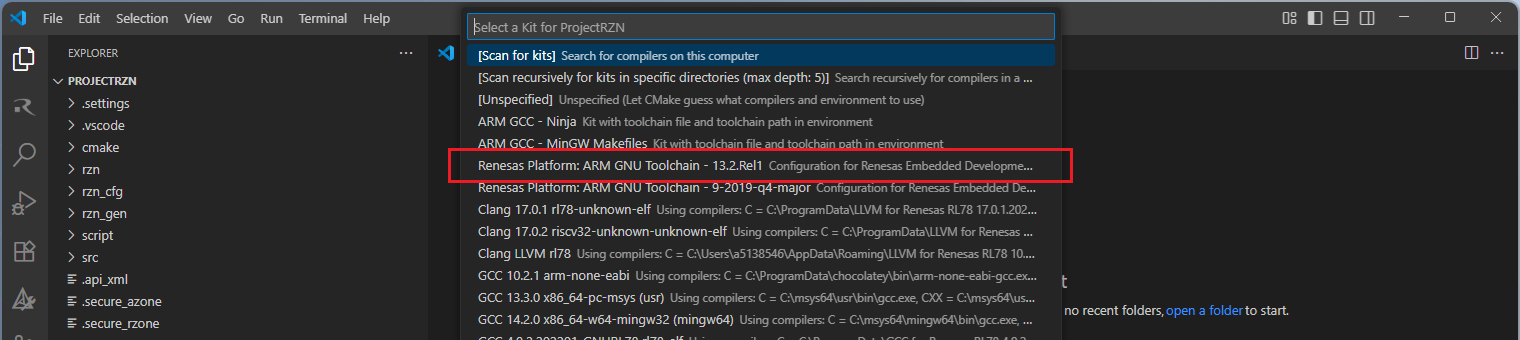
Then, a kit selection menu will be shown. Select “Renesas Platform: Arm GNU Toolchain …” from the menu if the project is generated for GCC toolchain, or, select “Renesas Platform: Arm LLVM Toolchain …” from the menu if the project is generated for LLVM toolchain. It is important to use the “Renesas Platform: …” kits since they contain Renesas-specific configuration parameters for Renesas projects.
Note
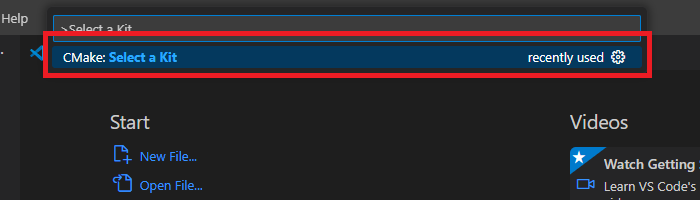
Missing the selection of the CMake Kit or wrong selection can cause build problems. If you missed the CMake Kit selection or selected a wrong kit, you can re-select the CMake Kit by running “CMake: Select a kit” command from the VSCode Command Palette.
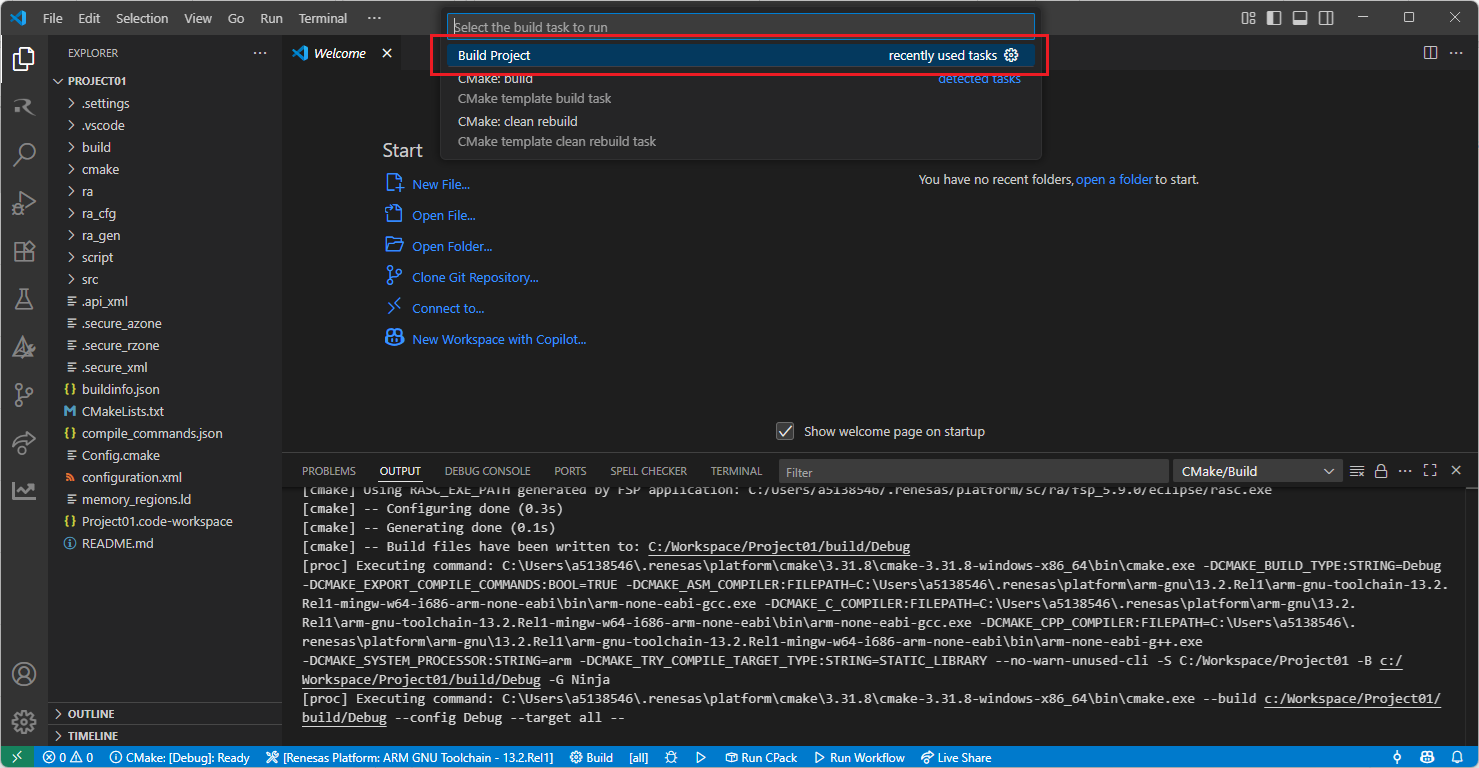
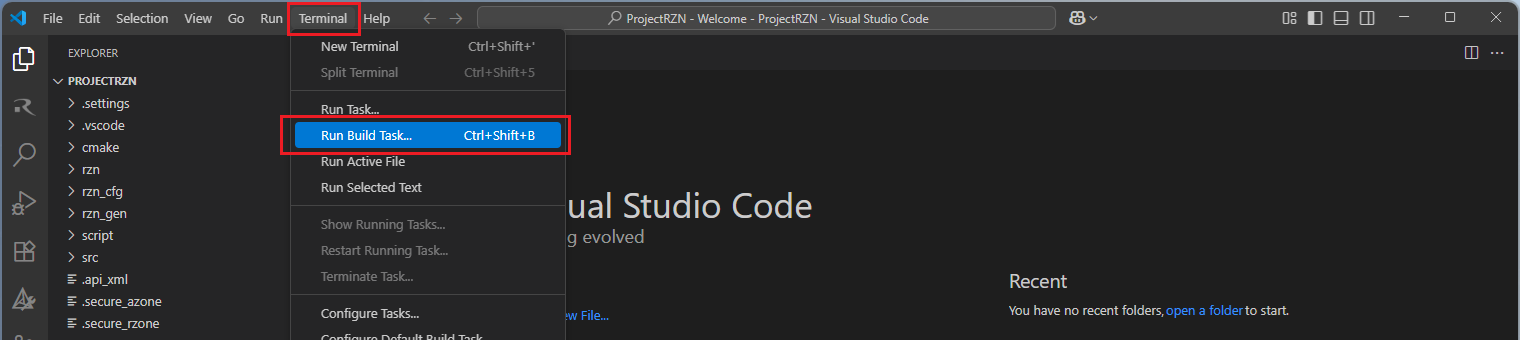
Now, go to and click “Terminal” => “Run Build Task” from the menu.
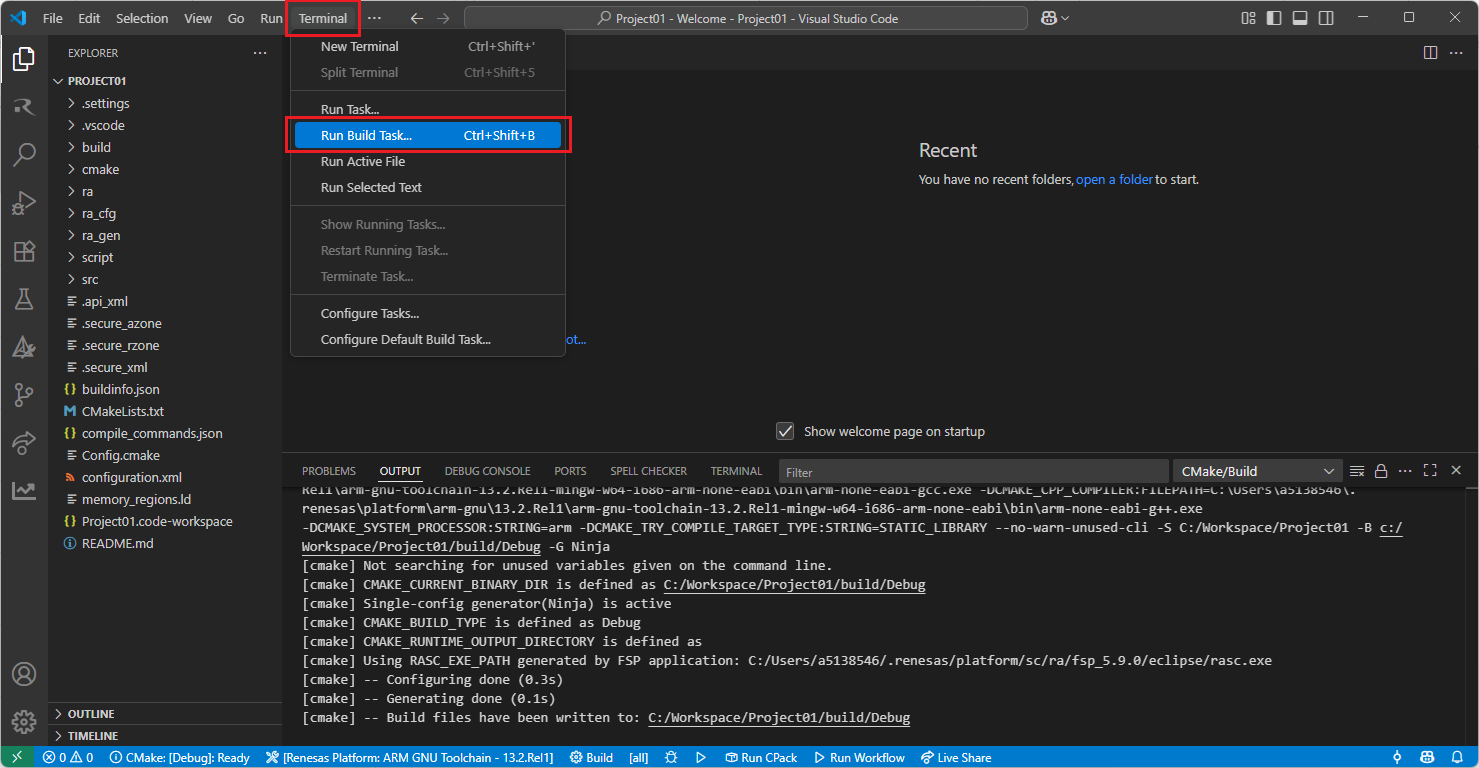
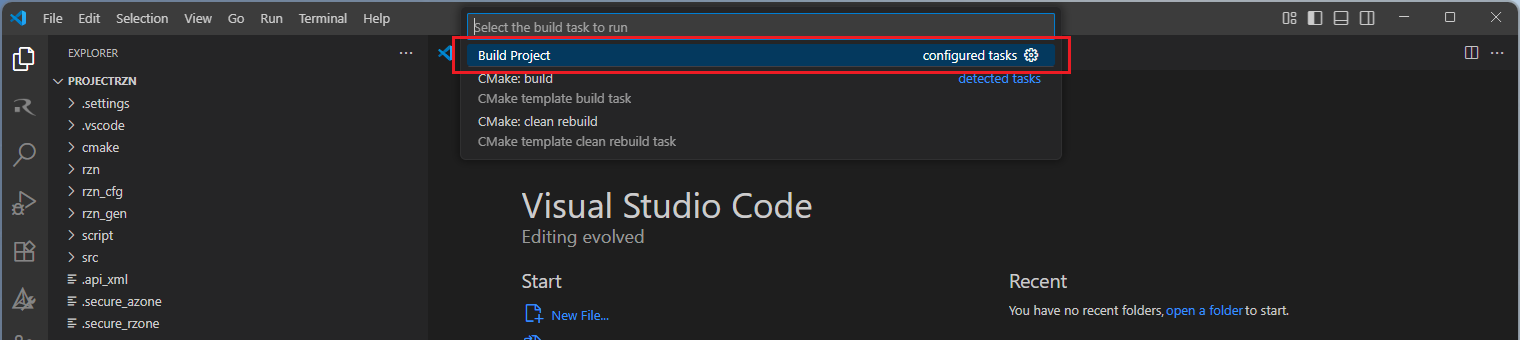
Build options will be shown, select the “Build Project” option.
Note
Alternatively, you can directly use the “Build” button to start the build operation via the VS Code toolbar.

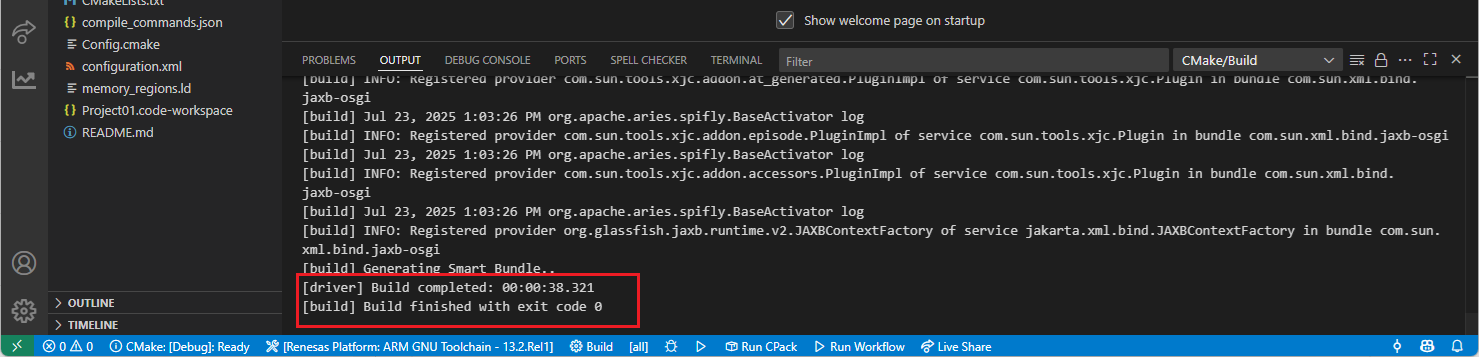
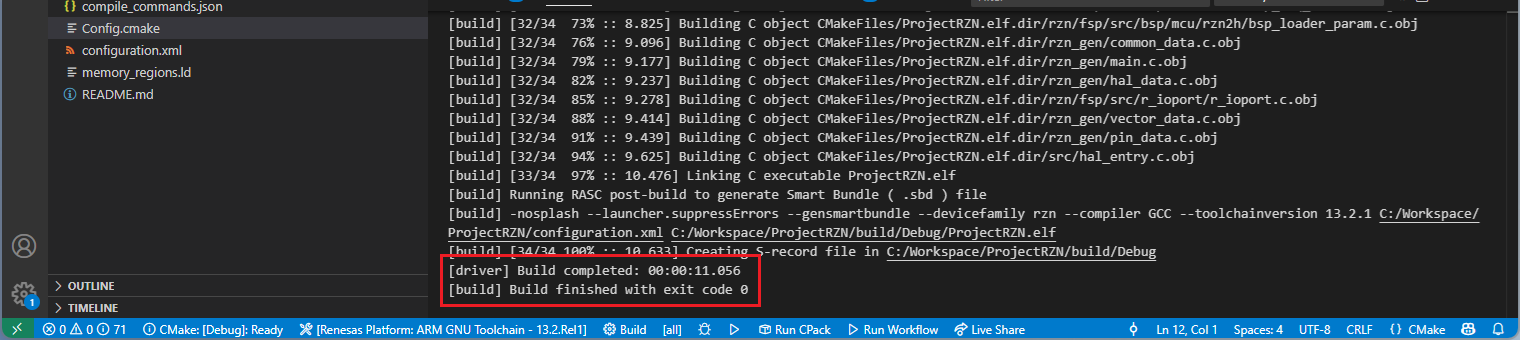
After the build operation, you will see the progress completed successfully. By default, build output (<project name>.elf) can be found in “build/<Build Type>/CMakeFiles/<project name>.elf.dir/” folder.
2.1.3. Editing/Re-configuring an RA Project created in Smart Configurator
To edit a project, which has been created with RA Smart Configurator, please follow the steps below:
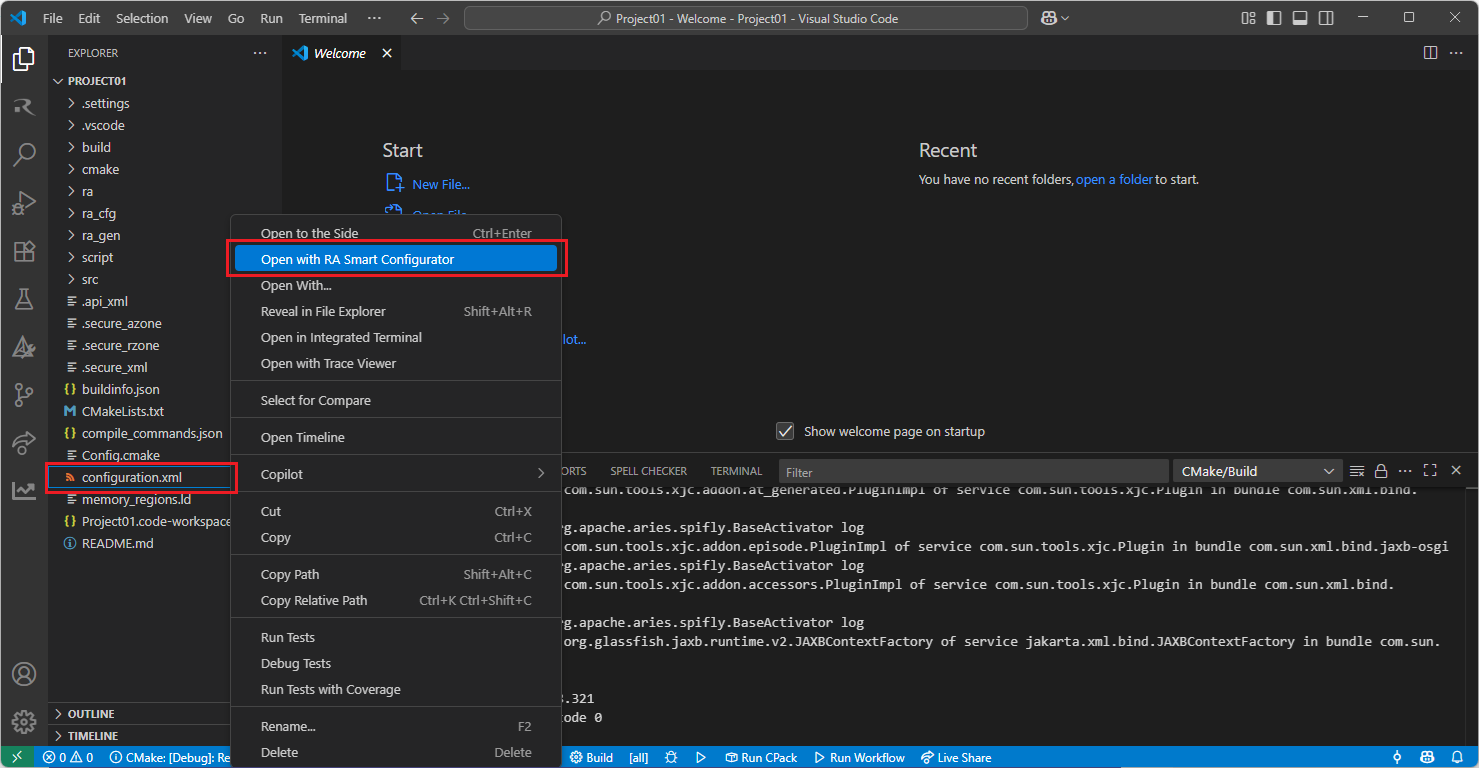
Right click the “configuration.xml” file at the project root, and select the “Open with RA Smart Configurator” option in the context menu.
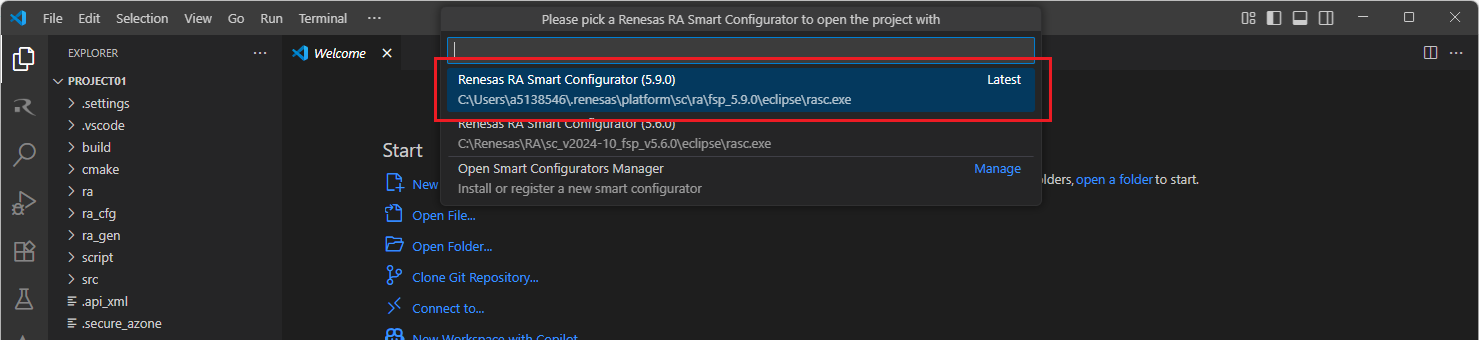
VSCode will show installed [RA Smart Configurator] list, select a [Smart Configurator] from the list to open the project.
VSCode will open the project in the selected RA Smart Configurator, now you can edit your project configuration in the RA Smart Configurator. Once the changes completed, click the “Generate Project Content” button to re-generate the project content.

TIP: For more information about RA Smart Configurator, click here to visit RA Smart Configurator page.
2.2. Using Smart Configurator for RH850 Projects (RH850 SC)
For RH850 device family projects, it is recommended to use RH850 Smart Configurator to create a project for VS Code. Please follow these instructions to create and build a project for RH850 device family.
2.2.1. Creating an RH850 Project with Smart Configurator
For RH850 device family projects, Smart Configurator can be accessed via the “Create Project” view in the “Renesas” tab. Please use the following instructions to create and build a project for RH850 device family.
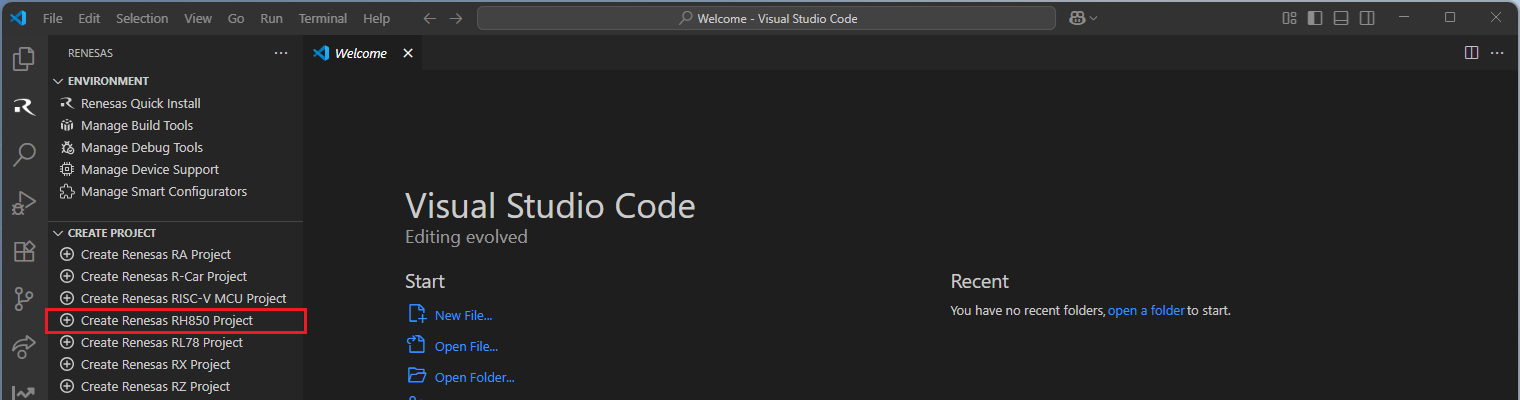
Navigate to “Renesas” and click [Create Renesas RH850 project] from the commands.
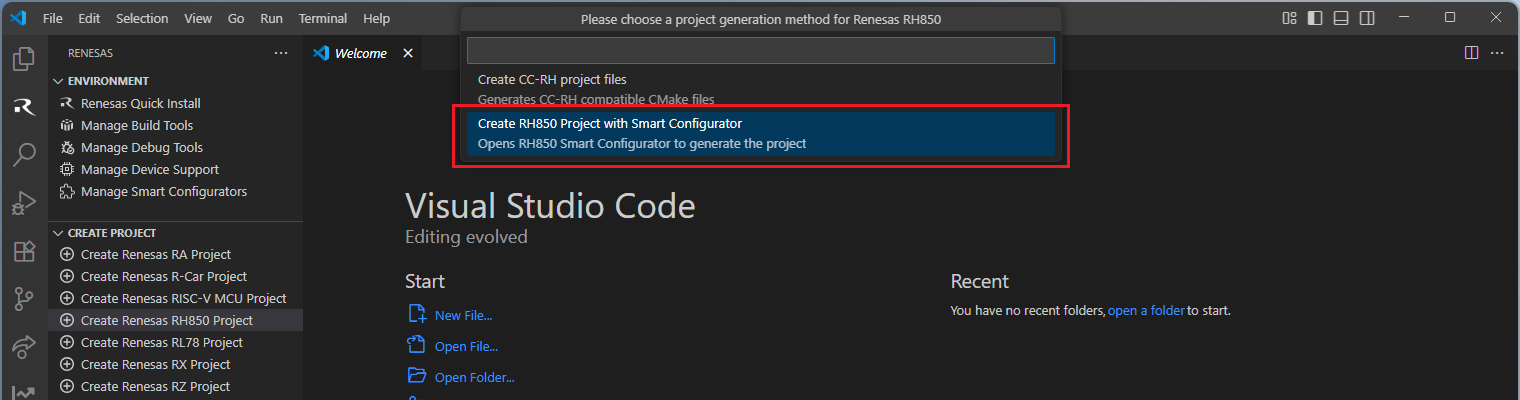
Select [Create RH850 Project with Smart Configurator] option from the list.
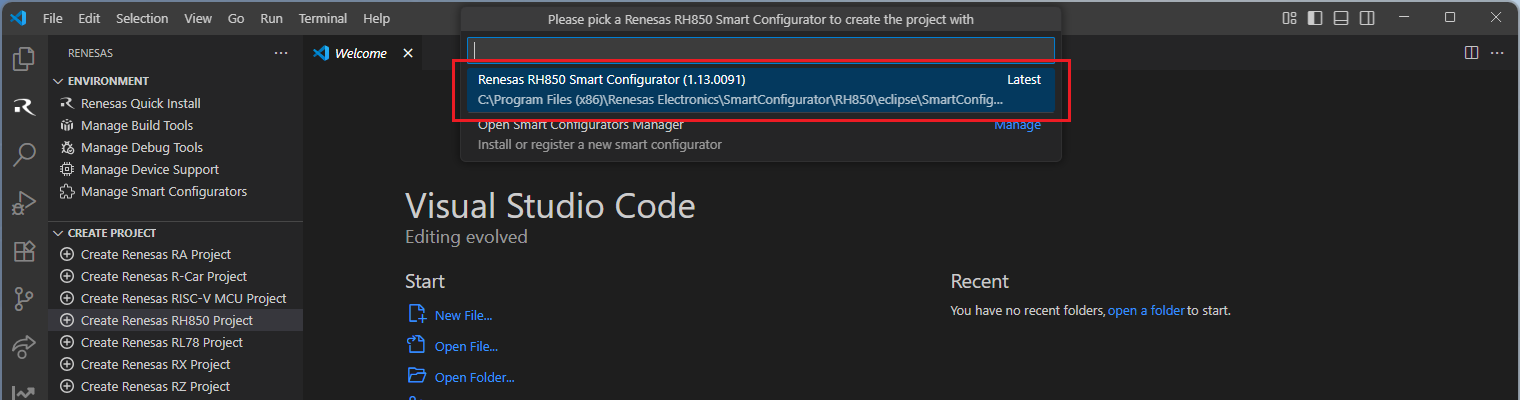
Then, VSCode will show installed [RH850 Smart Configurator] list, select a [Smart Configurator] from the list.
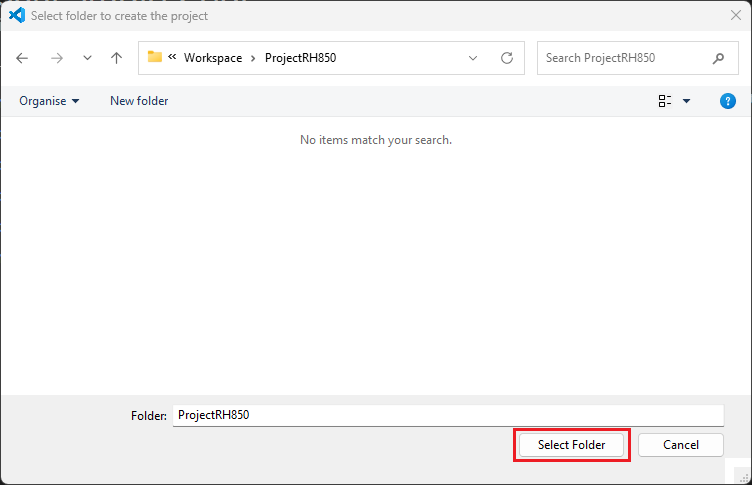
Select a [Folder] to create the project.
Enter [File name], configure your board and device type, select [Renesas CCRH850 Toolchain], and then click [Next].
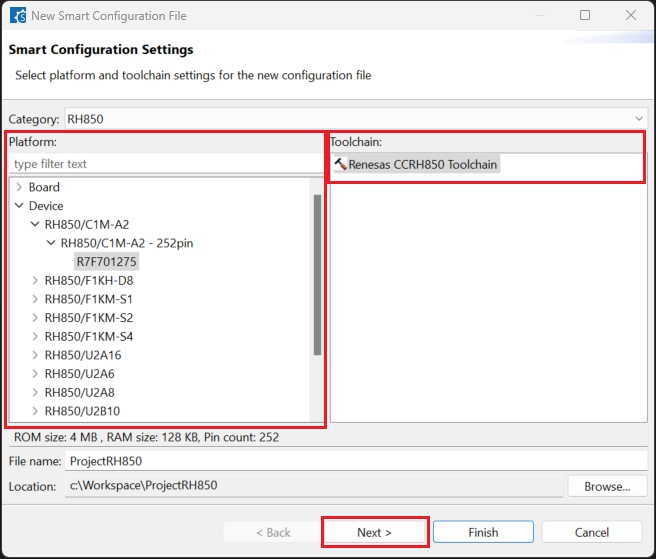
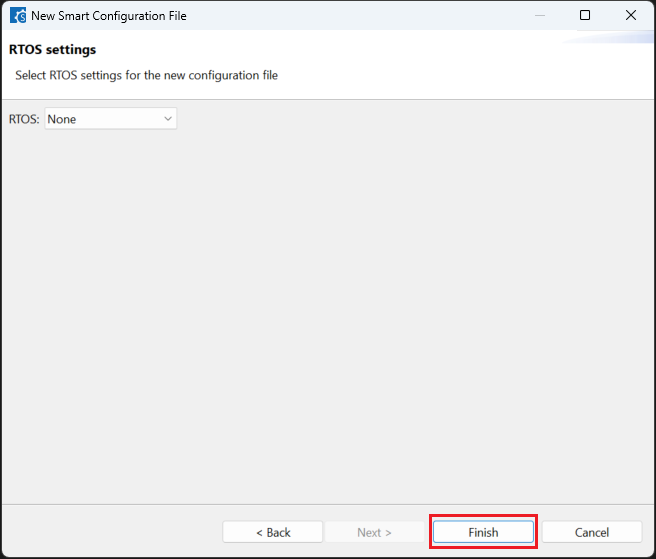
Choose the [RTOS] configuration and continue by clicking [Next] (Continue with “No RTOS” for the sample project).
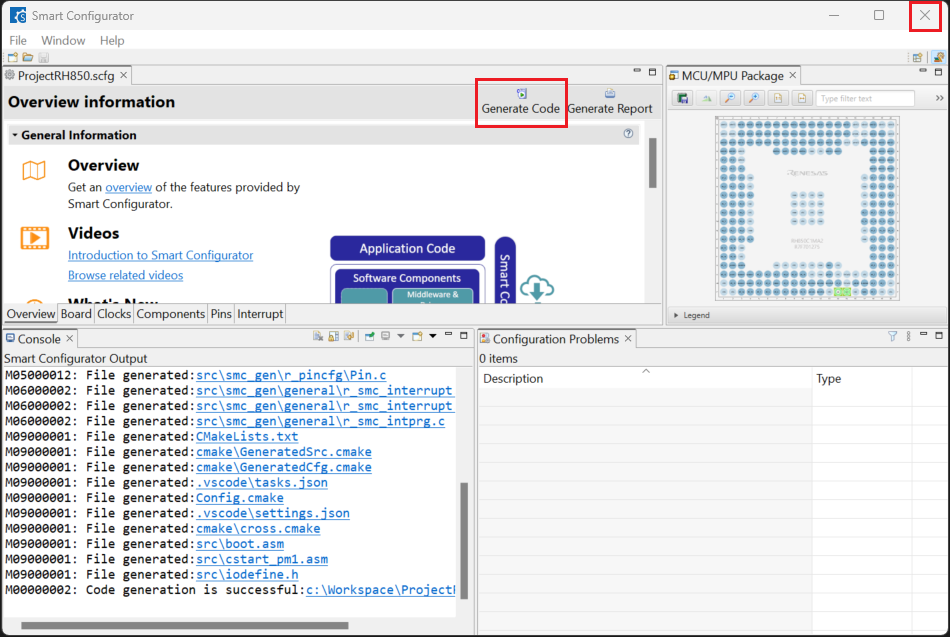
Click [Generate Code] and close [RH850 Smart Configurator] after generation of the project files completes.
2.2.2. Building an RH850 Project created in Smart Configurator
For building a project, which has been created with RH850 Smart Configurator, please follow the steps below:
In the VS Code Command Palette, run the “CMake: Delete Cache and Reconfigure” command.

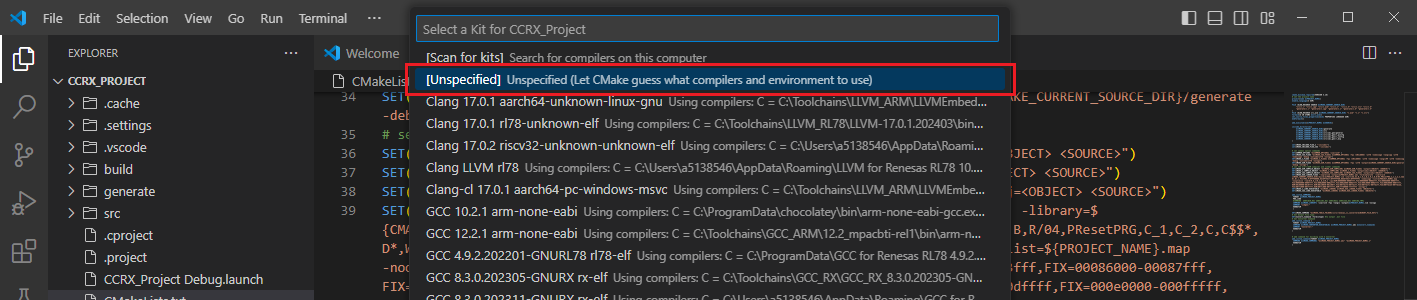
In the first time of running, a kit selection is shown. Select “[Unspecified]”.

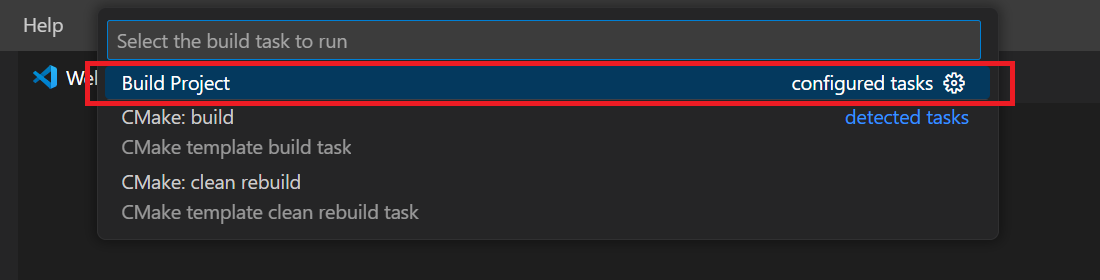
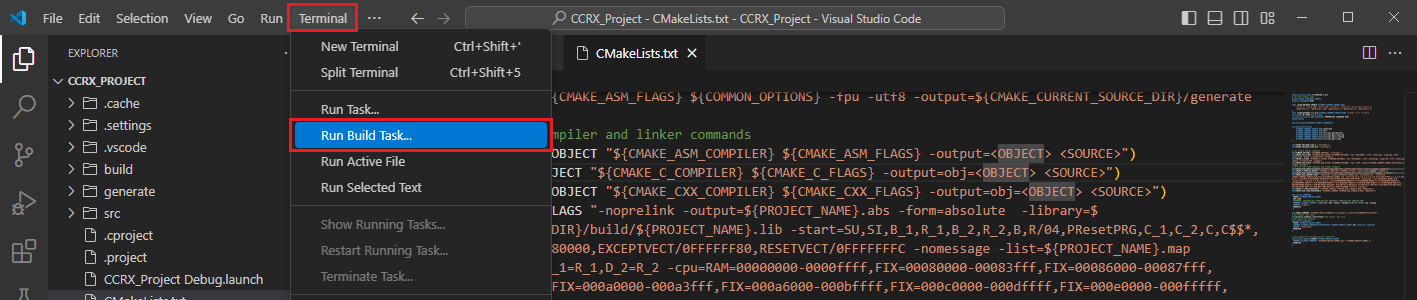
In VS Code, click [Terminal] ⇒ [Run Build Task] from the menu. Alternatively, press ctrl+shift+B to quickly open the Build task.
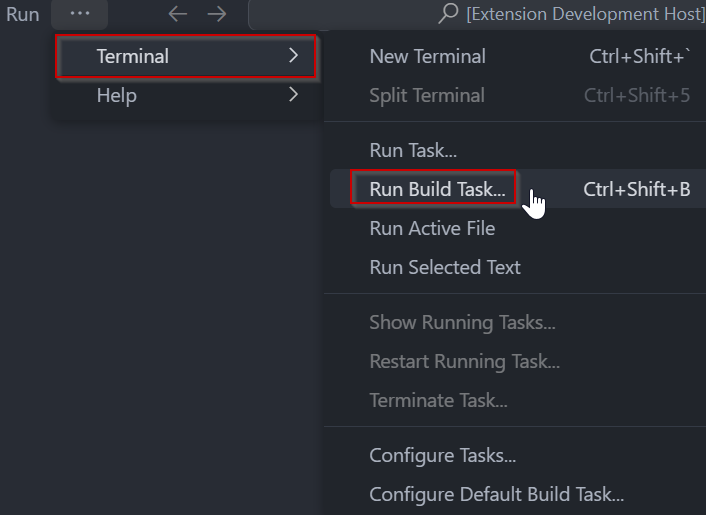
Select [Build Project] from the commands.
TIP: For more information about RH850 Smart Configurator, click here to visit the RH850 Smart Configurator page.
2.3. Using Smart Configurator for RISC-V MCU Projects (RISC-V MCU SC)
For RISC-V MCU device family projects, it is recommended to use RISC-V MCU Smart Configurator to create a project for VS Code. Please follow these instructions to create and build a project for RISC-V MCU device family.
2.3.1. Creating an RISC-V MCU Project with Smart Configurator
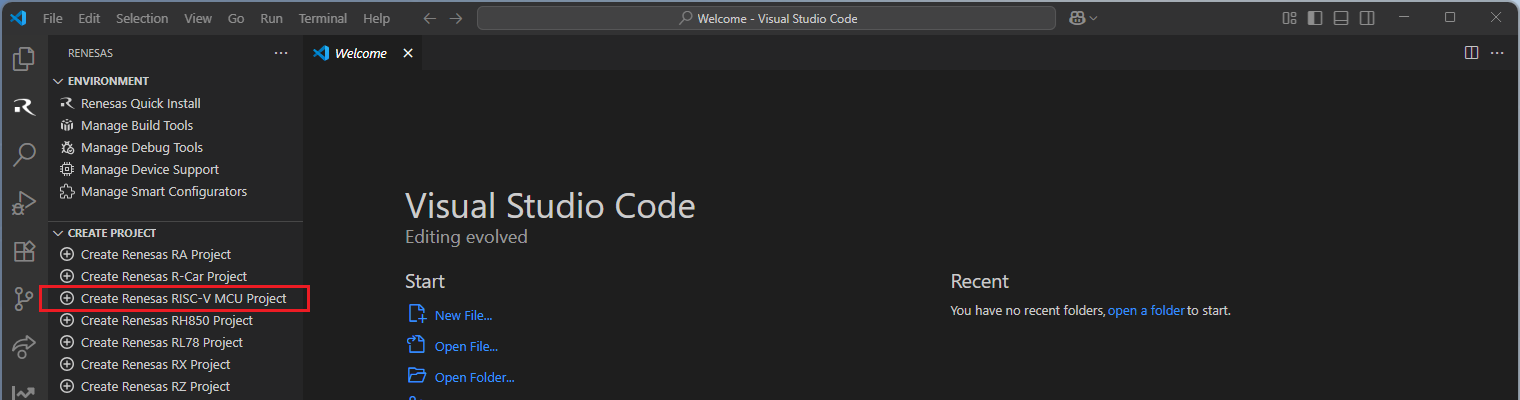
For RISC-V MCU family projects, Smart Configurator can be accessed via the “Create Project” view in the “Renesas” tab. Please use the following instructions to create and build a project for RISC-V MCU device family.
Navigate to “Renesas” and click [Create Renesas RISC-V MCU project] from the commands.
Then, VSCode will show installed [RISC-V MCU Smart Configurator] list, select a [Smart Configurator] from the list.

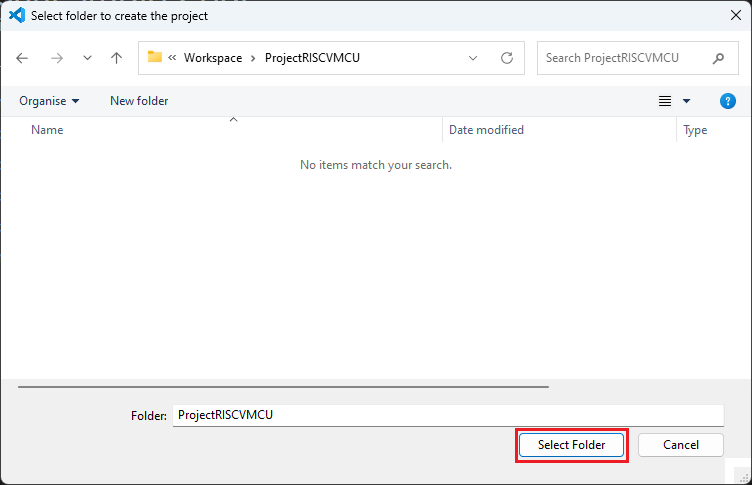
Select a [Folder] to create the project.
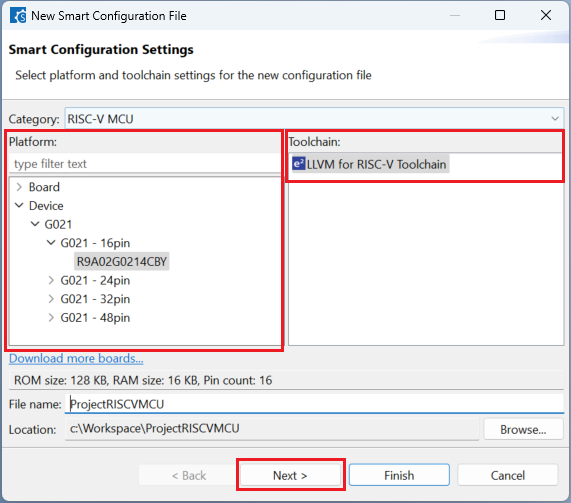
Enter [File name], configure your board and device type, select [LLVM for RISC-V Toolchain], and then click [Next].
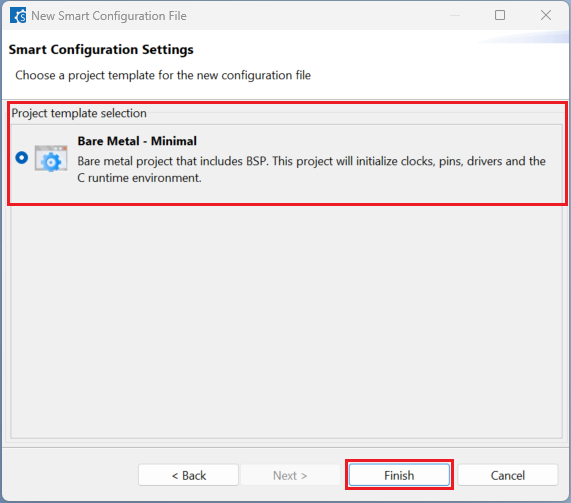
Choose a [project template] then click [Finish] to complete the project creation steps.
Click [Generate Code] and close [RISC-V MCU Smart Configurator] after generation of the project files completes.

2.3.2. Building an RISC-V MCU Project created in Smart Configurator
For building a project, which has been created with RISC-V MCU Smart Configurator, please follow the steps below:
In the VS Code Command Palette, run the “CMake: Delete Cache and Reconfigure” command.
In the first time of running, a kit selection is shown. Select “[Unspecified]”.
Then, run the “CMake: Build” command.

TIP: For more information about RISC-V MCU Smart Configurator, click here to visit the RISC-V MCU Smart Configurator page.
2.4. Using Smart Configurator for RL78 Projects (RL78 SC)
For RL78 device family projects, it is recommended to use RL78 Smart Configurator to create a project for VS Code. Please follow these instructions to create and build a project for RL78 device family.
2.4.1. Creating an RL78 Project with Smart Configurator
For RL78 device family projects, Smart Configurator can be accessed via the “Create Project” view in the “Renesas” tab. Please use the following instructions to create and build a project for RL78 device family.
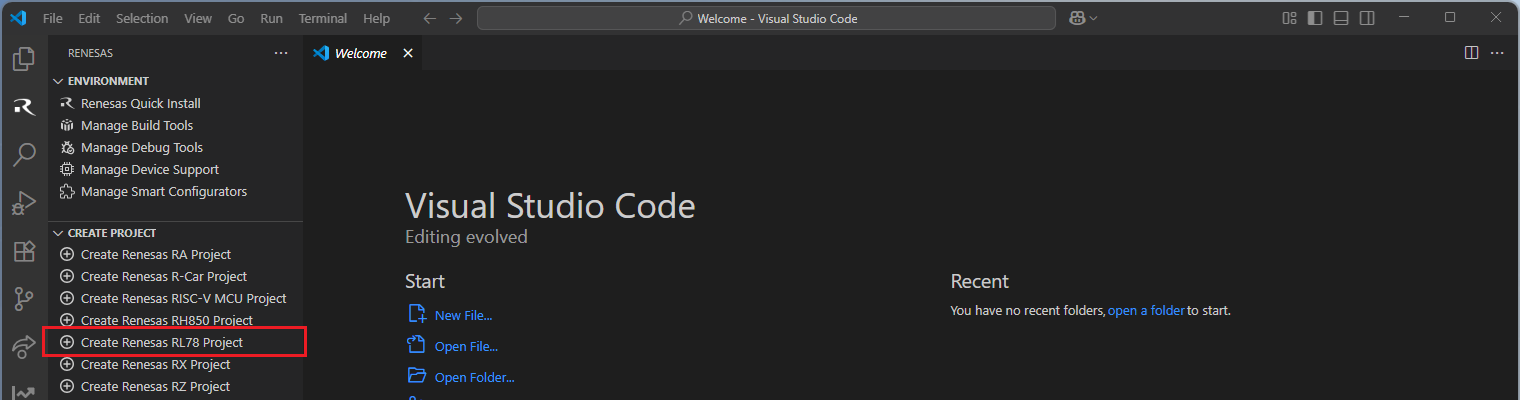
Navigate to “Renesas” and click [Create Renesas RL78 project] from the commands.
Select [Create RL78 Project with Smart Configurator] option from the list.

Then, VSCode will show installed [RL78 Smart Configurator] list, select a [Smart Configurator] from the list.

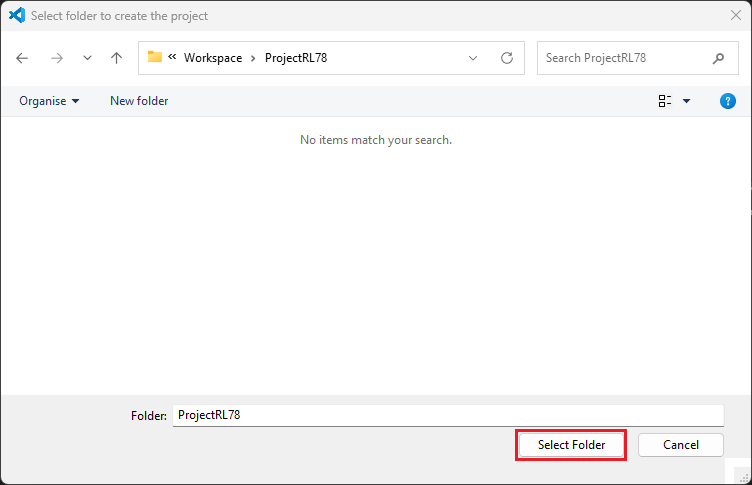
Select a [Folder] to create the project.
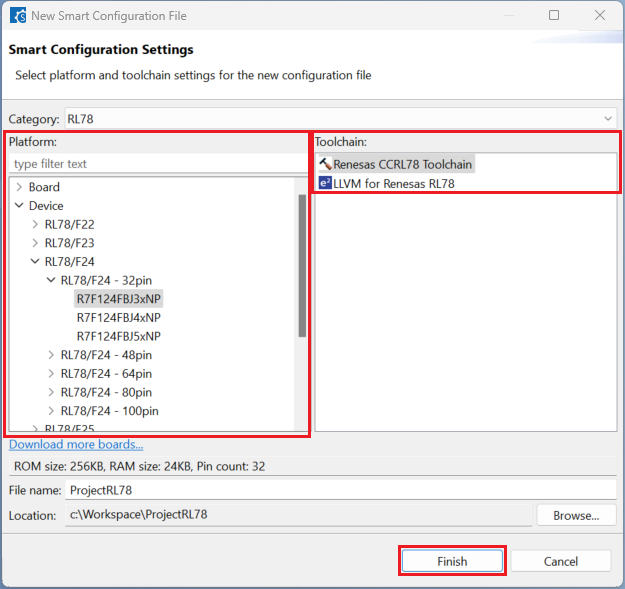
Enter [File name], configure your board and device type, select either [Renesas CCRL78 Toolchain] or [LLVM for Renesas RL78] (only applicable for some devices), and then click [Finish] to complete the project creation steps.
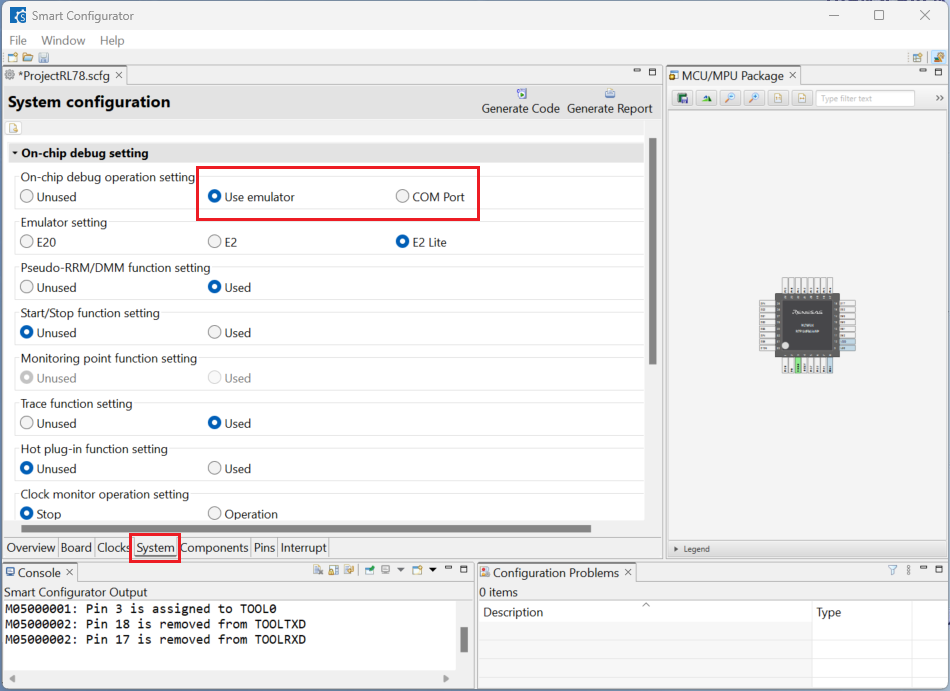
Click [System], select [Use emulator] or [COM Port] for [On-chip debug operation setting].
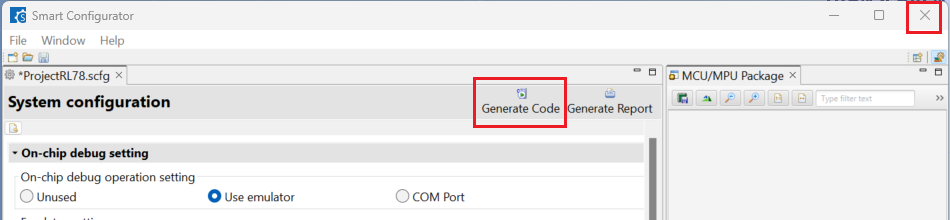
Click [Generate Code] and close [RL78 Smart Configurator] after generation of the project files completes.
2.4.2. Building an RL78 Project created in Smart Configurator
For building a project, which has been created with RL78 Smart Configurator, please follow the steps below:
In the VS Code Command Palette, run the “CMake: Delete Cache and Reconfigure” command.
In the first time of running, a kit selection is shown. Select “[Unspecified]”.
In VS Code, click [Terminal] ⇒ [Run Build Task] from the menu. Alternatively, press ctrl+shift+B to quickly open the Build task.
Select [Build Project] from the commands.
TIP: For more information about RL78 Smart Configurator, click here to visit the RL78 Smart Configurator page.
2.5. Using Smart Configurator for RX Projects (RX SC)
For RX device family projects, it is recommended to use RX Smart Configurator to create a project for VS Code. Please follow these instructions to create and build a project for RX device family.
2.5.1. Creating an RX Project with Smart Configurator
For RX device family projects, Smart Configurator can be accessed via the “Create Project” view in the “Renesas” tab. Please use the following instructions to create and build a project for RX device family.
Navigate to “Renesas” and click [Create Renesas RX project] from the commands.
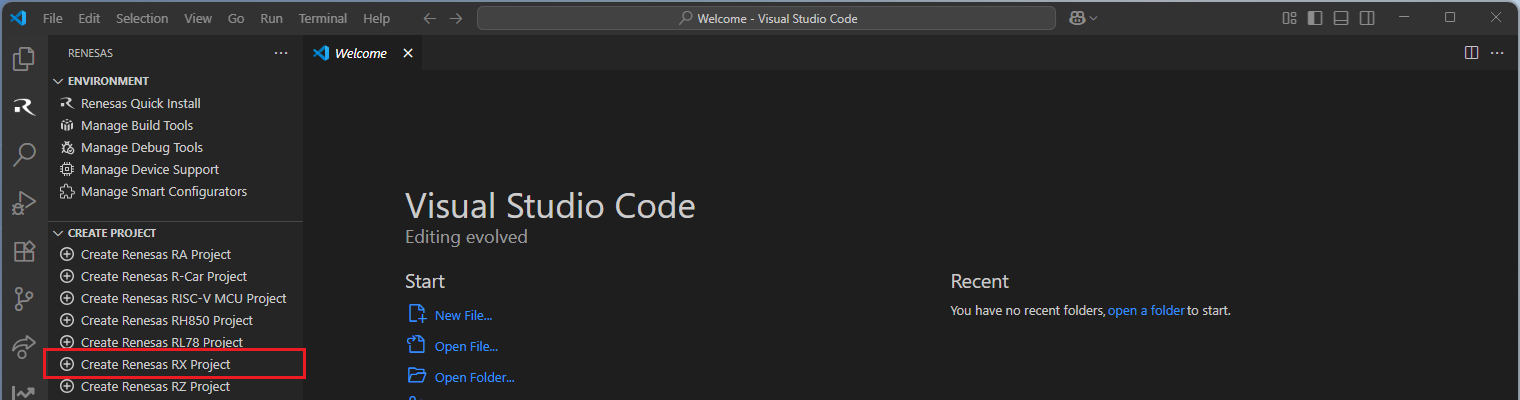
Select [Create RX Project with Smart Configurator] option from the list.

Then, VSCode will show installed [RX Smart Configurator] list, select a [Smart Configurator] from the list.

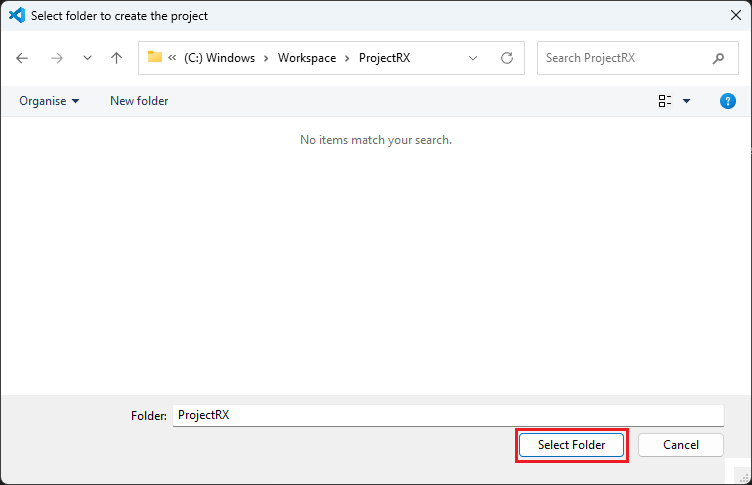
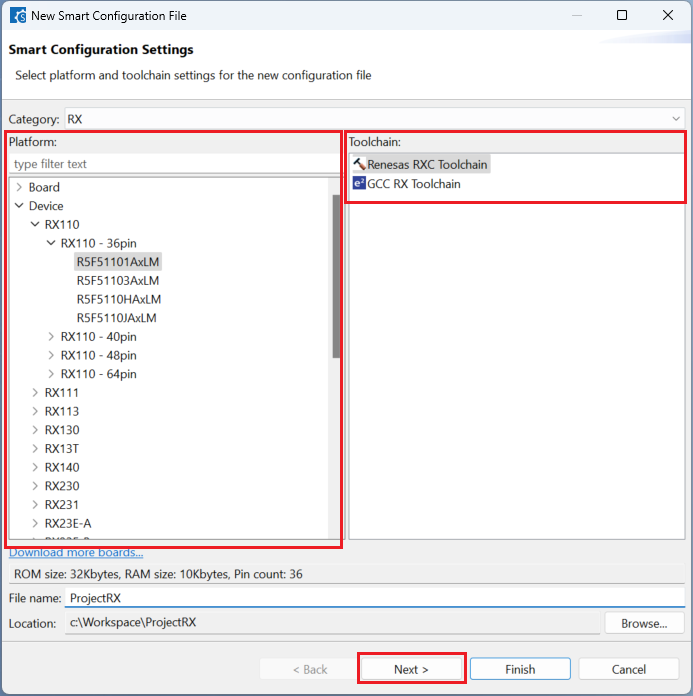
Select a [Folder] to create the project.
Enter [File name], configure your board and device type, select either [Renesas RXC Toolchain] or [GCC RX Toolchain], and then click [Next].
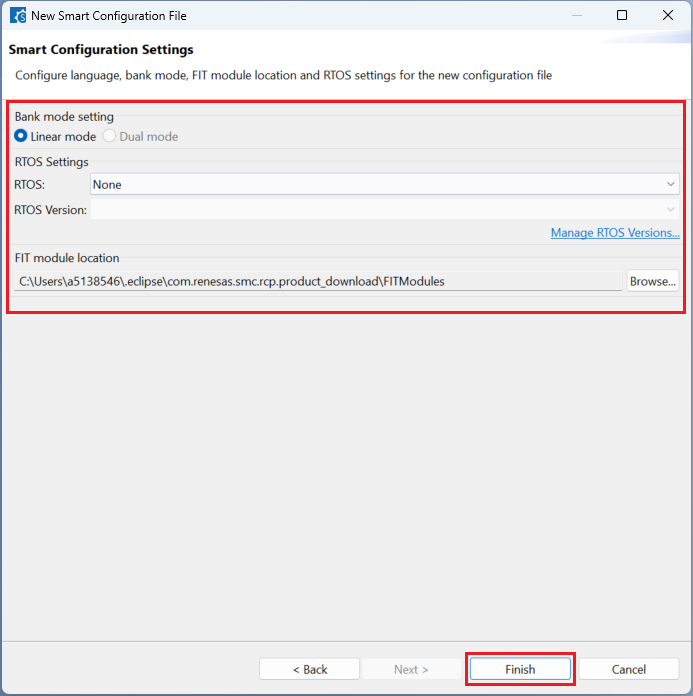
Choose one of the [Bank mode setting] (applicable for some devices) then click [Finish] to complete the project creation steps.
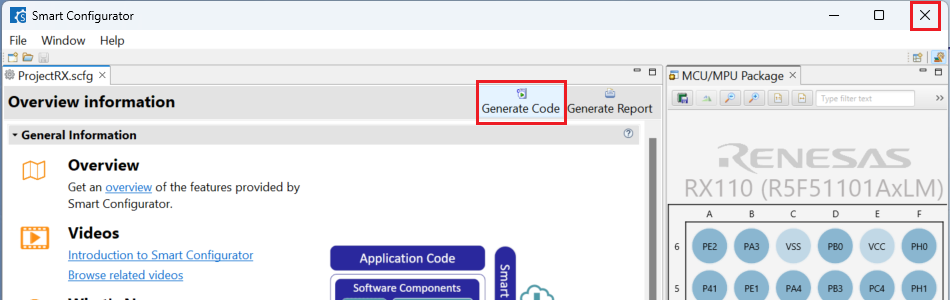
Click [Generate Code] and close [RX Smart Configurator] after generation of the project files completes.
2.5.2. Building an RX Project created in Smart Configurator
For building a project, which has been created with RX Smart Configurator, please follow the steps below:
In the VS Code Command Palette, run the “CMake: Delete Cache and Reconfigure” command.
In the first time of running, a kit selection is shown. Select “[Unspecified]”.
In VS Code, click [Terminal] ⇒ [Run Build Task] from the menu. Alternatively, press ctrl+shift+B to quickly open the Build task.
Select [Build Project] from the commands.
TIP: For more information about RX Smart Configurator, click here to visit the RX Smart Configurator page.
2.6. Using Smart Configurator for RZ/N Projects (RZ/N SC)
For RZ/N device family projects, it is recommended to use RZ/N Smart Configurator to create a project for VS Code. Please follow the following instructions to create and build a project for RZ/N device family.
2.6.1. Creating an RZ/N Project with Smart Configurator
For RZ/N device family projects, it is recommended to use RZ/N Smart Configurator to create a project for VS Code. Smart Configurator can be accessed via the “Create Project” view in the “Renesas” tab. Please use the following instructions to create and build a project for RZ/N device family.
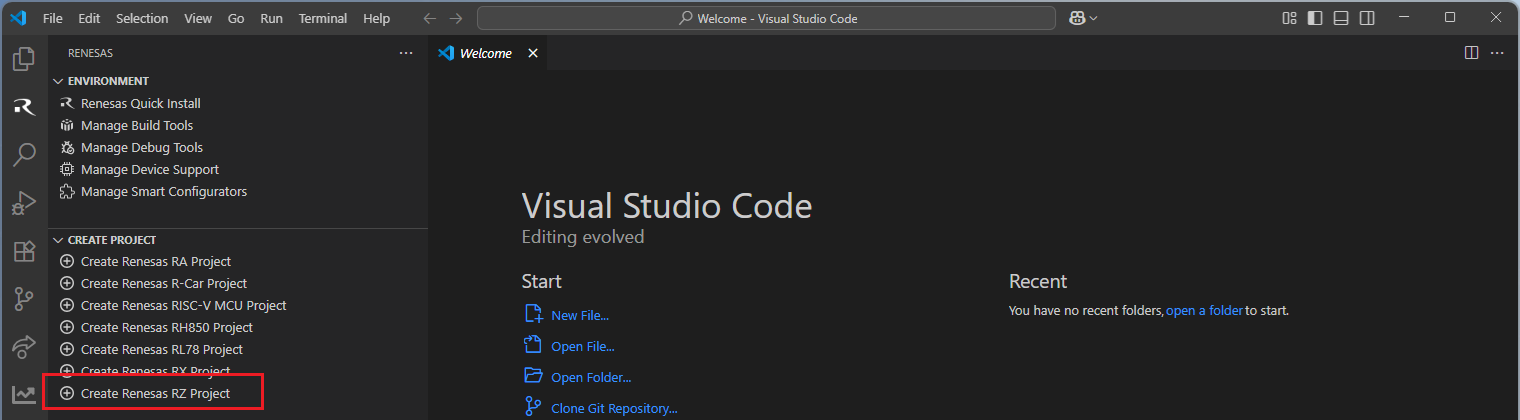
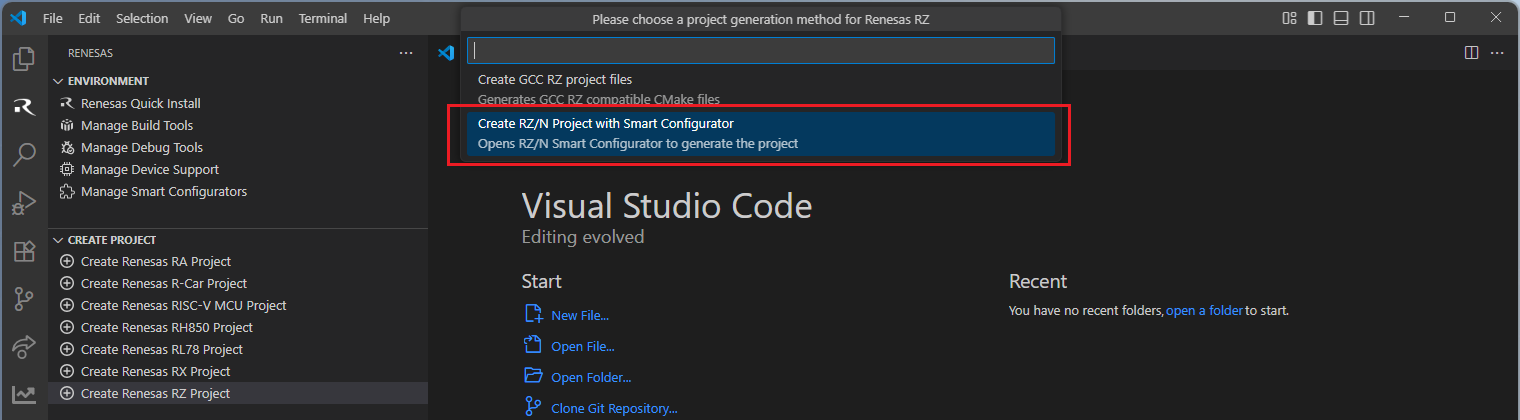
Navigate to “Renesas” and click [Create Renesas RZ project] from the commands.
Select [Create RZ/N Project with Smart Configurator] option from the list.
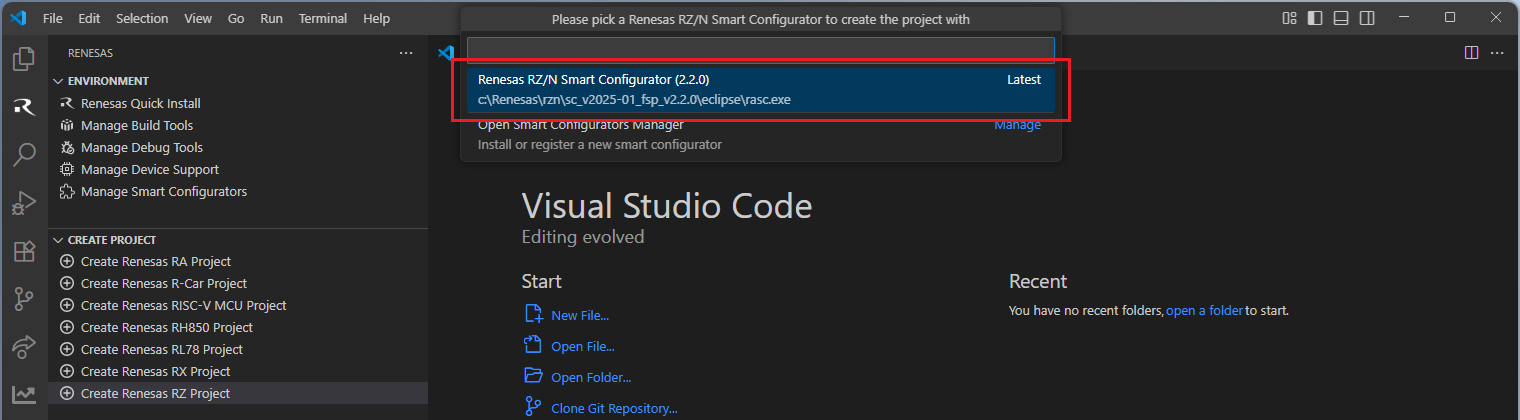
Then, VSCode will show installed [RZ/N Smart Configurator] list, select a [Smart Configurator] from the list.
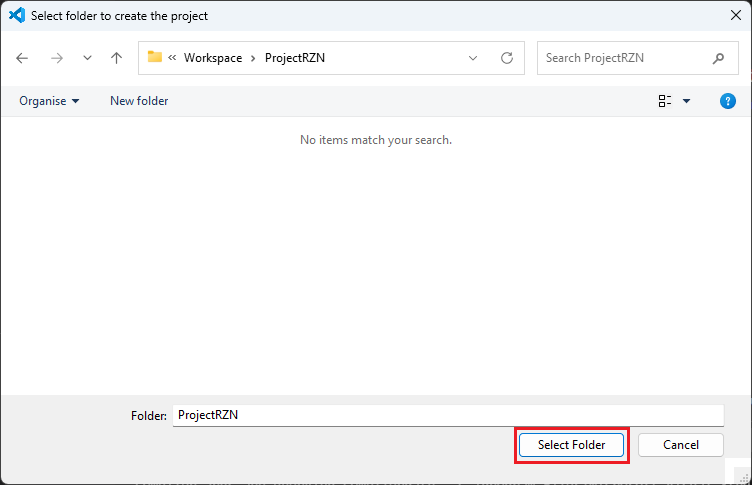
Select a [Folder] to create the project.
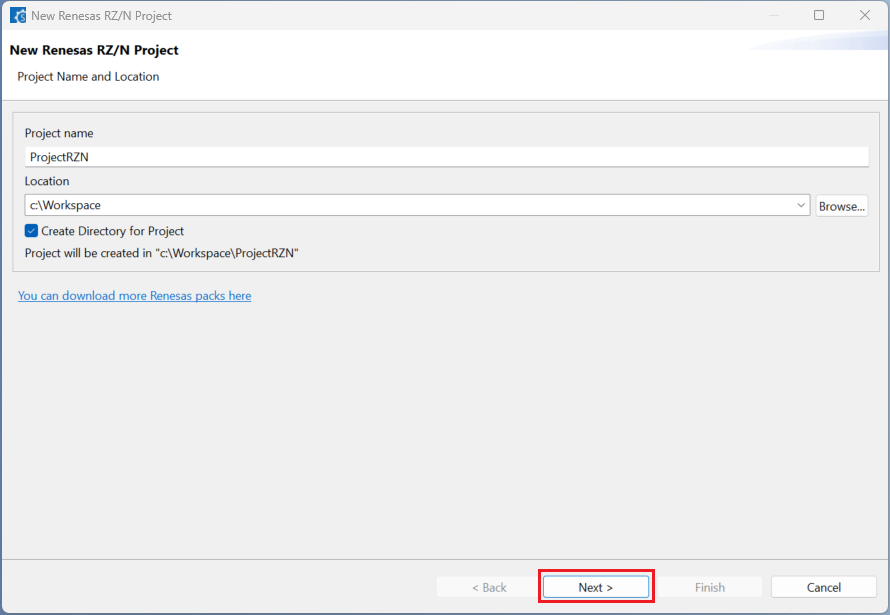
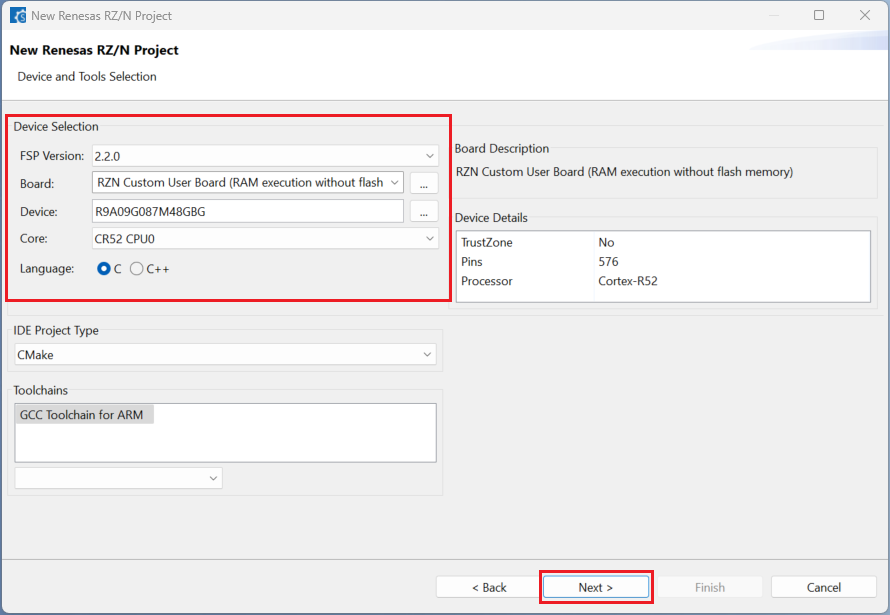
Keep the [Project name] and click [Next].
Configure your board, device type and programming language, then click [Next].
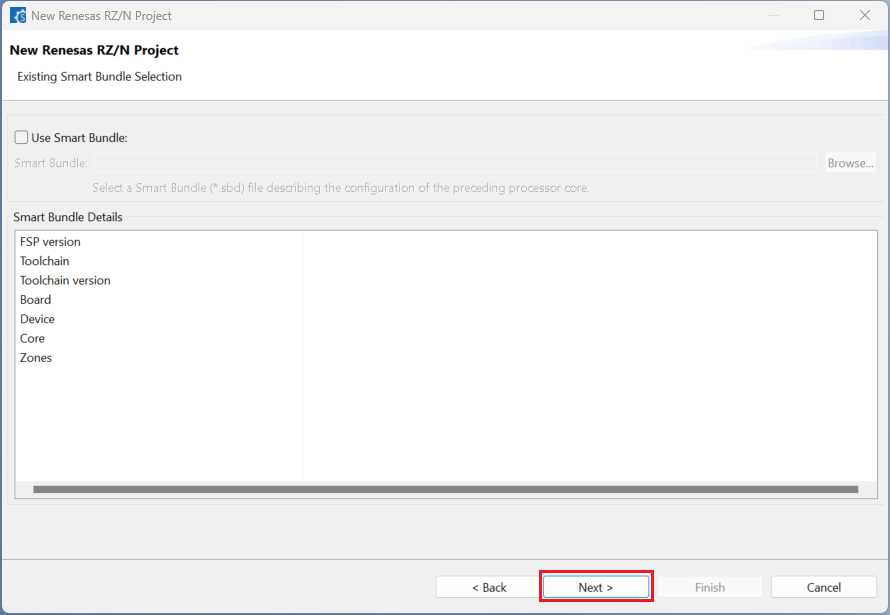
Choose the “Smart Bundle” configuration and continue by clicking [Next] (Skip choosing the Smart Bundle selection for the sample project).
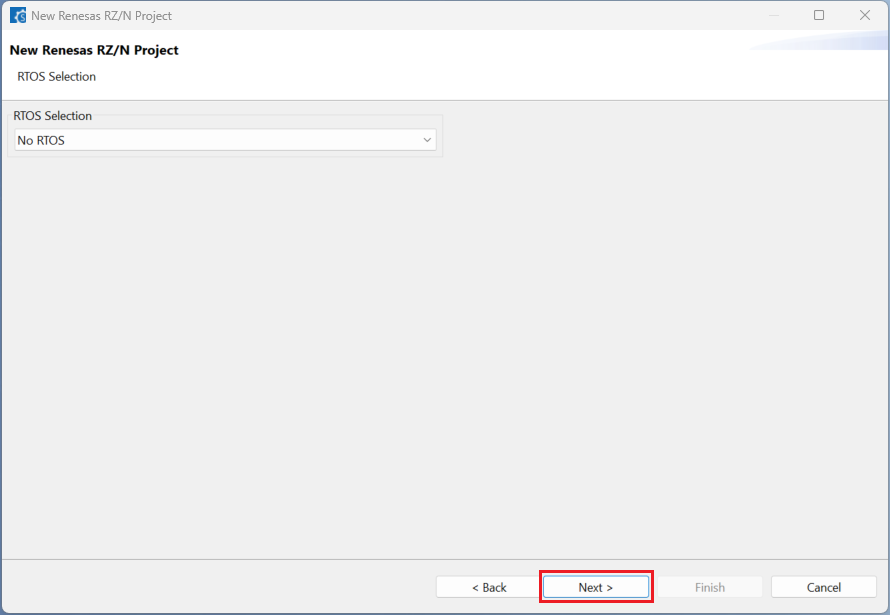
Choose the “RTOS” configuration and continue by clicking [Next] (Continue with “No RTOS” for the sample project).
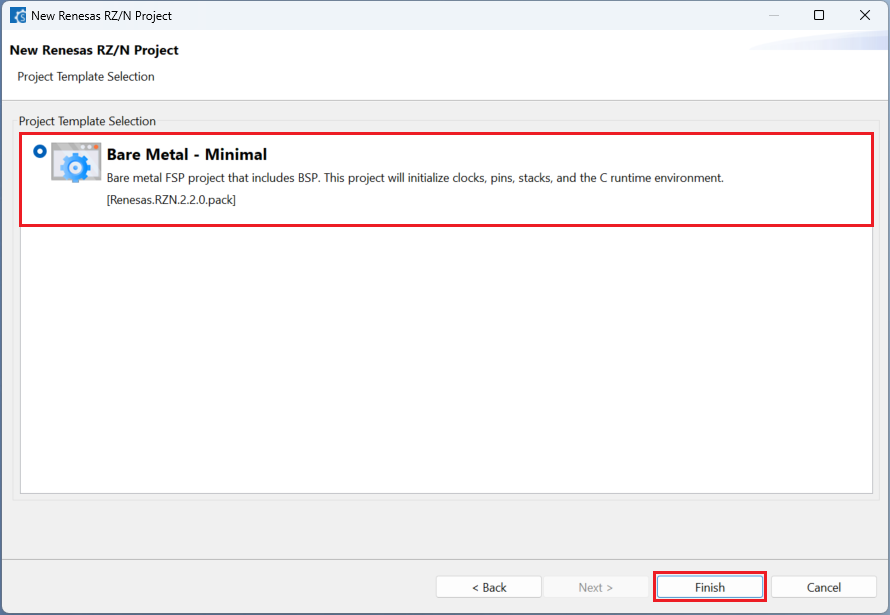
Choose one of the project templates then click [Finish] to complete the project creation steps.
Close [RZ/N Smart Configurator] after generation of the project files completed.

2.6.2. Building an RZ/N Project created in Smart Configurator
For building a project, which has been created with RZ/N Smart Configurator, please follow the steps below:
When the project is opened for the first time, CMake configure and the CMake Kit selection operations must be performed. In order to do these operations, open the “Command Palette” in VSCode and select “CMake: Configure” from the commands.
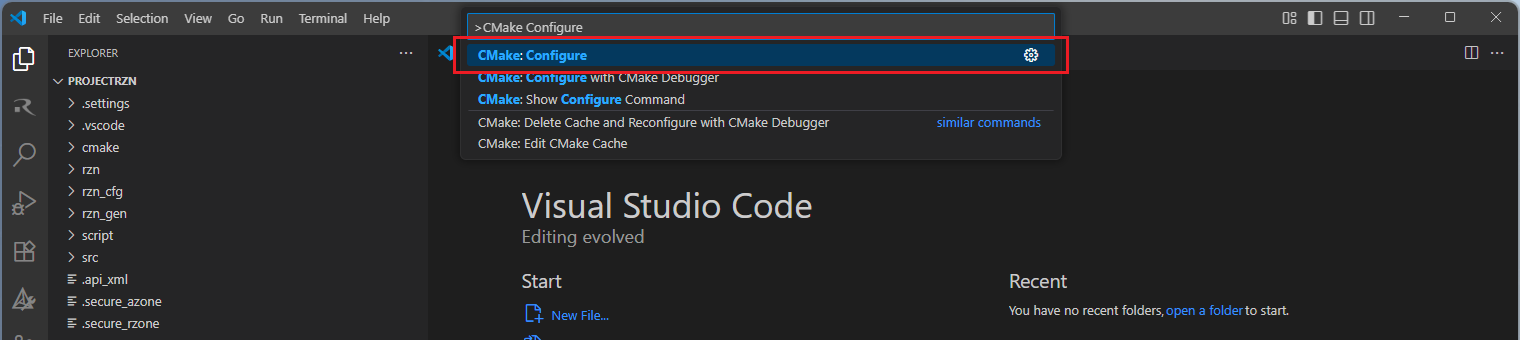
Then, a kit selection menu will be shown. Select “Renesas Platform: Arm GNU Toolchain …” from the menu if the project is generated for GCC toolchain. It is important to use the “Renesas Platform: …” kits since they contain Renesas-specific configuration parameters for Renesas projects.
Note
Missing the selection of the CMake Kit or wrong selection can cause build problems. If you missed the CMake Kit selection or selected a wrong kit, you can re-select the CMake Kit by running “CMake: Select a kit” command from the VSCode Command Palette.
Now, go to and click “Terminal” => “Run Build Task” from the menu.
Build options will be shown, select the “Build Project” option.
Note
Alternatively, you can directly use the “Build” button to start the build operation via the VS Code toolbar.

After the build operation, you will see the progress completed successfully. By default, build output (<project name>.elf) can be found in “build/<Build Type>/CMakeFiles/<project name>.elf.dir/” folder.
2.7. Using Audio Development Platform (ADP) for Dialog DA148xx device family
Renesas VS Code extensions support project development for DA148xx family of integrated audio processors. Customers can have access to the Audio Development Platform software upon request and start their Dialog project development by using Dialog Audio Development Platform (ADP). The ADP comes with ready to start, predefined project samples inside the package. Please follow the instructions below to start developing a Dialog device project:
From the ADP sample projects, open a desired start up project in VSCode.
Note
Sample projects in the ADP can be found inside the following directories:
<ADP_ROOT>/Software/Source/projects/bare_metal
<ADP_ROOT>/Software/Source/projects/freertos
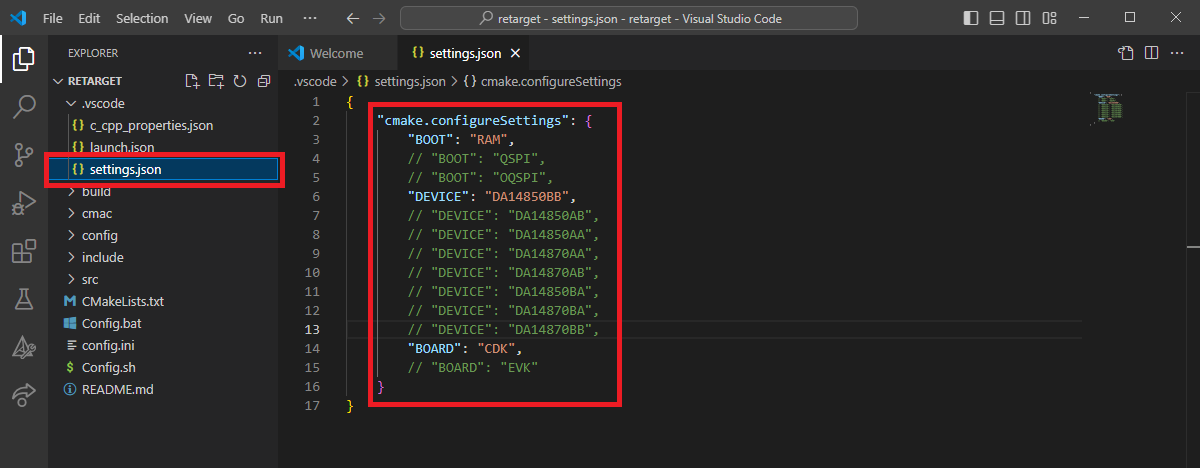
After your project is opened in VSCode, open the settings file of the project in .vscode/settings.json path and check the cmake.configureSettings configuration. Make sure the BOARD, BOOT and DEVICE settings are correct for the targeted development. Configure them if necessary.
Then, open “Command Palette” (by using “View”” => “Command Palette” menu), and run the “CMake: Select a Kit” command.
From the list, select the CMake Kit “Renesas Platform: ARM GNU Toolchain - 9-2019-q4-major” toolchain (you can search for search and look for “Renesas Platform” to filter the list).

In the VS Code Command Palette, run “CMake: Delete Cache and Reconfigure” command.

Then, run the “CMake: Build” command.

By default, the executable file (<project name>.elf) is generated into the “build/syscpu” folder.
2.8. Using CMake Toolchain Scripts
2.8.1. Creating CMake Toolchain Scripts and Building the Project
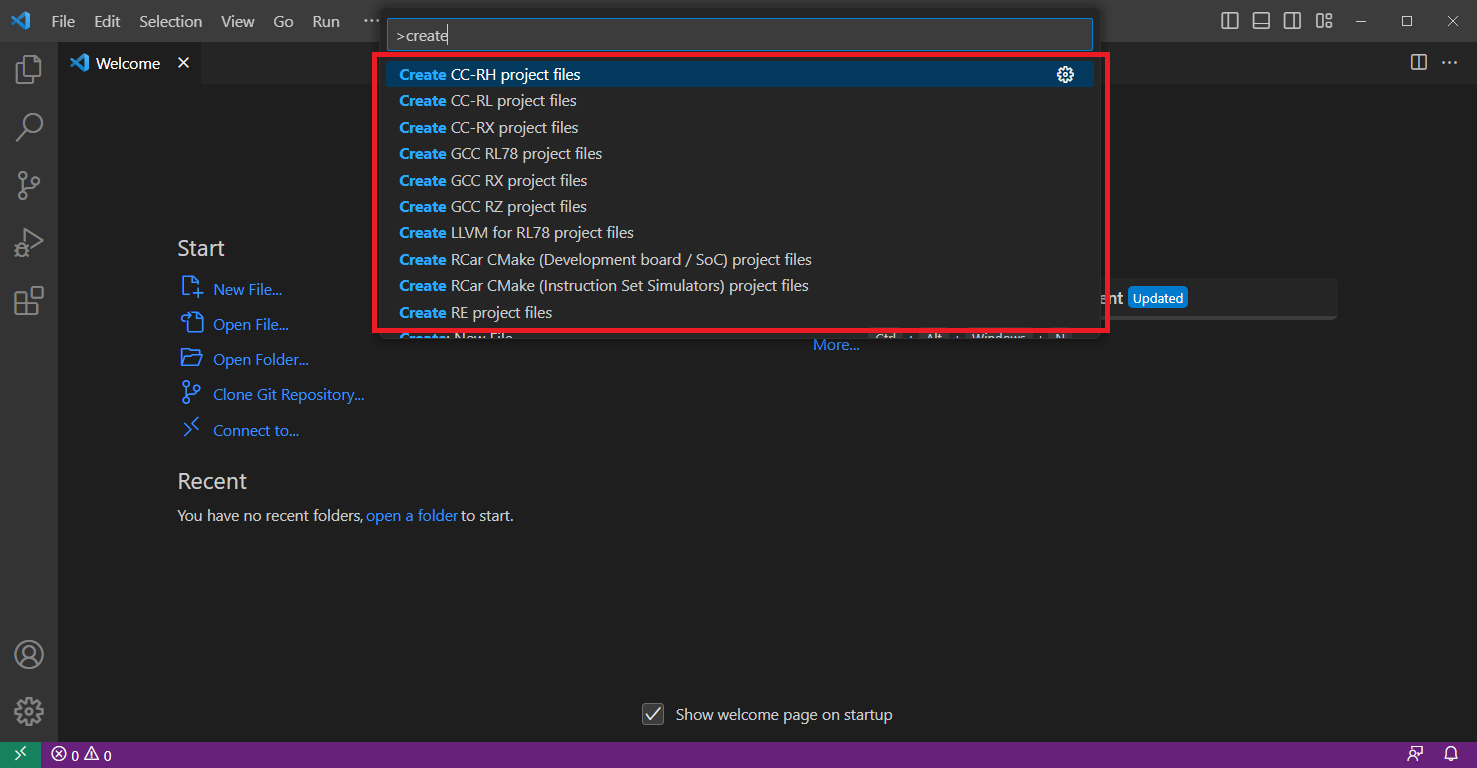
It is recommended to use the Smart Configurators in VS Code when creating new projects. When projects are generated by the Smart Configurators through VS Code, there is no need to perform additional steps to configure the CMake build scripts. On the other hand, Renesas extensions provide predefined scripts to define the build environment for Renesas C/C++ projects, which are generated with e2 studio. The predefined build scripts can be accessed in the “Create Project” view in the “Renesas” tab. The following list contains all the predefined script options under the various device families:
Create Renesas R-Car Project
Create RCar CMake (Development board / SoC) project files
Create RCar CMake (Instruction Set Simulators) project files
Create Renesas RH850 Project
Create CC-RH project files
Create Renesas RL78 Project
Create CC-RL project files
Create GCC RL78 project files
Create LLVM for RL78 project files
Create Renesas RX Project
Create CC-RX project files
Create GCC RX project files
Create Renesas RZ Project
Create GCC RZ project files
Click the desired family to start the project files generation:
Then, select the desired toolchain and continue (e.g. sample options for RX shown below).

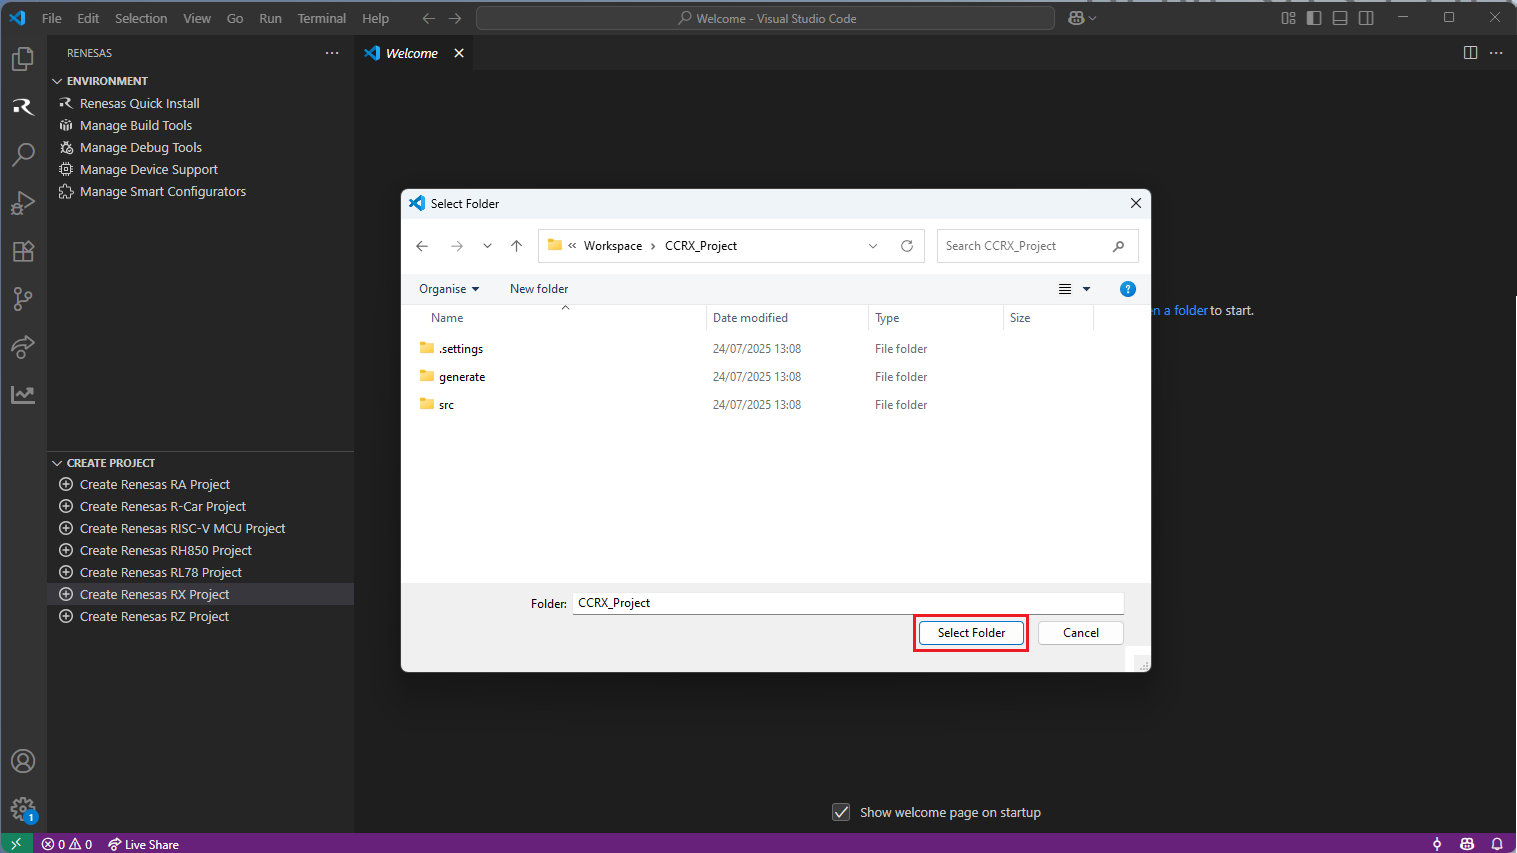
The VSCode will ask to select the project root folder, select the target project folder.
The commands will open the project and generate the VS Code settings files, as well as the CMake script files cross.cmake and CMakeLists.txt files:
.vscode/settings.json - this file contains the settings for CMake.
.vscode/tasks.json - this file contains the build definitions for VSCode.
Cross.cmake - this file contains the information about the toolchain to use.
CMakeLists.txt - this file contains the information about the building project (which files to build, which options to set etc.).
File .vscode/settings.json - this file contains the settings for CMake.
.settings.json file’s general content:
1{
2    "cmake.configureArgs": [
3        "-DCMAKE_TOOLCHAIN_FILE=<absolute/relative path of toolchain information file (<file name>.cmake file)"
4    ],
5    "cmake.sourceDirectory": "<absolute/relative path of the folder containing the root CMakeLists.txt file>"
6}
File .vscode/tasks.json - this file contains the build definitions for VSCode.
.tasks.json file’s general content:
 1{
 2  "version": "2.0.0",
 3  "tasks": [
 4    {
 5      "label": "Build Project",
 6      "group": "build",
 7      "type": "renesas-build",
 8      "command": "build",
 9      "deviceFamily": "<Device family (e.g. RA, RCAR, RH850, RL78, RX or RZ)>",
10      "toolchain": "<Toolchain (e.g. gcc, cc-rl, cc-rx, llvm)>"
11    }
12  ]
13}
Cross.cmake - this file contains the information about the toolchain to use.
Cross.cmake file’s general content:
 1# Specify toolchain path
 2SET(CMAKE_FIND_ROOT_PATH "<absolute path of toolchain's bin folder>")
 3
 4# Specify the C compiler and necessary options
 5SET(CMAKE_C_COMPILER ${CMAKE_FIND_ROOT_PATH}/<C compiler executable file>)
 6
 7# Specify the CPP compiler and necessary options
 8SET(CMAKE_CXX_COMPILER ${CMAKE_FIND_ROOT_PATH}/<CPP compiler executable file>)
 9
10# Specify the assembler and necessary options
11SET(CMAKE_ASM_COMPILER ${CMAKE_FIND_ROOT_PATH}/<assembler executable file>)
12
13# Specify the linker and necessary options
14SET(CMAKE_LINKER ${CMAKE_FIND_ROOT_PATH}/<linker executable file>)
15
16# Specify the library generator and necessary options
17SET(CMAKE_LIBRARY ${CMAKE_FIND_ROOT_PATH}/<library generator executable file>)
18
19# Specify the converter and necessary options
20SET(CMAKE_CONVERTER_EXECUTABLE ${CMAKE_FIND_ROOT_PATH}/<converter executable file>)
CMakeLists.txt - this file contains the information about the building project (which files to build, which options to set etc.).
.CMakeLists.txt file’s general content:
 1cmake_minimum_required(VERSION 3.16)
 2
 3# Set project name
 4project("<project name>")
 5
 6enable_language(C ASM)
 7
 8# Collect source files
 9FILE (GLOB_RECURSE SOURCE ${CMAKE_CURRENT_SOURCE_DIR}
10"*.c" "*.cpp" "*.asm"
11)
12add_executable(${PROJECT_NAME} ${SOURCE})
13
14# Set C compiler command
15SET(CMAKE_C_COMPILE_OBJECT "${CMAKE_C_COMPILER} <specify C compiler options here>")
16
17# Set C++ compiler command
18SET(CMAKE_CXX_COMPILE_OBJECT "${CMAKE_CXX_COMPILER} <specify C++ compiler options here>")
19
20# Set Assembler command
21SET(CMAKE_ASM_COMPILE_OBJECT "${CMAKE_ASM_COMPILER} <specify assembler options here>")
22
23# Set Linker command
24SET(CMAKE_C_LINK_EXECUTABLE "${CMAKE_LINKER} <specify linker options here>")
25
26# Set Library generator command
27add_custom_COMMAND(
28 TARGET ${CMAKE_PROJECT_NAME}
29 PRE_LINK
30 COMMAND ${CMAKE_LIBRARY} <specify library generator options here>
31 COMMENT "Libgen:"
32 VERBATIM
33)
34
35# Set Converter Command
36add_custom_command (
37 TARGET ${CMAKE_PROJECT_NAME}
38 COMMAND ${CMAKE_CONVERTER_EXECUTABLE} <specify converter options here>
39 COMMENT "Converter:"
40 VERBATIM
41)
After generating these files, it is necessary to configure the toolchain information and device specific build settings in these files. The typical approach can be structured into the following steps:
Open the cross.cmake file, and configure the toolchain path.
Get the device specific build settings from e2 Studio by following the instructions below:
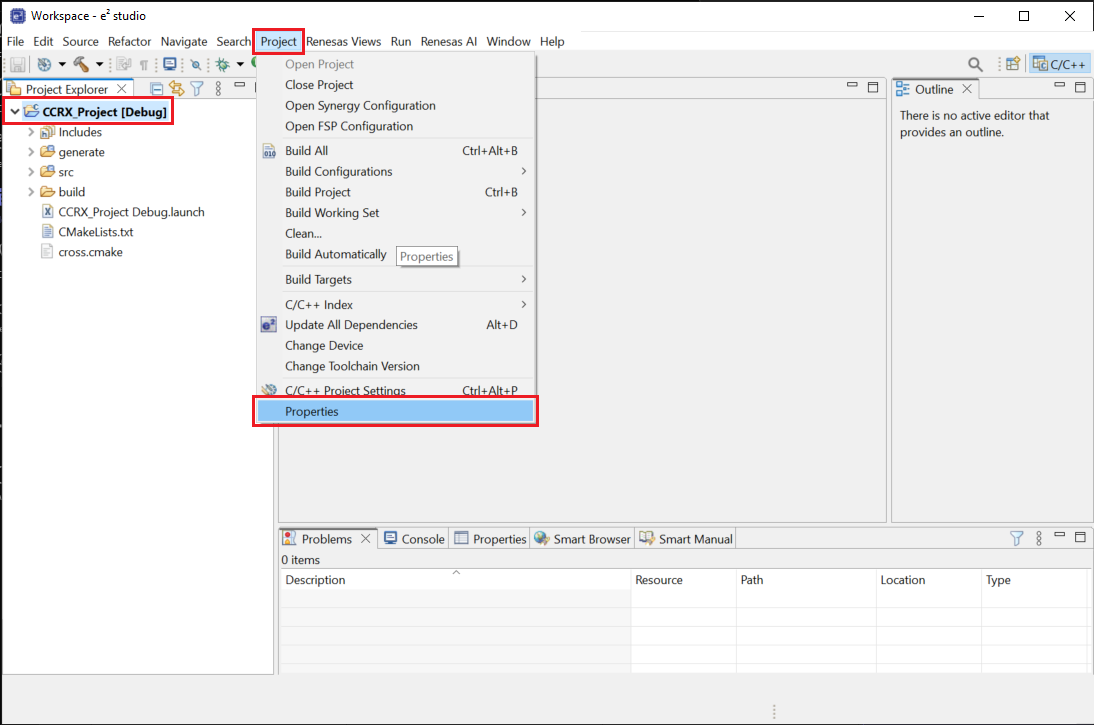
Open the desired project in e2 studio.
Go to [Project] => [Properties] menu.
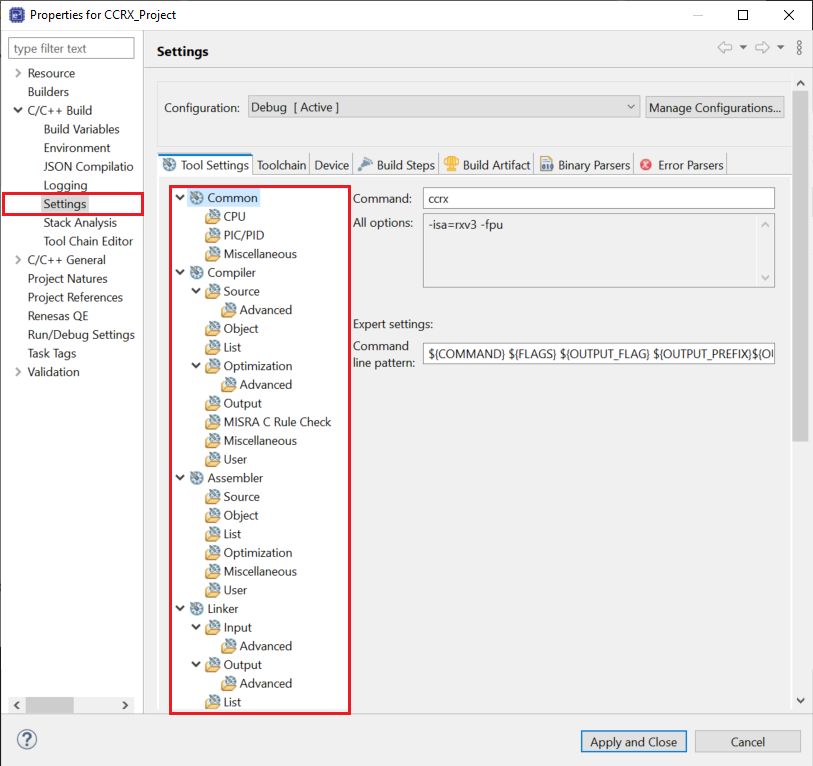
In the project properties windows, navigate to [C/C++ Build] => [Settings] section.
In the “Tool Settings” tab, check the “Common”, “Compiler”, “Assembler”, “Linker” sections. Depending on the target device get the values of the device specific parameters. The following parameters are the most common device specific parameters:
-isa
-cpu
-fpu (generally either -fpu or -nofpu)
-rom
-start
Now, open the project in VSCode, navigate to CMakeLists.txt and configure the device specific parameters in the CMake script.
Once all the necessary files are in place, open the [Command Palette] and run the [CMake: Delete Cache and Reconfigure] operation.
To run build task, either press [CTRL+SHIFT+B] ([CMD+SHIFT+B] for macOS) or select [Terminal] → [Run Build Task…] from the menu.
Open the [Command Palette] in VSCode and click [CMake: Delete Cache and Reconfigure].
In the first time of running, a kit selection is shown. Select “[Unspecified]”.
Note
Missing the selection of the CMake Kit or wrong selection can cause build problems. If you missed the CMake Kit selection or selected a wrong kit, you can re-select the CMake Kit by running “CMake: Select a kit” command from the VSCode Command Palette.

Go to and click [Terminal] => [Run Build Task] from the menu.
Build options will be shown, select the [Build Project] option.

2.8.2. Sample Scenario: Configuring CC/RX project CMake Files
In the following example, we are going to cover step by step instructions for converting the CMakeLists.txt script, and targeting it for the CCRX toolchain and an RX66T device.
First, open your project in e2 Studio, (or create an new one using e2 Studio).
Go to [Project] => [Properties] menu.
In the project properties windows, navigate to [C/C++ Build] => [Settings] section.
In parallel, open your project in VSCode.
Navigate to [Renesas] tab, and click [Create Renesas RX Project] to start the project files generation:
Then, select the [Create CC-RX project files] and continue.
The VSCode will ask to select the project root folder, select the target project folder.
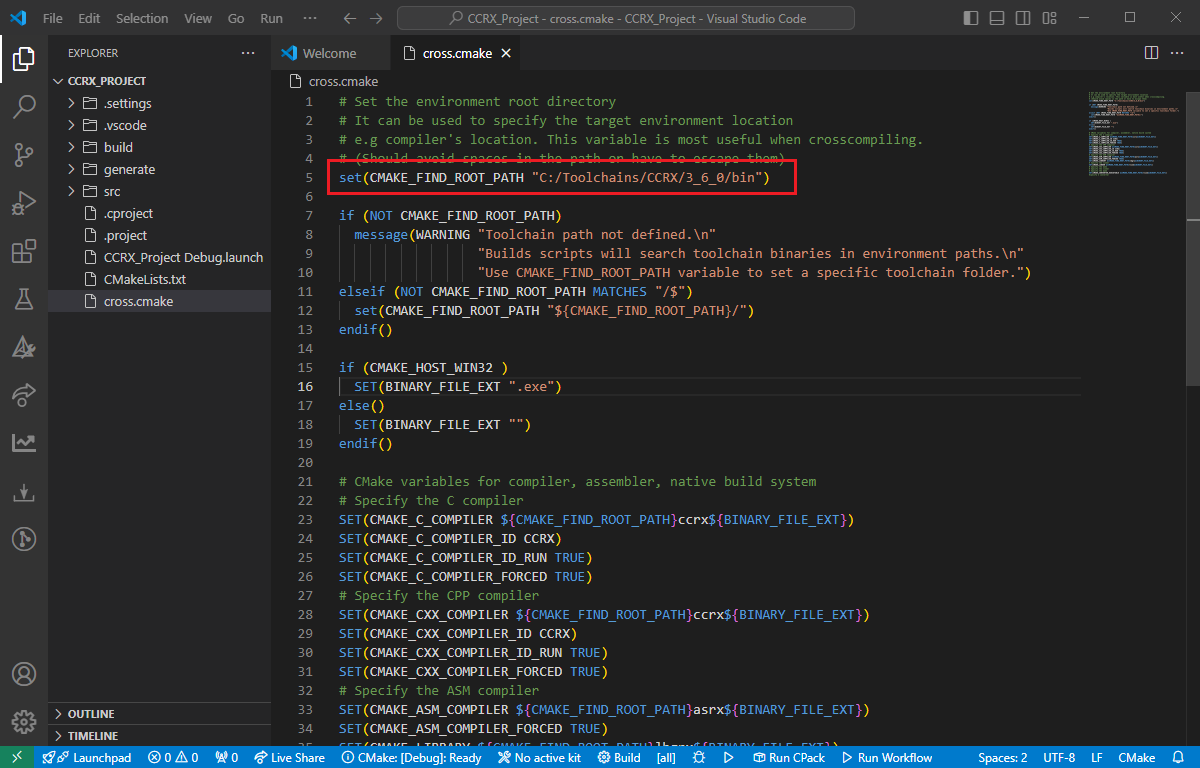
Now, VSCode will create the necessary files. Open the cross.cmake file and set the path of the toolchain as shown in the screenshot below.
Now, VSCode will create the necessary files. Open the CMakeLists.txt file.
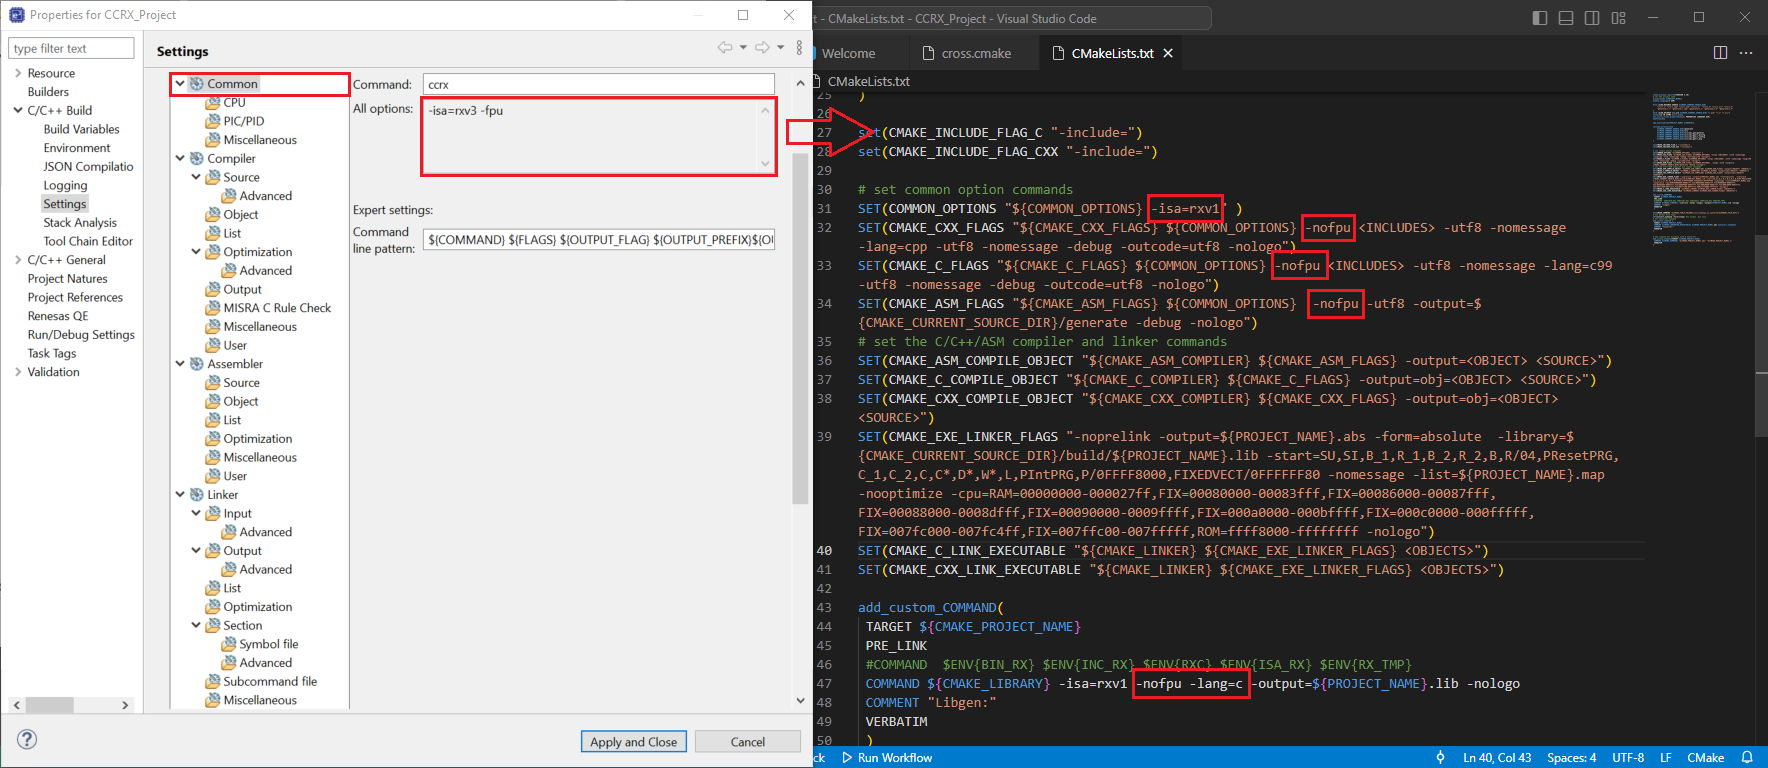
In the e2 Studio Project Settings, navigate to [Common], take the -isa and fpu parameters, then replace them in the CmakeLists.txt in VSCode. Change the -isa=rxv1 parameter to -isa=rxv3, and replace the -nofpu parameters with -fpu.
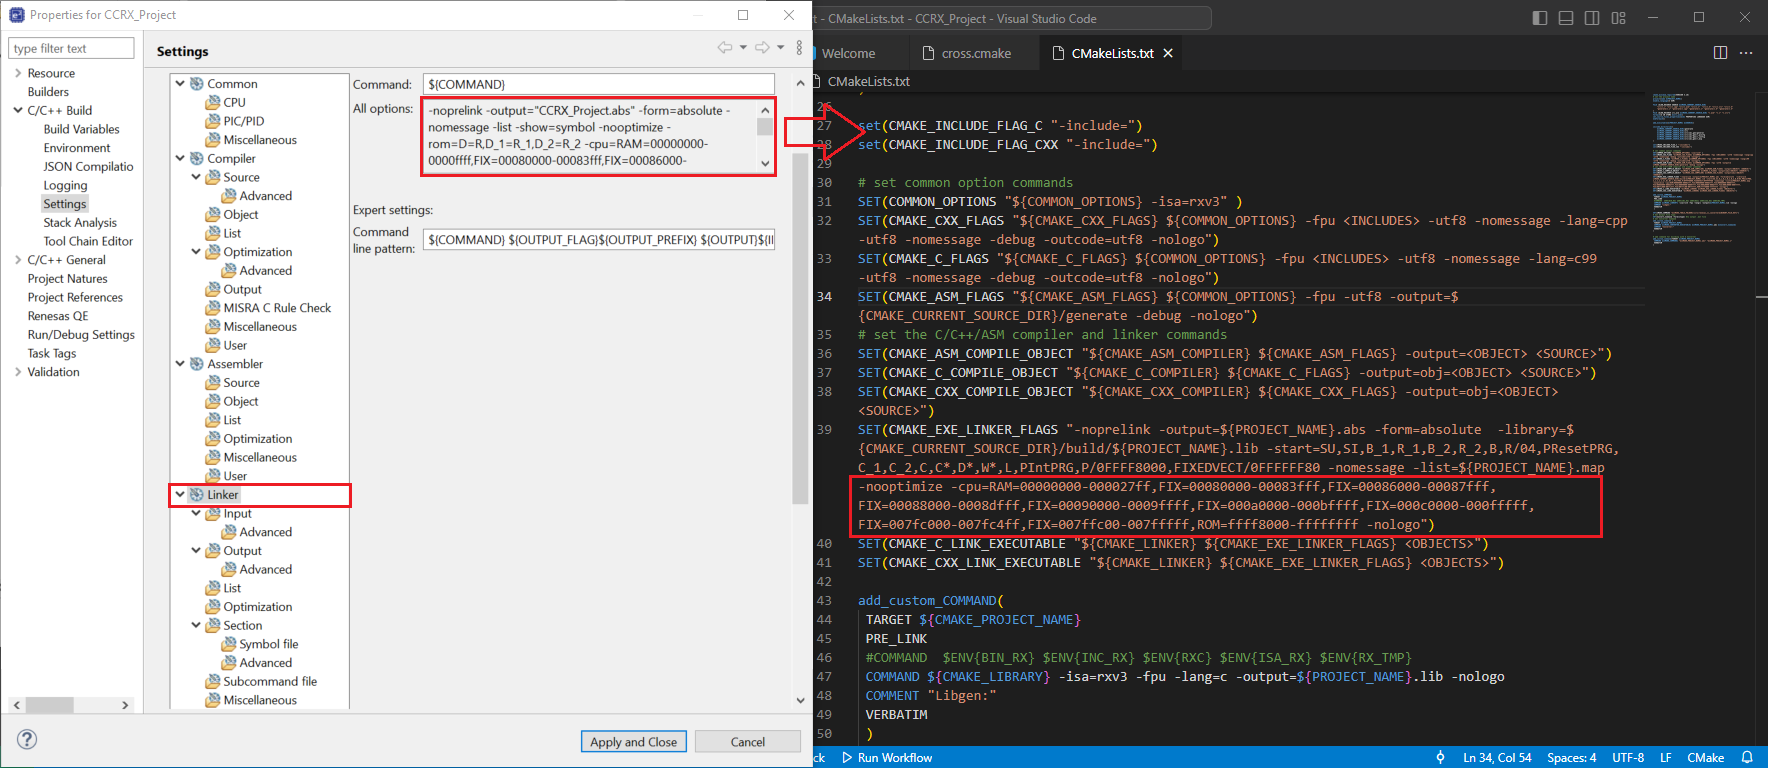
In the e2 Studio Project Settings, navigate to [Linker], take the -rom and -cpu parameters, then replace the value of the -cpu and add the -rom parameter in the CMAKE_EXE_LINKER_FLAGS at CmakeLists.txt file.
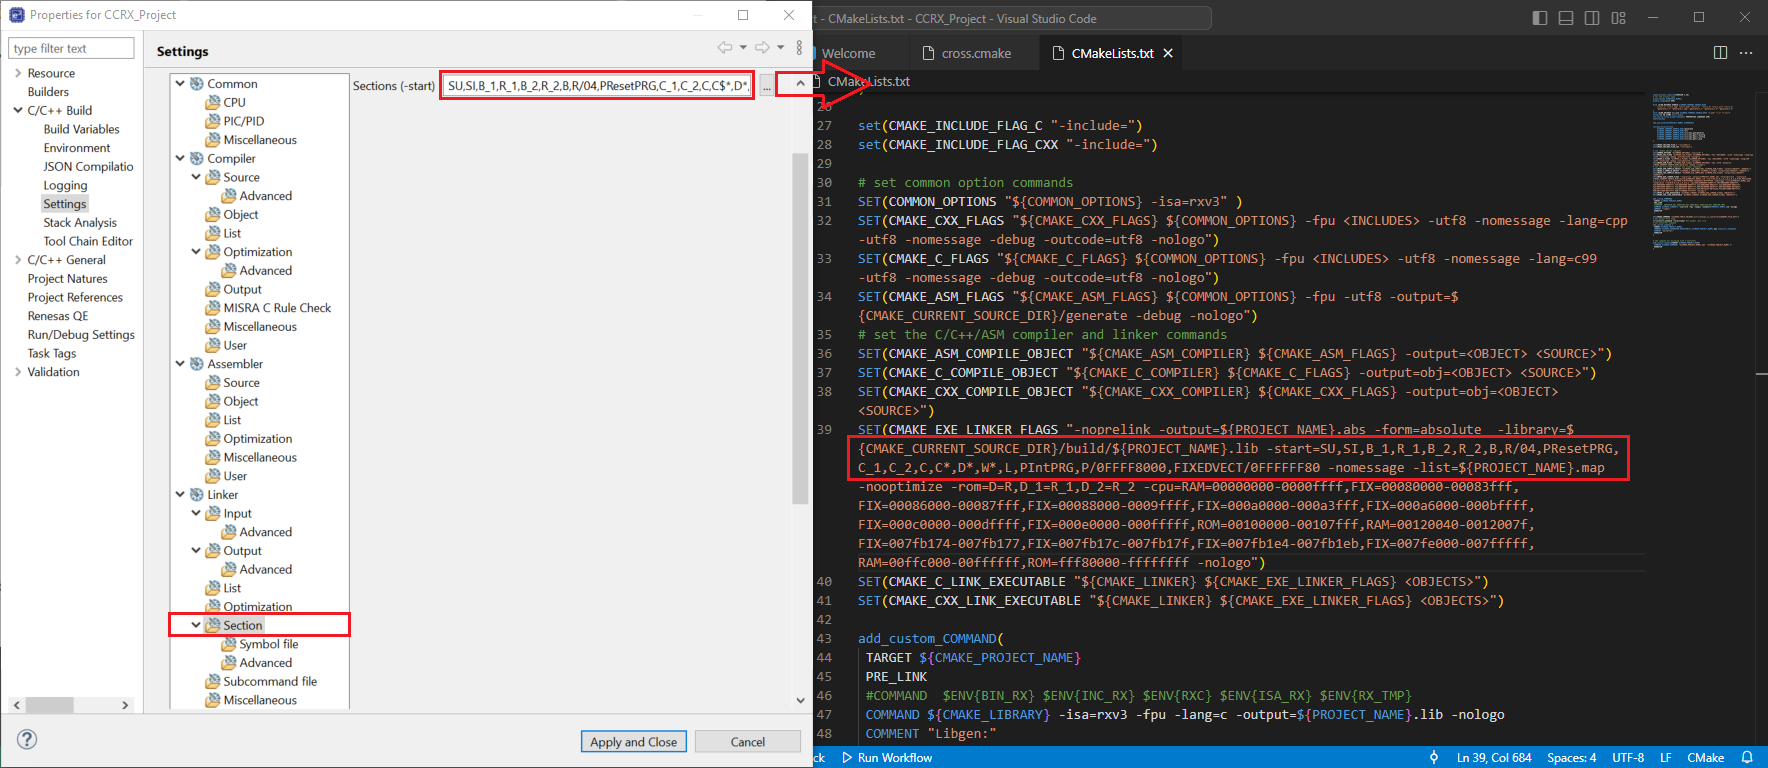
In the e2 Studio Project Settings, navigate to [Linker] => [Section], take the -start parameter, then replace the value of the -start parameter in the CMAKE_EXE_LINKER_FLAGS at CmakeLists.txt file.
In the e2 Studio Project Settings, navigate to [Assembly], then take the -start parameter, then replace them in the CmakeLists.txt in VSCode.
Note
Please note that you may need to follow the escape character rules while setting the values, for example the -start parameter may include a $ character, which needs to be replaced with a double dollar sign $$ according to the CMake escape character usage:
SU,SI,B_1,R_1,B_2,R_2,B,R/04,PResetPRG,C_1,C_2,C,C$*,D*,W*,L,PIntPRG,P/0FFF80000,EXCEPTVECT/0FFFFFF80,RESETVECT/0FFFFFFFC
should be defined as:
SU,SI,B_1,R_1,B_2,R_2,B,R/04,PResetPRG,C_1,C_2,C,C$$*,D*,W*,L,PIntPRG,P/0FFF80000,EXCEPTVECT/0FFFFFF80,RESETVECT/0FFFFFFFC
Open the [Command Palette] in VSCode and click [CMake: Delete Cache and Reconfigure].
In the first time of running, a kit selection is shown. Select “[Unspecified]”.
Note
Missing the selection of the CMake Kit or wrong selection can cause build problems. If you missed the CMake Kit selection or selected a wrong kit, you can re-select the CMake Kit by running “CMake: Select a kit” command from the VSCode Command Palette.
Go to and click [Terminal] => [Run Build Task] from the menu.
Build options will be shown, select the [Build Project] option.
For testing the project, you can use the RX Simulator (Simulator is only available for Windows operating systems).
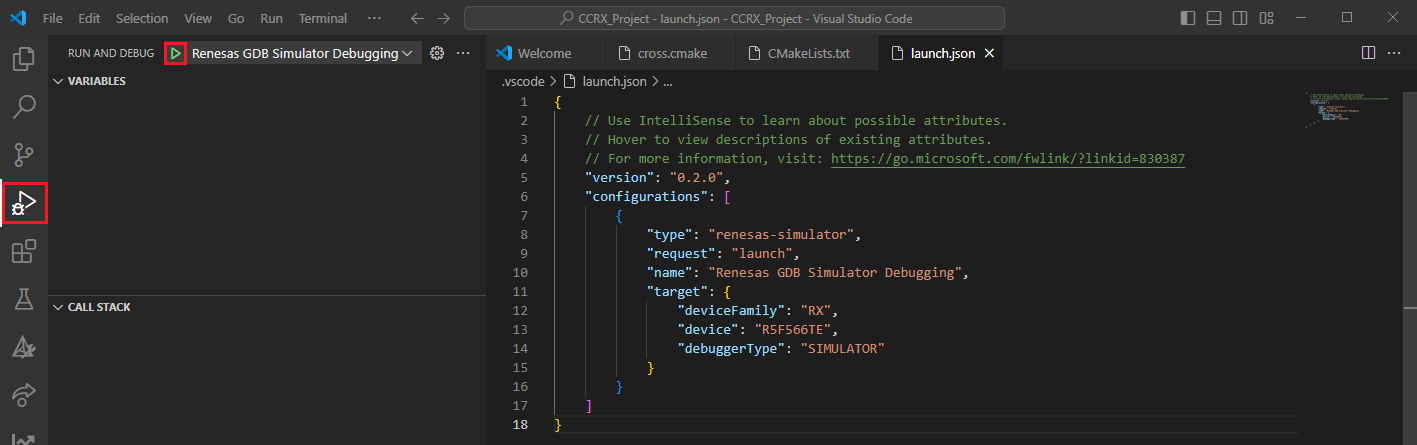
Go to the [Debug] tab in VSCode and generate a launch configuration for [Renesas GDB Simulator Debugging]. This will generate a sample Launch configuration in the .vscode/launch.json file.
Open the Launch configuration and set the correct parameters for your target device. For example:
 1{
 2  // Use IntelliSense to learn about possible attributes.
 3  // Hover to view descriptions of existing attributes.
 4  // For more information, visit: https://go.microsoft.com/fwlink/?linkid=830387
 5  "version": "0.2.0",
 6  "configurations": [
 7    {
 8      "type": "renesas-simulator",
 9      "request": "launch",
10      "name": "Renesas GDB Simulator Debugging",
11      "target": {
12        "deviceFamily": "RX",
13        "device": "R5F566TE",
14        "debuggerType": "SIMULATOR"
15      }
16    }
17  ]
18}
Start your debug session.
2.8.3. Sample Scenario: Using Renesas R-Car SDK
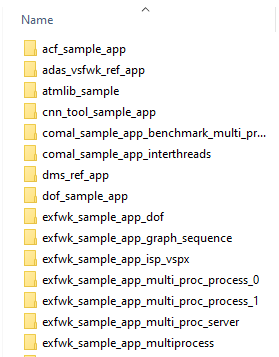
The details of some specific devices will be presented here. Sample projects can be found in the samples folder inside the SDK directory.
The package is typically installed in the default path: “C:/Renesas/rcar-xos”

Using [Create RCar CMake (Development board / SoC) project files] command, necessary files listed below are going to be created.
.vscode/settings.json
.vscode/tasks.json
cross.cmake
CMakeLists.txt
module.cmake
Contents of the .vscode/settings.json file:
{
    "C_Cpp.updateChannel": "Insiders",
    "workbench.iconTheme": "vs-minimal",
    //For Linux.
    //"cmake.generator": "Unix Makefiles"
    //For Window:
    "cmake.generator": "MinGW Makefiles",
    "cmake.buildDirectory": "${workspaceFolder}/build/rcar.debug.DevBoard",
    "cmake.configureArgs": [
        "-DCMAKE_TOOLCHAIN_FILE=${workspaceFolder}/cross.cmake"
    ],
    "cmake.sourceDirectory": "${workspaceFolder}",
    "cmake.configureOnOpen": true,
    "C_Cpp.intelliSenseEngineFallback": "enabled"
}
Contents of the .vscode/tasks.json file
{
    "version": "2.0.0",
    "tasks": [
        {
            "label": "Build Project",
            "group": "build",
            "type": "renesas-build",
            "command": "build",
            "deviceFamily": "RCAR",
            "toolchain": "gcc"
        }
    ]
}
Contents of the cross.cmake file
# Set the environment root directory
# It can be used to specify the target environment location
# e.g compiler's location. This variable is most useful when crosscompiling.
#(Should avoid spaces in the path or have to escape them)

# Please modify rcar-xos platform location and its version
set (PLATFORM_FIND_ROOT_PATH  "C:/Renesas/rcar-xos")
set (VERSION_SDK "v3.24.0")

# Check rcar-xos platform
if (NOT PLATFORM_FIND_ROOT_PATH)
  message(WARNING "rcar-xos PLATFORM_FIND_ROOT_PATH is not defined\n"
                  "Builds scripts will search rcar-xos platform in environment paths.\n"
                  "Use PLATFORM_FIND_ROOT_PATH variable to set a specific platform folder.")
elseif (NOT PLATFORM_FIND_ROOT_PATH MATCHES "/$")
  set(PLATFORM_FIND_ROOT_PATH "${PLATFORM_FIND_ROOT_PATH}/")
endif()

# Check rcar-xos platform version
if (NOT VERSION_SDK)
  message(WARNING "rcar-xos VERSION_SDK is not defined\n"
                  "Builds scripts will search rcar-xos platform version in environment paths.\n"
                  "Use VERSION_SDK variable to set a specific platform version.")
elseif (NOT VERSION_SDK MATCHES "/$")
  set(VERSION_SDK "${VERSION_SDK}/")
endif()

# Include module.cmake file
include("${CMAKE_CURRENT_LIST_DIR}/module.cmake")

# Set SDKROOT
Set(SDKROOT ${PLATFORM_FIND_ROOT_PATH}/${VERSION_SDK}/tools/toolchains/poky)

# Set CMake folder
set(CMAKE_PREFIX_PATH ${PLATFORM_FIND_ROOT_PATH}/${VERSION_SDK}/cmake)

# Set Device. Example: V3U, V3H1, V3H2, V3M2,..
set(RCAR_SOC V4H2)

# Set IMP Debug level variable
# R_CAR_DEBUG_IMP_LEVEL_CPU:  Only CPU Code
# R_CAR_DEBUG_IMP_LEVEL_CVE_DEBUG: CVe (Shader) debugging
set(R_CAR_DEBUG_IMP_LEVEL_VAR R_CAR_DEBUG_IMP_LEVEL_CVE_DEBUG)

# Build target
set(R_CAR_BUILD_TARGET_VAR aarch64-gnu-linux)

# Include cmake toolchain files as following
include("${CMAKE_PREFIX_PATH}/toolchain_poky_3_1_11_adas.cmake")
Note
Information about the samples corresponding to which device is available in:
C:/Renesas/rcar-xos/<version SDK>/samples/SUPPORTED_ENVIRONMENT.html
Example:
C:/Renesas/rcar-xos/v3.24.0/samples/SUPPORTED_ENVIRONMENT.html
CMakeLists.txt and module.cmake files are overridden with their corresponding files from the project.

