1. Installation
1.1. Supported Environments
Operating System |
Windows: Windows 10 / Windows 11 Linux: Ubuntu 22.04 / Ubuntu 24.04 macOS: macOS 14 Sonoma (Apple silicon) / macOS 15 Sequoia (Apple silicon) |
VS Code version |
1.102.0 (minimum) |
VS Code can be downloaded and installed from this page https://code.visualstudio.com/.
1.2. Installing the Renesas Extensions
Renesas provides the Renesas Platform VS Code extension to support the development of Renesas C/C++ projects in Visual Studio Code.
The latest versions of these extensions can be installed directly from the Extension Marketplace. Developers can follow the steps below to install the latest versions of the extensions from the Extension Marketplace.
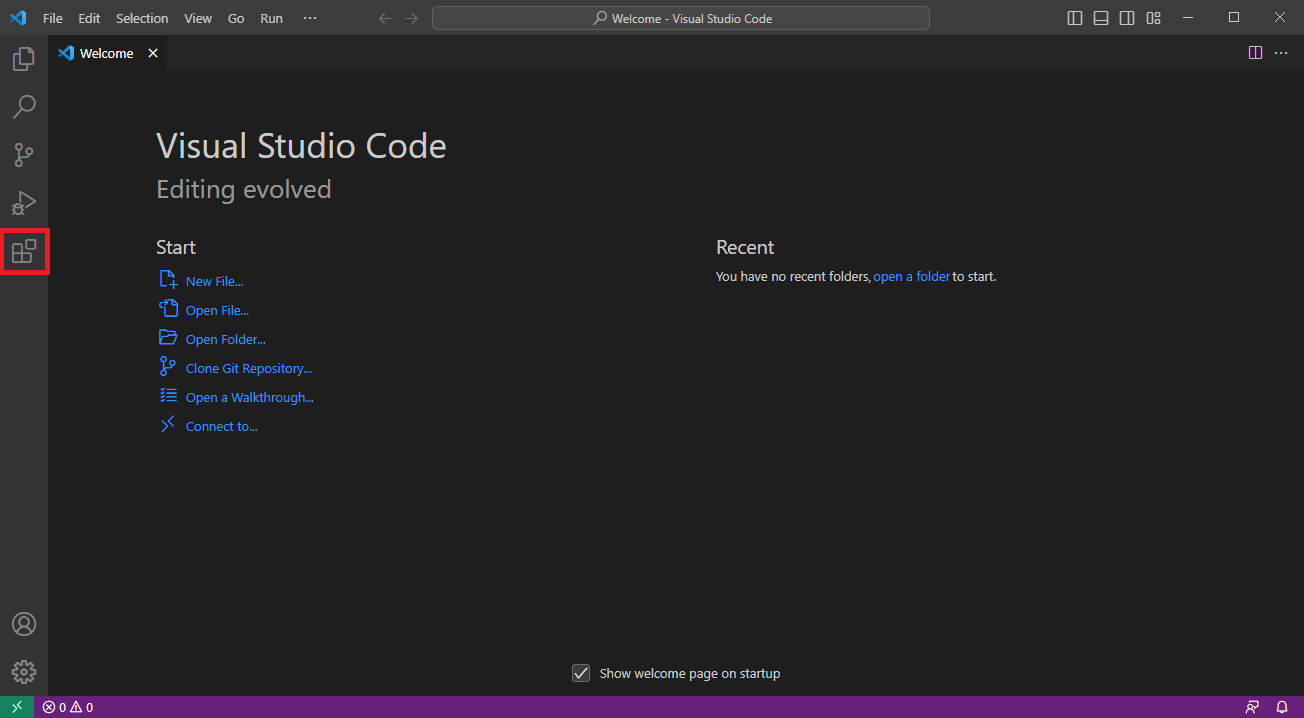
Open “VS Code” and navigate to the “Extensions” section.
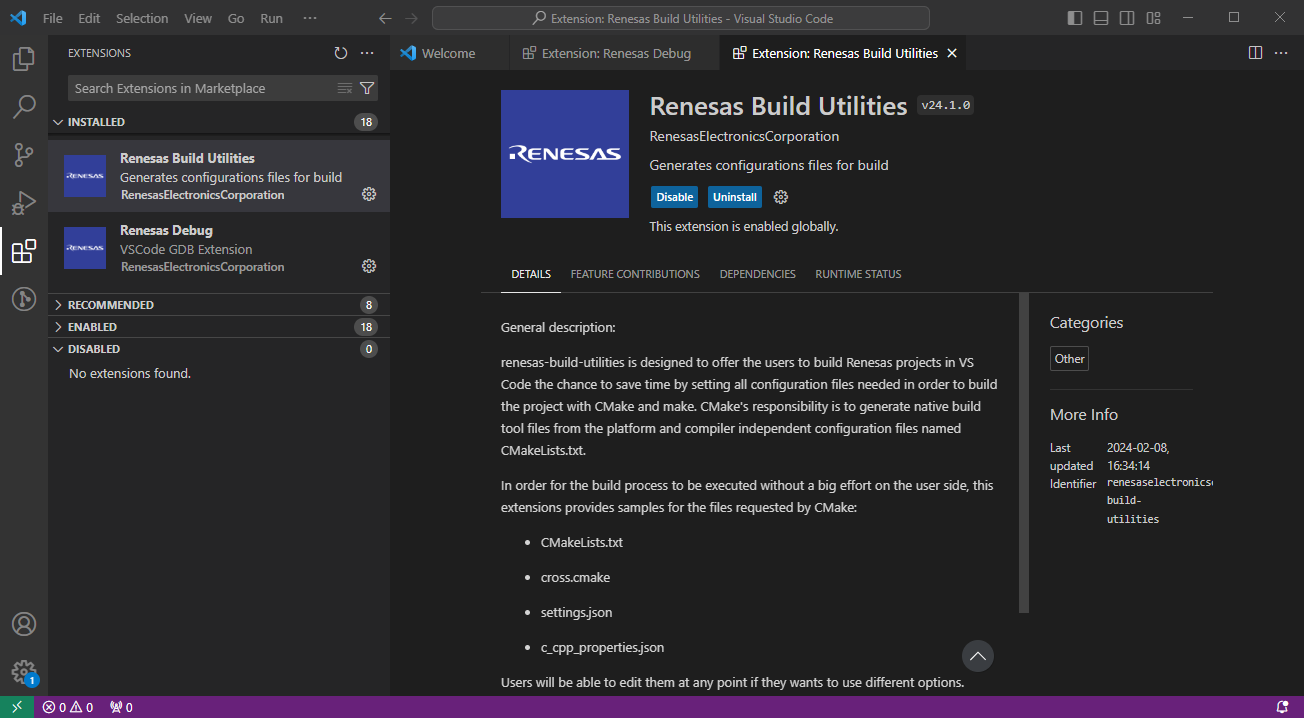
Search for “Renesas Platform”
Click the “Install” button for “Renesas Platform”.
The Renesas Platform extension also automatically installs the following essential Renesas VS Code extensions:
Renesas extensions include dependent packages required for build and debug operations. After installing the extensions, please follow the user guide to set up the development environment:
1.3. Setup for Windows
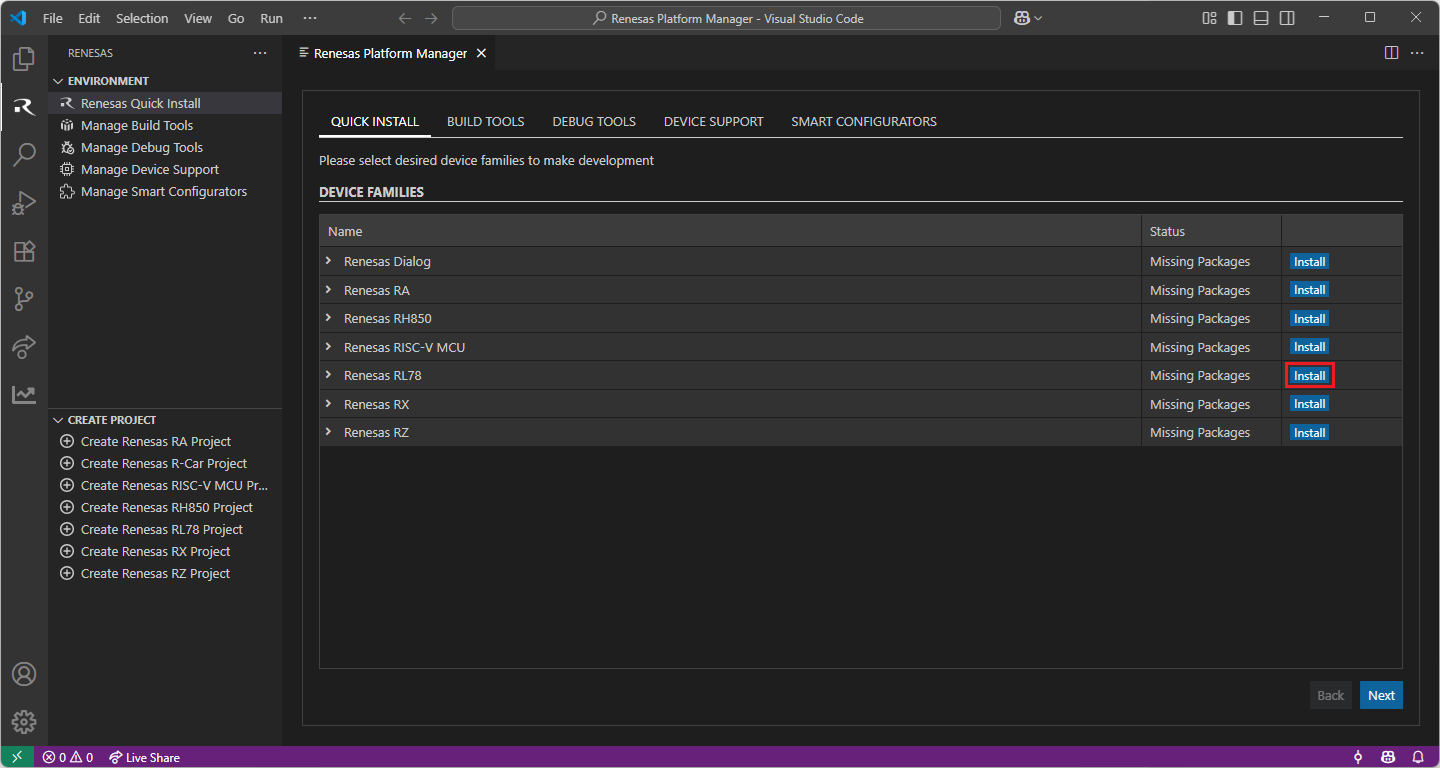
Renesas extensions support a variety of device and tool combinations for embedded development. It is essential to set up your development environment properly before starting your work. For Windows operating systems, please follow this guide to set up your environment. It is recommended to check the device-specific setup guide to complete the required setup steps.
1.3.1. Setup for Dialog
For the Dialog Family, Renesas Platform provides a straightforward installation wizard to install CMake, Ninja Build, Python 3.10, ARM GNU Toolchain, SEGGER J-Link and Support Files for Dialog Family. To set up your environment:
Open VS Code.
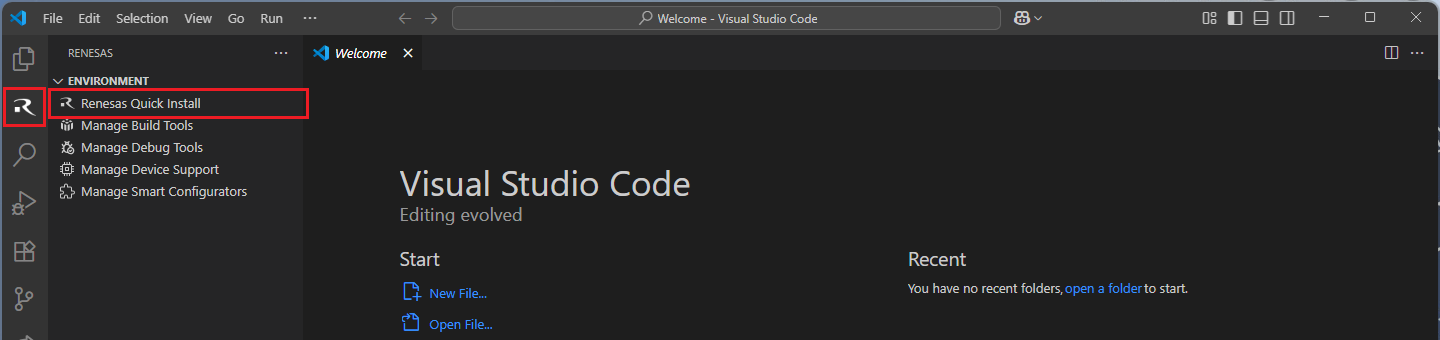
Navigate to the “Renesas” tab in VS Code. Then, click “Renesas Quick Install” in the “Environment” view.
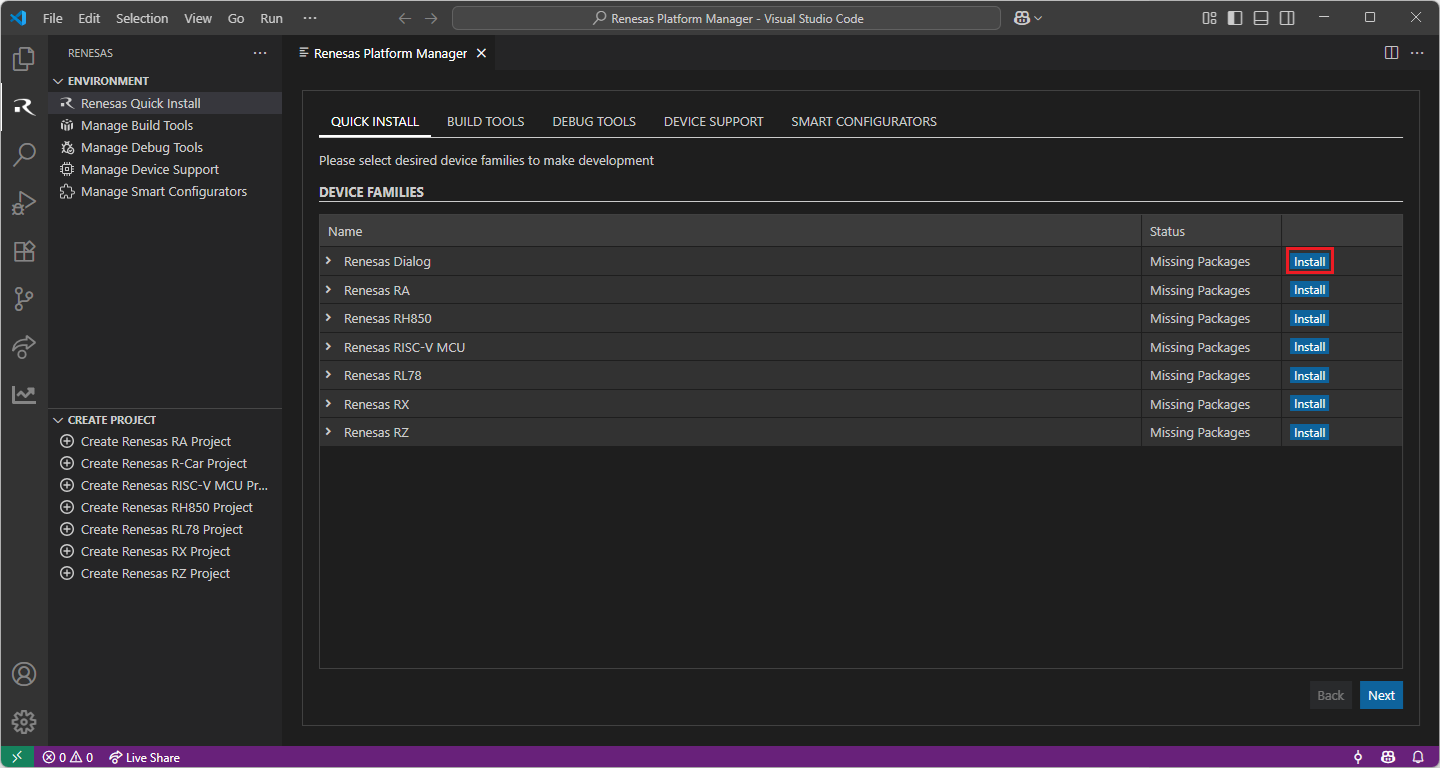
Click the “Install” button for the “Dialog” device family. The Renesas Platform will now check the dependencies required by the Dialog Device Family. The Renesas Platform extension will check the local environment and CMake, Ninja Build, Python 3.10, ARM GNU Toolchain, SEGGER J-Link and Support Files for Dialog Family, then create an installation plan for them if necessary.
When your selection is ready, click the “Start Installations” button. The download and installation process will start automatically.
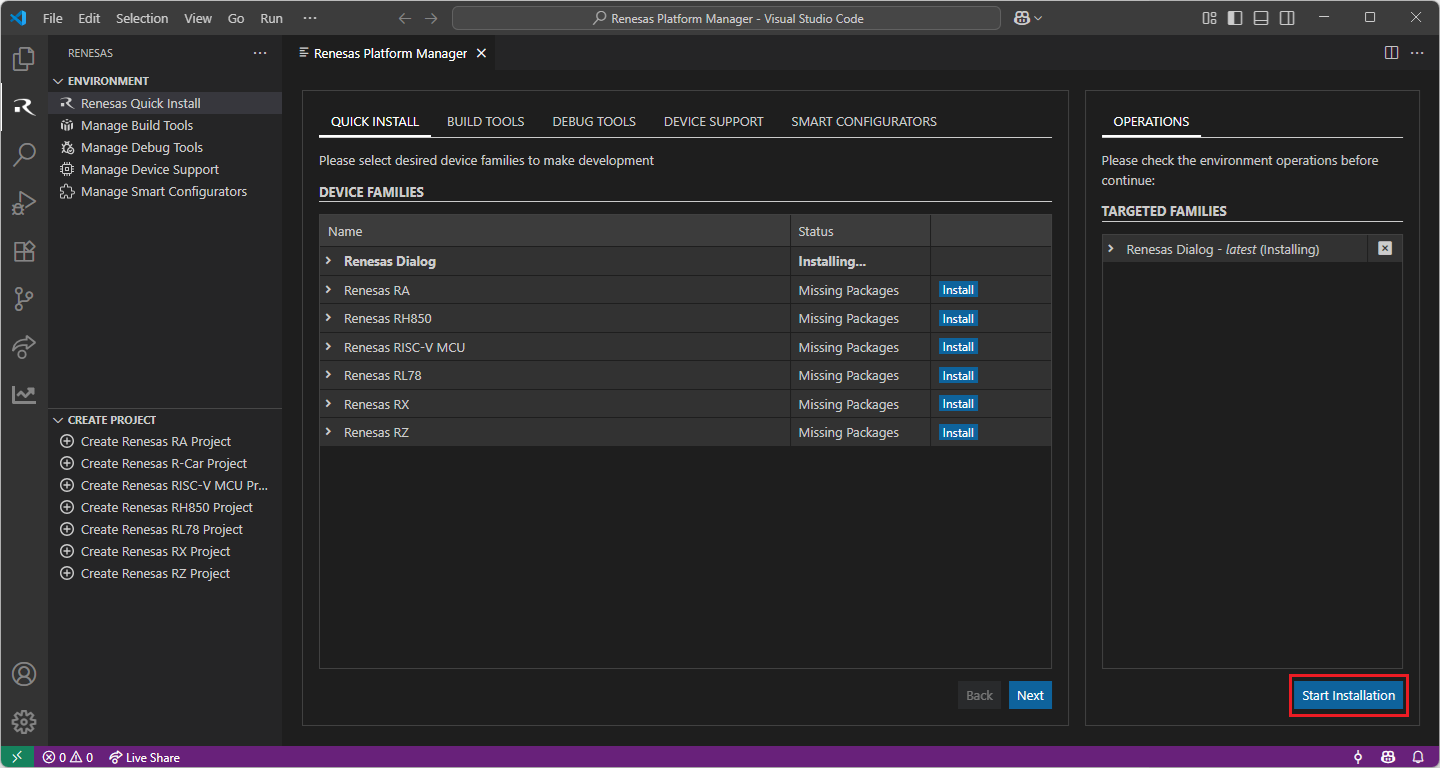
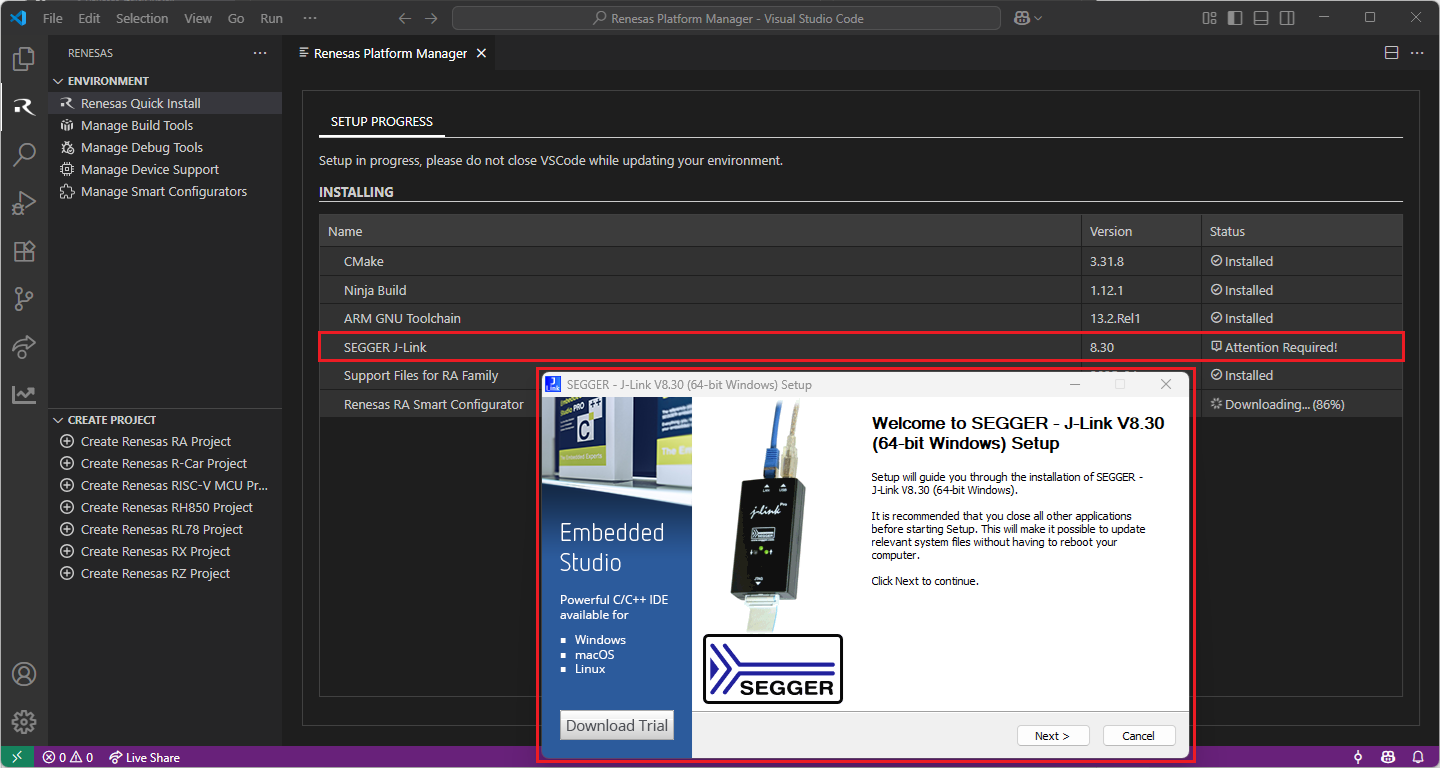
Most of the installations will be performed automatically, some installations may require manual interaction.
During the SEGGER J-Link installation, the setup wizard will appear for manual installation, please follow the steps to complete the SEGGER J-Link installation.
Getting the Dialog Audio Development Platform:
For Dialog projects, it is recommended to use the “Dialog Audio Development Platform” during project development. Customers can access the Audio Development Platform (ADP) software upon request.
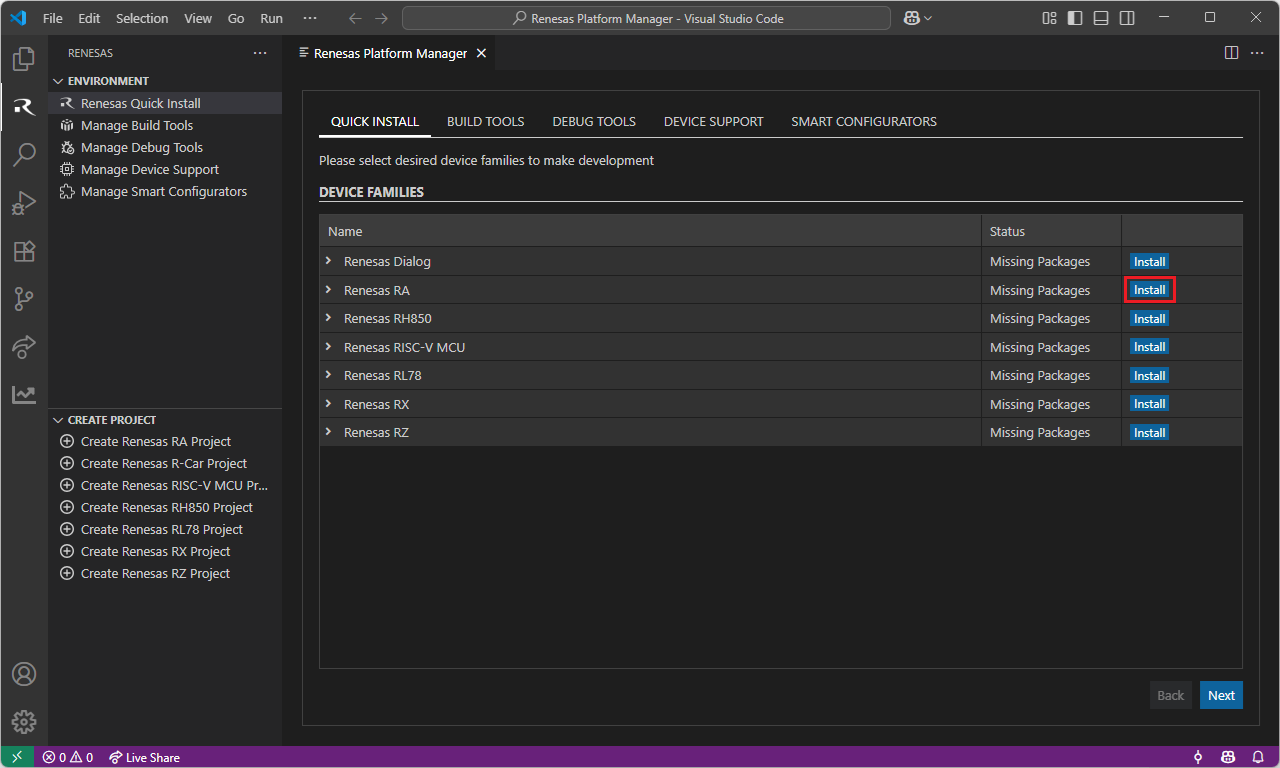
1.3.2. Setup for RA
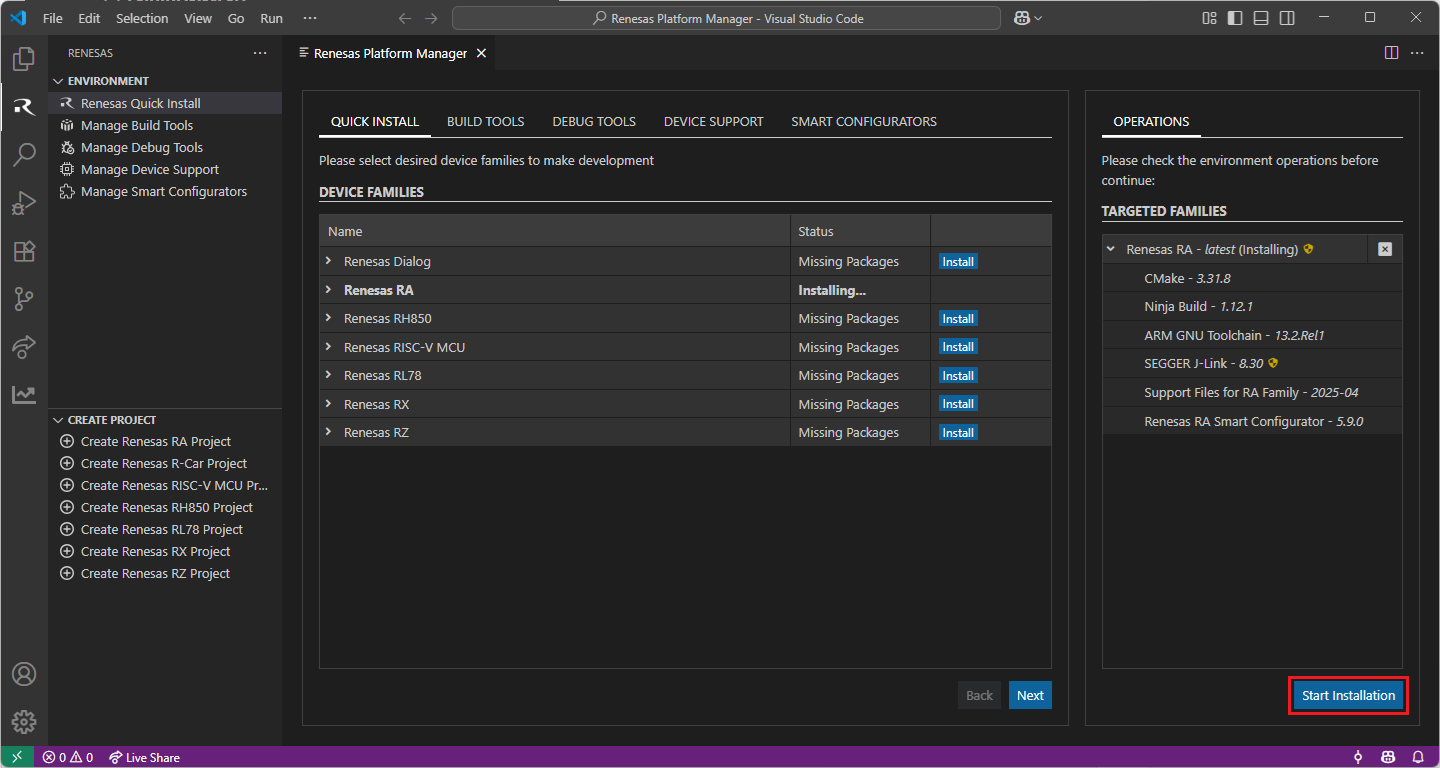
Renesas Platform, provides a complete installation wizard to start developing for Renesas RA Family. To set up your environment:
Open VS Code.
Navigate to the “Renesas” tab in VS Code. Then, click “Renesas Quick Install” in the “Environment” view.
Click the “Install” button for the “Renesas RA” device family. The Renesas Platform will now check the dependencies required by the Renesas RA Device Family. The Renesas Platform extension will check the local environment and CMake, Ninja Build, Python 3.10, ARM GNU Toolchain, SEGGER J-Link, Support Files for RA Family and the Renesas RA Smart Configurator installations, then create an installation plan for them if necessary.
The installation plan automatically includes all the prerequisites. Moreover, you can also select additional tools or toolchain versions by checking the “Build Tools”, “Debug Tools”, “Device Support” and the “Smart Configurators” tabs.
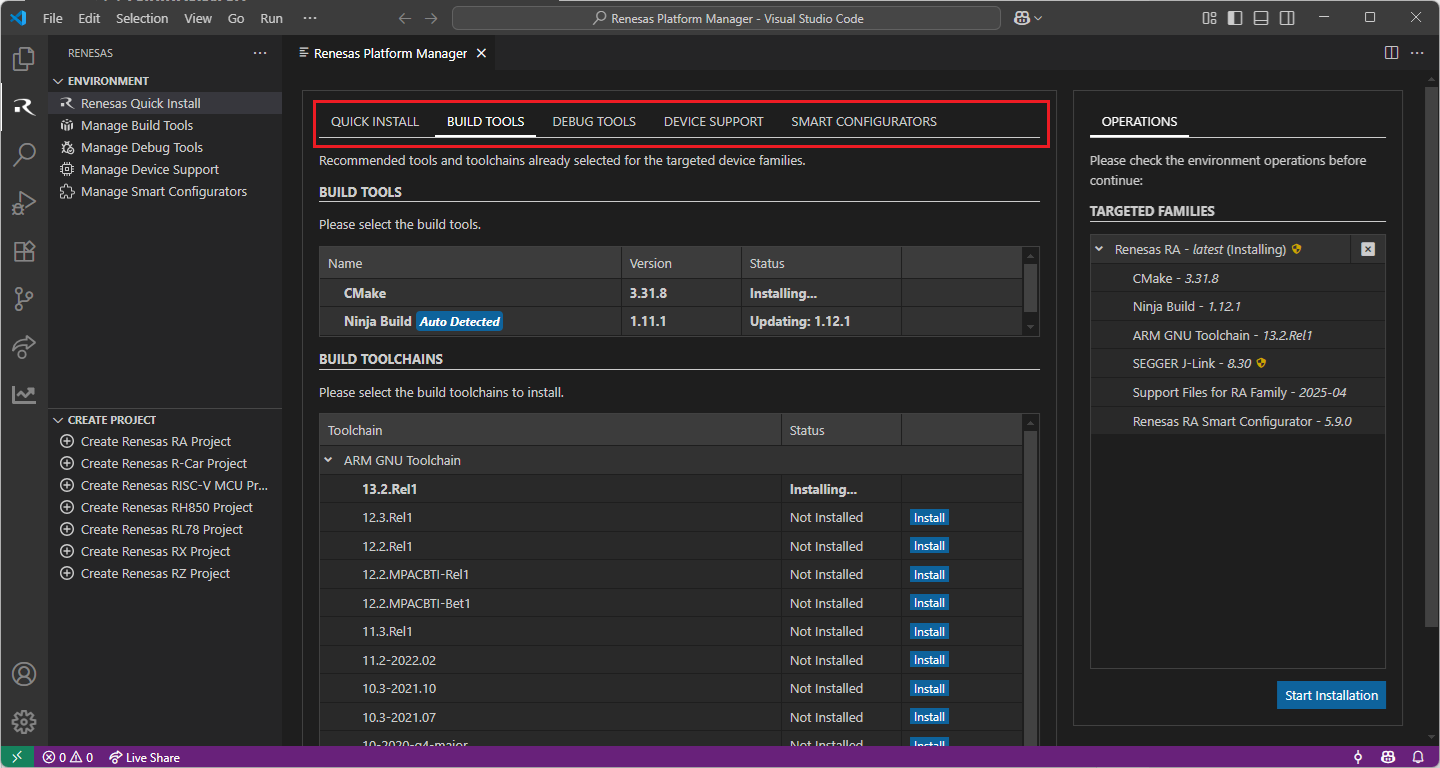
When your selection is ready, click the “Start Installations” button. The download and installation process will start automatically.
Most of the installations will be performed automatically, some installations may require manual interaction.
During the SEGGER J-Link installation, the setup wizard will appear for manual installation, please follow the steps to complete the SEGGER J-Link installation.
Installing Additional Emulator Drivers
For some debug emulators, you may need to download and install additional USB drivers for establishing a connection with the emulators and devices.
Using Renesas E2/E2Lite Emulators:
If you are using Renesas Emulators, please install the latest drivers before starting your debug session. Use the following links to download the drivers suitable for your operating system and device:
1.3.3. Setup for R-Car
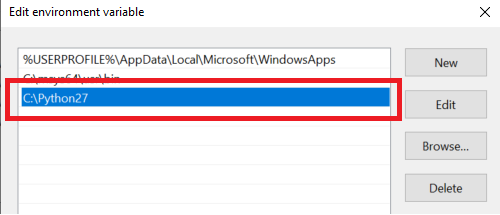
Installing Python 2.7 (32-bit):
Install the 32-bit version of the Python 2.7.18 (Important!: 32-bit Python is needed even in 64-bit OS environment).
Add the path of the Python 2.7.18 installation into the “Path” environment variable.
Guide to add Python 2.7 folder into the “Path” environment variable
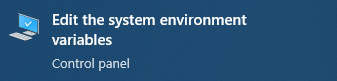
Use Window search to find and open “Edit the system environment variables”
In “Advanced” tab, click on “Environment Variables…” button to open “Environment Variables” dialog
Select to edit “Path”
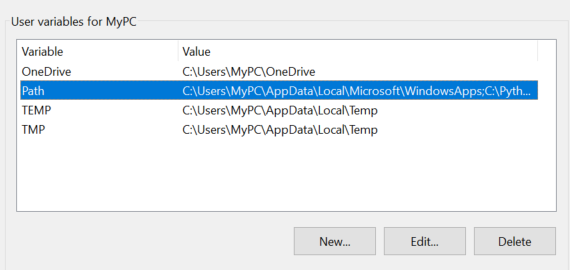
Add the path of Python folder
Click OK to close the dialog
Setting up a build environment with MinGW over MSYS2 for Windows
R-Car and RZ/N families require MinGW Makefiles in the development environment on Windows. Please, install CMake and MSYS2 packages.
Step 1: Install the latest CMake version for Windows.
Download the latest version of CMake for Windows.
Install CMake for Windows.
Important!: You must add the CMake folders to the Path environment variable. The Windows Installer of CMake has an option to modify the system’s environment variables and add the CMake folders to the Path variable. Please select this option during installation. If you are not using the installer or this option is not selected during installation, please use the notes at step 3 to manually add CMake’s bin folder to the Path variable.
Step 2: Install and configure the latest MSYS2 package.
Download the latest version of the MSYS2 package.
Install the MSYS2 package. The MSYS2 package will automatically install the MinGW environment.
Use Windows Search to find and open [MSYS2 MINGW64] terminal.
Install the make package for MinGW64 using pacman package manager.
pacman -S mingw-w64-x86_64-make
Check if make package is installed correctly.
mingw32-make --versionSee also
make package is a 32-bit package. You can install it by using “MSYS2 MINGW32” terminal instead of “MSYS2 MINGW64” terminal. If you are using “MSYS2 MINGW32” then run the following command for the installation:
pacman -S mingw-w64-i686-make
Also, please make sure you include the correct folder for the Path environment variable in the next step (e.g. C:\msys64\mingw32\bin).
Step 3: Configure the Path environment variable.
Use Windows Search to find and open [Edit the system environment variables]
In the [Advanced] tab, click on the [Environment Variables…] button to open the [Environment Variables] dialog.
Select to edit the Path.
Add the path of CMake’s bin folder if it is not defined during the CMake installation.
(e.g. C:\Program Files\CMake\bin)
Add the path of the MSYS2 and MinGW bin folders.
(e.g. C:\msys64\usr\bin, C:\msys64\mingw64\bin)
Installing Emulator Drivers
You may need to download and install additional USB drivers for establishing a proper connection with the emulators and devices.
Using Renesas E2/E2Lite Emulators:
If you are using Renesas Emulators, please install the latest drivers before starting your debug session. Use the following link to download the drivers suitable for your operating system and device:
Using SEGGER J-Link Connection:
Install the latest SEGGER J-Link drivers before starting your debug session. Use the following link to download the J-Link drivers suitable for your operating system:
1.3.4. Setup for RH850
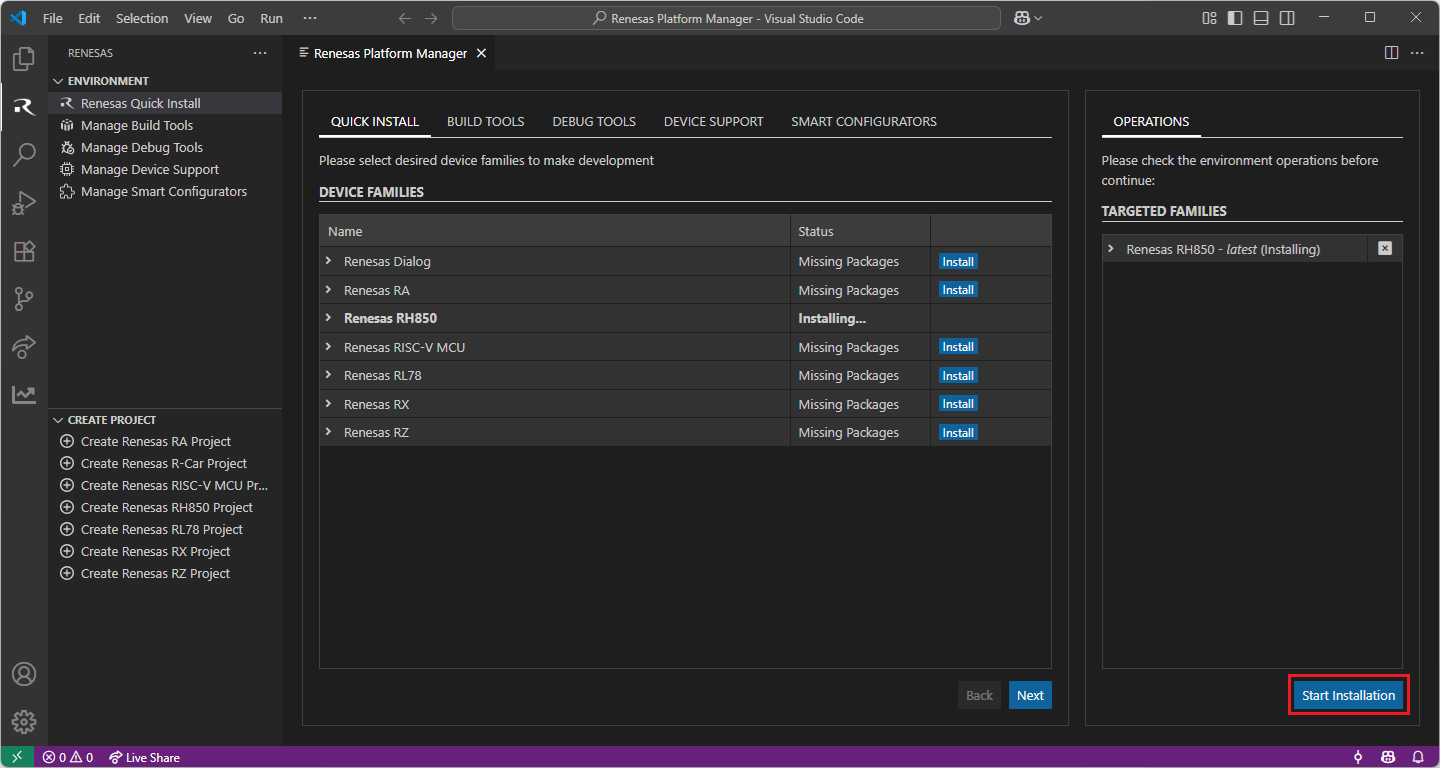
For the Renesas RH850 Family, Renesas Platform provides a straightforward installation wizard to install the CMake, Ninja, Python and the Support Files for RH850 Family. To set up your environment:
Open VS Code.
Navigate to the “Renesas” tab in VS Code. Then, click “Renesas Quick Install” in the “Environment” view.
Click the “Install” button for the “Renesas RH850” device family. The Renesas Platform will now check the dependencies required by the Renesas RH850 Device Family. The Renesas Platform extension will check the local environment and CMake, Ninja, Python and the Support Files for RH850 Family, then create an installation plan for them if necessary.

When your selection is ready, click the “Start Installations” button. The download and installation process will start automatically.
Installing the latest RH850 Smart Configurator (RH850 SC):
For RH850 projects, it is recommended to download and install the latest RH850 Smart Configurator.
https://www.renesas.com/en/software-tool/rh850-smart-configurator#downloads
Note
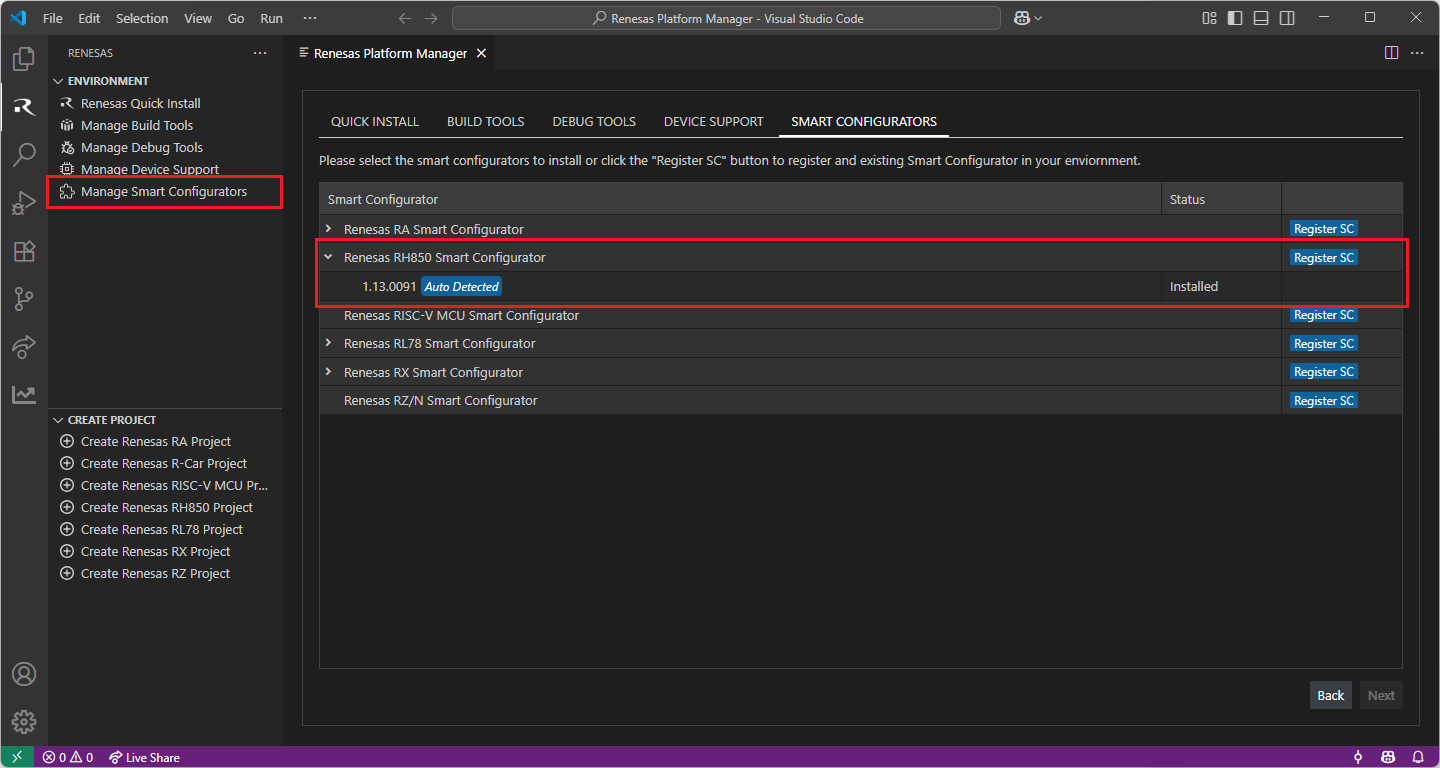
The Renesas Platform extension scans for changes at start-up, thus, after installing the Renesas RH850 Smart Configurator, please restart VS Code to force Renesas Platform to detect the recent RH850 Smart Configurator installation.
You can click “Manage Smart Configurators” to check the detected Smart Configurators. If it is not automatically detected, you can use the “Register SC” button to register the Smart Configurator manually by selecting the path of the Smart Configurator.
Installing “CC-RH” toolchains for RH850 Project Build:
For RH850 projects, it is recommended to install “CC-RH” toolchain. For installing “CC-RH”:
Download and install the latest toolchain:
https://www.renesas.com/us/en/software-tool/c-compiler-package-rh850-family
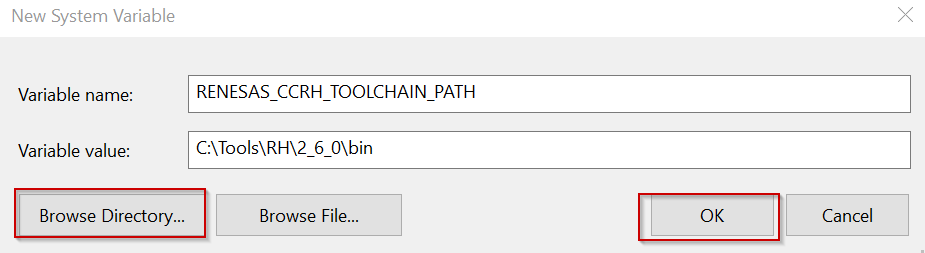
Add the bin folder of the toolchain as “RENESAS_CCRH_TOOLCHAIN_PATH” to the environment variables.
Configuring RENESAS_CCRH_TOOLCHAIN_PATH environment variable
Use Window search to find and open “Edit the system environment variables”
In “Advanced” tab, click on “Environment Variables…” button to open “Environment Variables” dialog
Click to “New…”.

Enter the “RENESAS_CCRH_TOOLCHAIN_PATH” to the Variable name field, and click to “Browse Directory…” to select the bin folder of the toolchain. Then click “OK”.
Installing Additional Emulator Drivers
You may need to download and install additional USB drivers for establishing a connection with the emulators and devices. Please install the latest drivers before starting your debug session. Use the following links to download the drivers suitable for your operating system and device:
1.3.5. Setup for RISC-V MCU
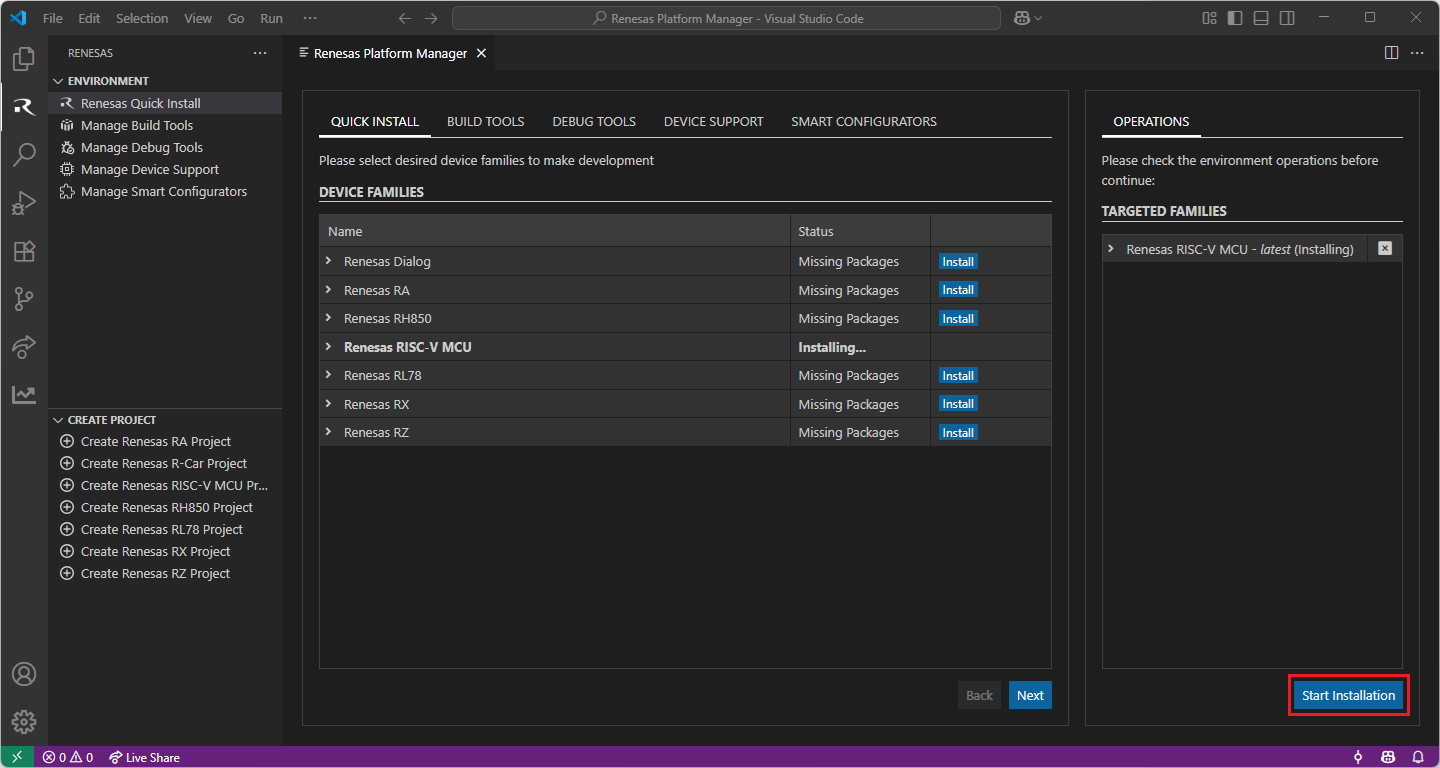
For the Renesas RISC-V MCU Family, Renesas Platform provides a straightforward installation wizard to install the CMake, Ninja, Python and the Support Files for RISC-V MCU Family. To set up your environment:
Open VS Code.
Navigate to the “Renesas” tab in VS Code. Then, click “Renesas Quick Install” in the “Environment” view.
Click the “Install” button for the “Renesas RISC-V MCU” device family. The Renesas Platform will now check the dependencies required by the Renesas RISC-V MCU Device Family. The Renesas Platform extension will check the local environment and CMake, Ninja, Python and the Support Files for RISC-V MCU Family, then create an installation plan for them if necessary.

When your selection is ready, click the “Start Installations” button. The download and installation process will start automatically.
Installing the latest RISC-V MCU Smart Configurator (RISC-V MCU SC):
Download and install the latest version of RISC-V MCU Smart Configurator:
After installing the Renesas RISC-V MCU Smart Configurator, you should register the Renesas Smart Configurator installation in VS Code. In order to register the Renesas RISC-V MCU Smart Configurator, perform the following steps:
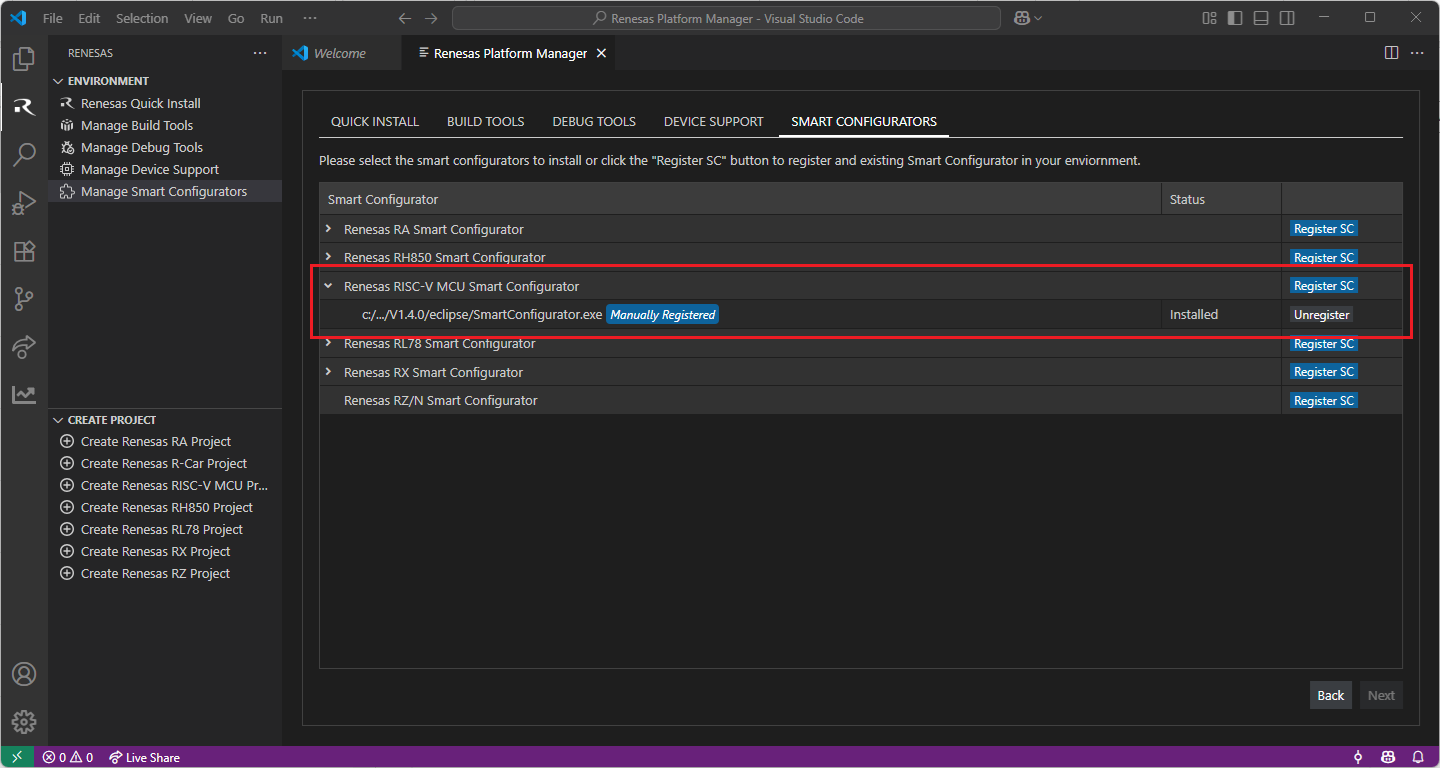
Click to “Manage Smart Configurators” and check the Renesas RISC-V MCU Smart Configurators. Use the “Register SC” button to register the Smart Configurator manually by selecting the path of the Smart Configurator.
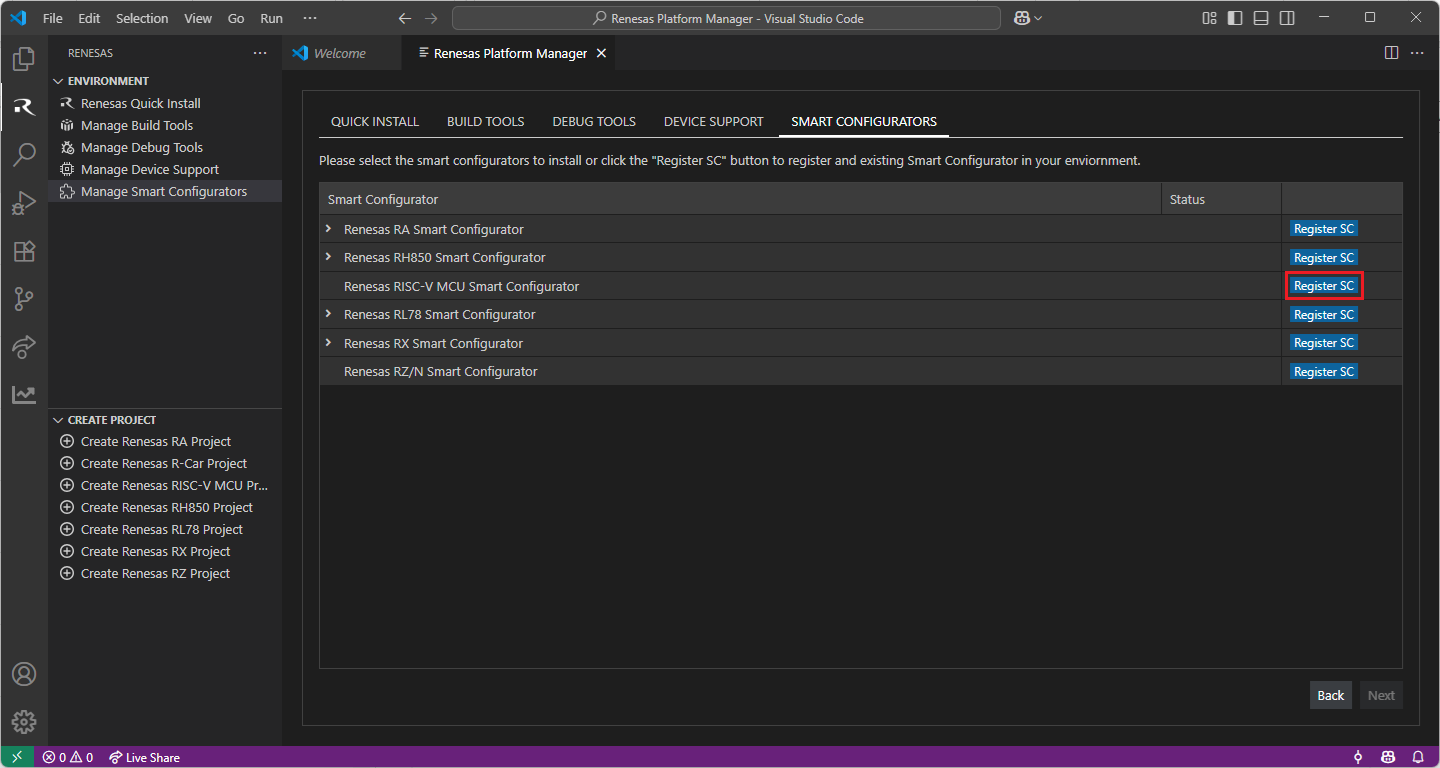
Once it is registered, the Smart Configurator will be visible in the Renesas RISC-V MCU Smart Configurators list.
Installing “LLVM for Renesas RISC-V MCU” toolchain for RISC-V MCU Project Build:
For RISC-V MCU projects, it is recommended to use “LLVM for Renesas RISC-V MCU” toolchain.
Download and install the latest toolchain:
https://llvm-gcc-renesas.com/riscv/riscv-download-toolchains
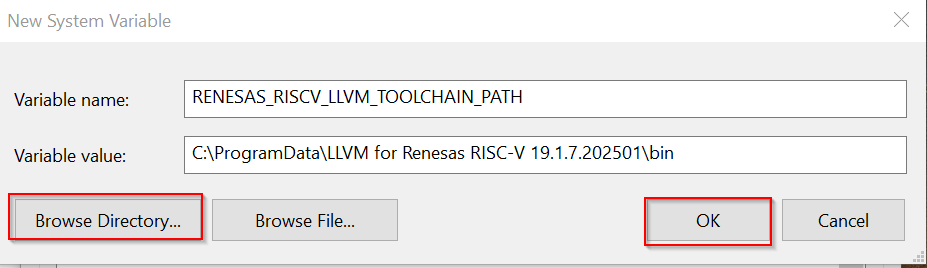
Add the bin folder of the toolchain as “RENESAS_RISCV_LLVM_TOOLCHAIN_PATH” to the environment variables.
Configuring RENESAS_RISCV_LLVM_TOOLCHAIN_PATH environment variable
Use Window search to find and open “Edit the system environment variables”
In “Advanced” tab, click on “Environment Variables…” button to open “Environment Variables” dialog
Click to “New…”.
Enter the “RENESAS_RISCV_LLVM_TOOLCHAIN_PATH” to the Variable name field, and click to “Browse Directory…” to select the bin folder of the toolchain. Then click “OK”.
1.3.6. Setup for RL78
For the Renesas RL78 Family, Renesas Platform provides a straightforward installation wizard to install the CMake, Ninja, Python and the Support Files for RL78 Family. To set up your environment:
Open VS Code.
Navigate to the “Renesas” tab in VS Code. Then, click “Renesas Quick Install” in the “Environment” view.
Click the “Install” button for the “Renesas RL78” device family. The Renesas Platform will now check the dependencies required by the Renesas RL78 Device Family. The Renesas Platform extension will check the local environment and CMake, Ninja, Python and the Support Files for RL78 Family, then create an installation plan for them if necessary.
When your selection is ready, click the “Start Installations” button. The download and installation process will start automatically.

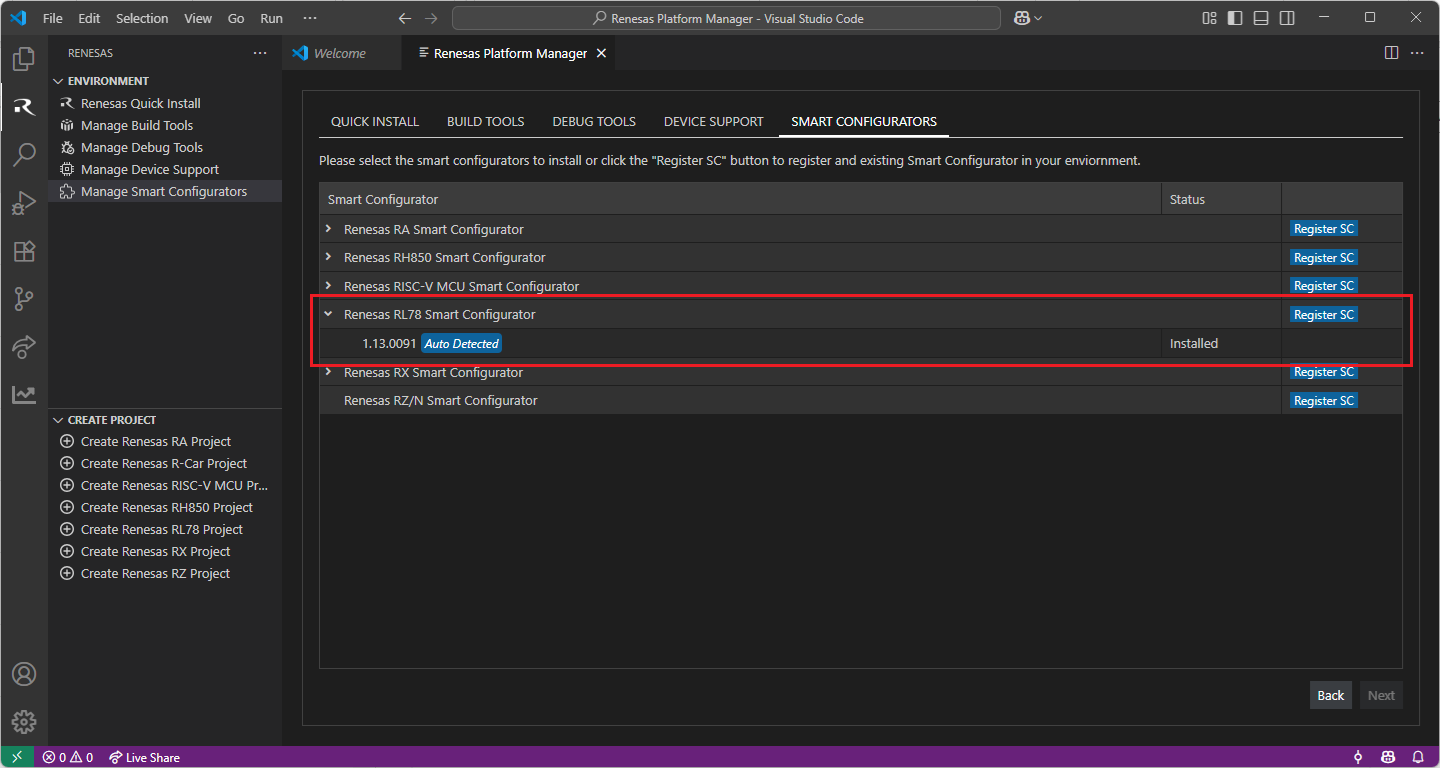
Installing the latest RL78 Smart Configurator (RL78 SC):
Download and install the latest version of RL78 Smart Configurator:
Note
Renesas Platform extension scans for changes at start-up, thus, after installing the Renesas RL78 Smart Configurator, please restart VS Code to force Renesas Platform to detect the recent RL78 Smart Configurator installation.
You can click “Manage Smart Configurators” to check the detected Smart Configurators. If it is not automatically detected, you can use the “Register SC” button to register the Smart Configurator manually by selecting the path of the Smart Configurator.
Installing Toolchains for RL78 Development:
Install one of the preferred toolchains for RL78 Project Build. It is recommended to use either “CC-RL” or “LLVM for Renesas RL78”.
Installing and Configuring “CC-RL” toolchain
For installing “CC-RL”:
Download and install the latest toolchain:
https://www.renesas.com/us/en/software-tool/c-compiler-package-rl78-family
Add the bin folder of the toolchain as “RENESAS_CCRL_TOOLCHAIN_PATH” to the environment variables.
Note
Configuring RENESAS_CCRL_TOOLCHAIN_PATH environment variable:
Use Window search to find and open “Edit the system environment variables”
In “Advanced” tab, click on “Environment Variables…” button to open “Environment Variables” dialog
Click to “New…”.
Enter the “RENESAS_CCRL_TOOLCHAIN_PATH” to the Variable name field, and click to “Browse Directory…” to select the bin folder of the toolchain. Then click “OK”.

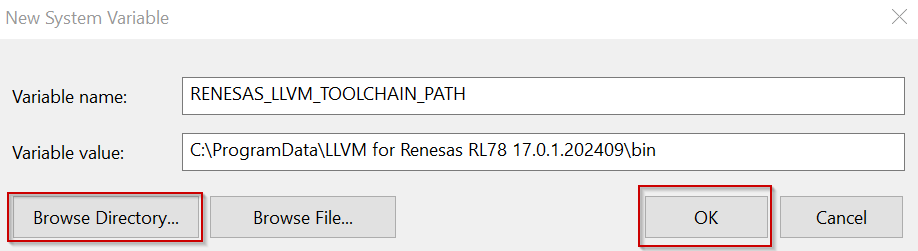
Installing and Configuring “LLVM for Renesas RL78” toolchain
For installing “LLVM for Renesas RL78”:
Download and install the latest toolchain:
Add the bin folder of the toolchain as “RENESAS_LLVM_TOOLCHAIN_PATH” to the environment variables.
Note
Configuring RENESAS_LLVM_TOOLCHAIN_PATH environment variable:
Use Window search to find and open “Edit the system environment variables”
In “Advanced” tab, click on “Environment Variables…” button to open “Environment Variables” dialog
Click to “New…”.
Enter the “RENESAS_LLVM_TOOLCHAIN_PATH” to the Variable name field, and click to “Browse Directory…” to select the bin folder of the toolchain. Then click “OK”.
Installing Additional Emulator Drivers
You may need to download and install additional USB drivers for establishing a connection with the emulators and devices. Please install the latest drivers before starting your debug session. Use the following links to download the drivers suitable for your operating system and device:
For other Renesas emulators, please check for any recommended drivers:
1.3.7. Setup for RX
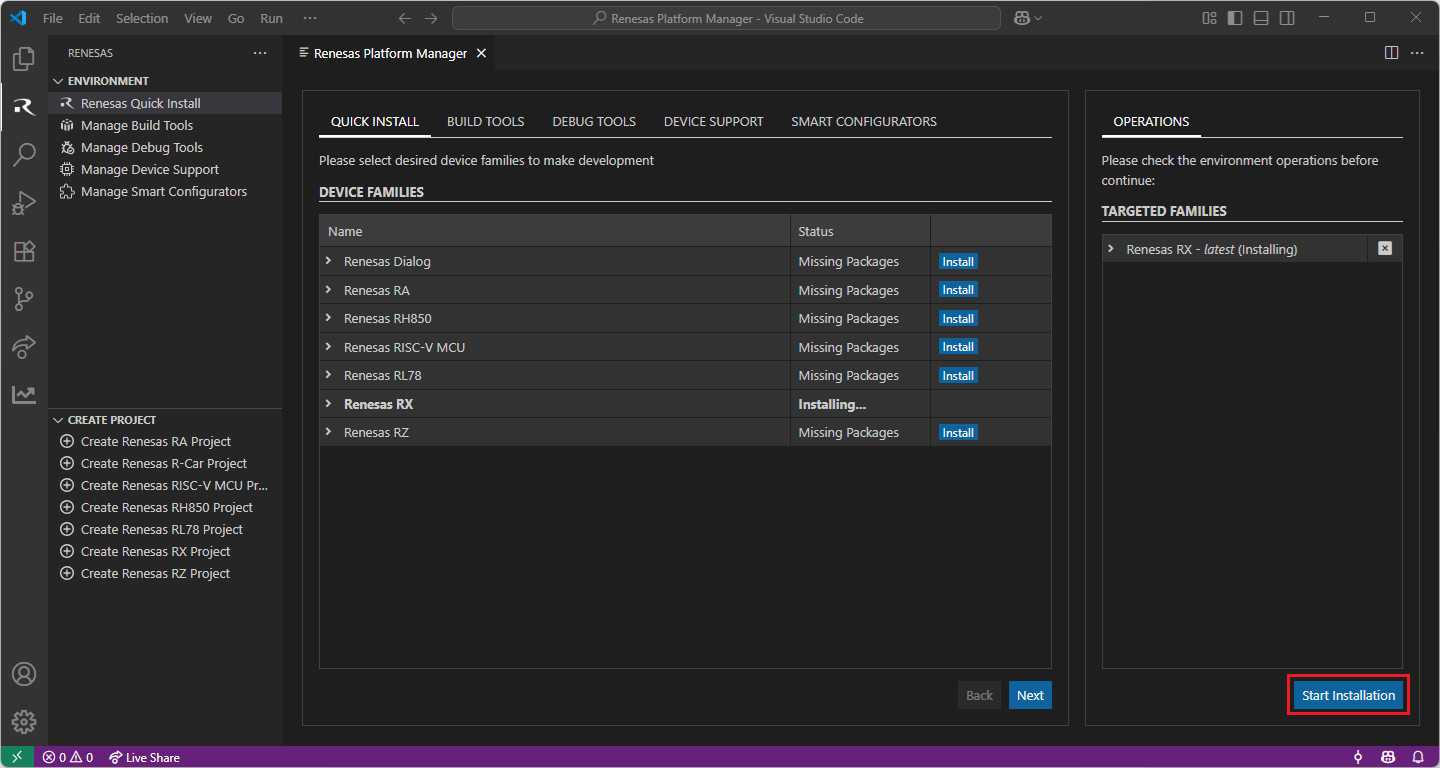
For the Renesas RX Family, Renesas Platform provides a straightforward installation wizard to install the CMake, Ninja, Python and the Support Files for RX Family. To set up your environment:
Open VS Code.
Navigate to the “Renesas” tab in VS Code. Then, click “Renesas Quick Install” in the “Environment” view.
Click the “Install” button for the “Renesas RX” device family. The Renesas Platform will now check the dependencies required by the Renesas RX Device Family. The Renesas Platform extension will check the local environment and CMake, Ninja, Python and the Support Files for RX Family, then create an installation plan for them if necessary.

When your selection is ready, click the “Start Installations” button. The download and installation process will start automatically.
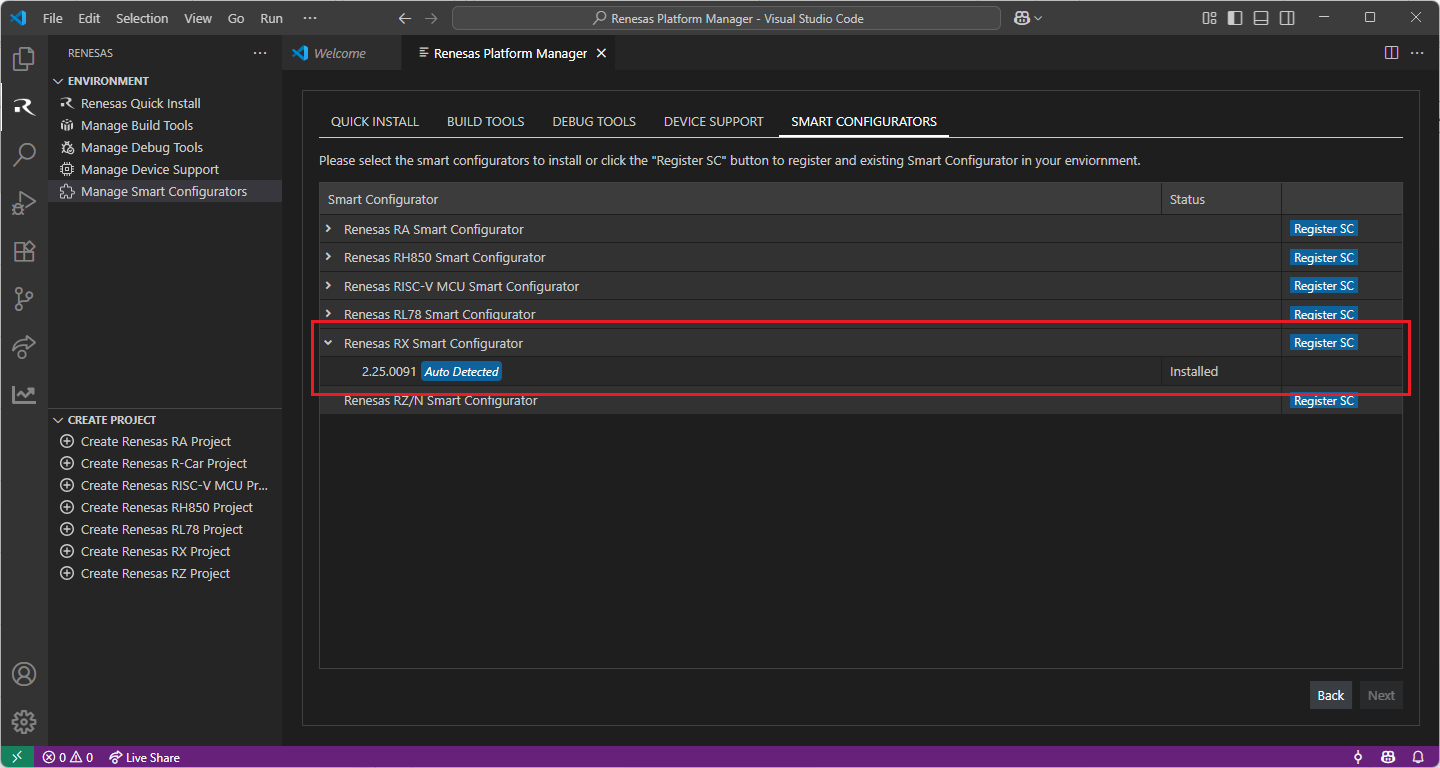
Installing the latest RX Smart Configurator (RX SC):
Download and install the latest version of RX Smart Configurator
https://www.renesas.com/en/software-tool/rx-smart-configurator#downloads
Note
Renesas Platform extension scans for changes at start-up, thus, after installing the Renesas RX Smart Configurator, please restart VS Code to force Renesas Platform to detect the recent RX Smart Configurator installation.
You can click “Manage Smart Configurators” to check the detected Smart Configurators. If it is not automatically detected, you can use the “Register SC” button to register the Smart Configurator manually by selecting the path of the Smart Configurator.
Installing Toolchains for RX Development:
Install one of the preferred toolchains for RX Project Build. It is recommended to use either “CC-RX” or “GCC for Renesas GNURX”.
Installing and Configuring “CC-RX” toolchain
For installing “CC-RX”:
Download and install the latest toolchain:
https://www.renesas.com/us/en/software-tool/cc-compiler-package-rx-family
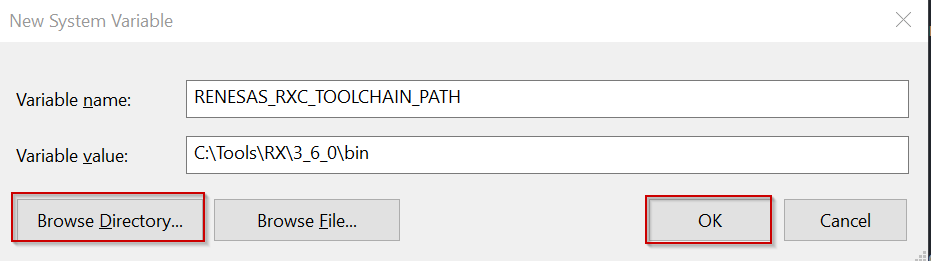
Add the bin folder of the toolchain as “RENESAS_RXC_TOOLCHAIN_PATH” to the environment variables.
Configuring RENESAS_RXC_TOOLCHAIN_PATH environment variable
Use Window search to find and open “Edit the system environment variables”
In “Advanced” tab, click on “Environment Variables…” button to open “Environment Variables” dialog
Click to “New…”.
Enter the “RENESAS_RXC_TOOLCHAIN_PATH” to the Variable name field, and click to “Browse Directory…” to select the bin folder of the toolchain. Then click “OK”.
Note
For building CC-RX projects without using RX Smart Configurator, add “BIN_RX”, “INC_RX” and “TMP_RX” variables to the environment variables with the following values:
BIN_RX: bin folder of the CC-RX toolchain (e.g.: C:\Toolchains\CCRX\3_6_0\bin).
INC_RX: include folder of the CC-RX toolchain (e.g.: C:\Toolchains\CCRX\3_6_0\include).
TMP_RX: root folder of the CC-RX toolchain (e.g.: C:\Toolchains\CCRX\3_6_0).
Installing and Configuring “GCC for Renesas GNURX” toolchain
For installing “GCC for Renesas GNURX”:
Download and install the latest toolchain:
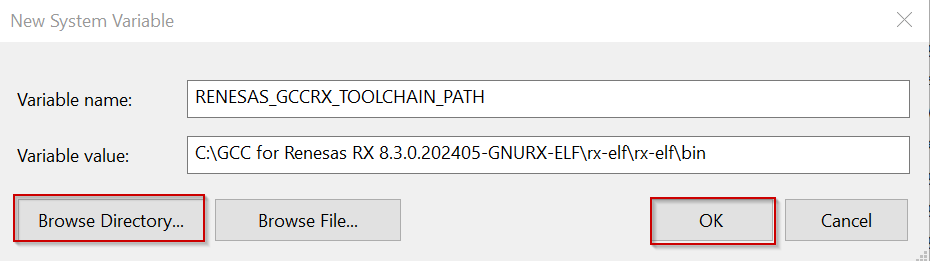
Add the bin folder of the toolchain as “RENESAS_GCCRX_TOOLCHAIN_PATH” to the environment variables.
Note
Configuring RENESAS_GCCRX_TOOLCHAIN_PATH environment variable:
Use Window search to find and open “Edit the system environment variables”
In “Advanced” tab, click on “Environment Variables…” button to open “Environment Variables” dialog
Click to “New…”.
Enter the “RENESAS_GCCRX_TOOLCHAIN_PATH” to the Variable name field, and click to “Browse Directory…” to select the bin folder of the toolchain. Then click “OK”.
Installing Additional Emulator Drivers
You may need to download and install additional USB drivers for establishing a connection with the emulators and devices. Please install the latest drivers before starting your debug session. Use the following links to download the drivers suitable for your operating system and device:
For other Renesas emulators, please check for any recommended drivers:
1.3.8. Setup for RZ family
For the Renesas RZ Family, Renesas Platform provides a straightforward installation wizard to install the CMake, Ninja, Python, SEGGER J-Link and the Support Files for RZ Family. To set up your environment:
Open VS Code.
Navigate to the “Renesas” tab in VS Code. Then, click “Renesas Quick Install” in the “Environment” view.
Click the “Install” button for the “Renesas RZ” device family. The Renesas Platform will now check the dependencies required by the Renesas RZ Device Family. The Renesas Platform extension will check the local environment and CMake, Ninja, Python, SEGGER J-Link and the Support Files for RZ Family, then create an installation plan for them if necessary.

When your selection is ready, click the “Start Installations” button. The download and installation process will start automatically.

Installing the “Arm GNU Toolchain” toolchains for RZ Development
For installing “Arm GNU Toolchain”:
Download and install the latest toolchain:
https://developer.arm.com/downloads/-/arm-gnu-toolchain-downloads
1.3.9. Setup for RZ/N family
For the Renesas RZ/N Family, Renesas Platform provides a straightforward installation wizard to install the CMake, Ninja, Python, ARM GNU Toolchain, SEGGER J-Link and the Support Files for RZ Family. To set up your environment:
Open VS Code.
Navigate to the “Renesas” tab in VS Code. Then, click “Renesas Quick Install” in the “Environment” view.
Click the “Install” button for the “Renesas RZ/N” device family. The Renesas Platform will now check the dependencies required by the Renesas RZ Device Family. The Renesas Platform extension will check the local environment and CMake, Ninja, Python, ARM GNU Toolchain, SEGGER J-Link and the Support Files for RZ Family, then create an installation plan for them if necessary.
When your selection is ready, click the “Start Installations” button. The download and installation process will start automatically.
Installing the latest RZ/N Smart Configurator:
Download and install the latest version of RZ/N Smart Configurator:
After installing the Renesas RZ/N Smart Configurator, you should register the Renesas Smart Configurator installation in VS Code. In order to register the Renesas RZ/N Smart Configurator, perform the following steps:
Click “Manage Smart Configurators” and check the Renesas RZ/N Smart Configurators. Use the “Register SC” button to register the Smart Configurator manually by selecting the path of the Smart Configurator.
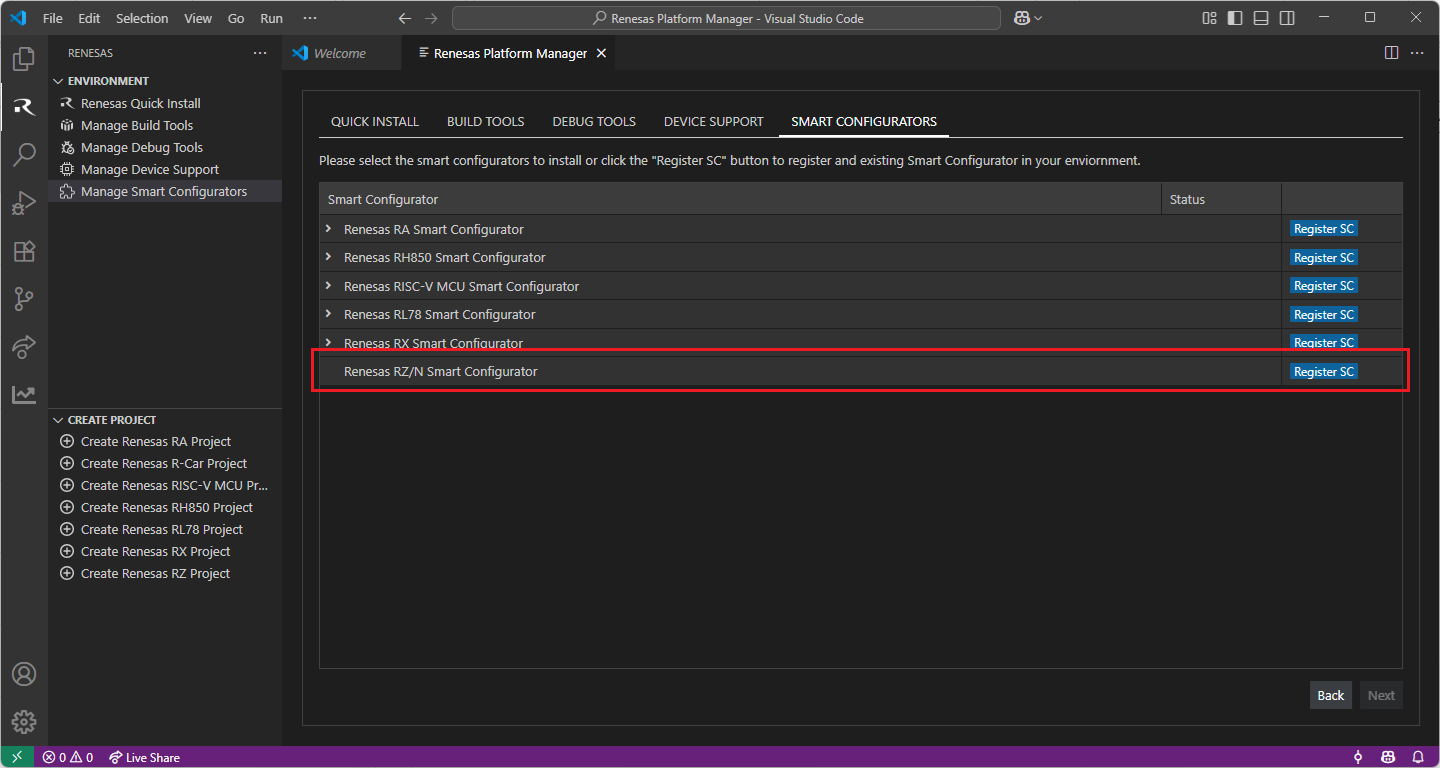
Once it is registered, the Smart Configurator will be visible in the Renesas RZ/N Smart Configurators list.

1.4. Setup for Ubuntu 22.04
Renesas extensions support a variety of device and tool combinations for embedded development. It is essential to set up your development environment properly before starting your work. For Ubuntu 22.04 operating systems, please follow this guide to set up your environment. It is recommended to check the device-specific setup guide to complete the required setup steps.
1.4.1. Setup for Dialog
For the Dialog Family, Renesas Platform provides a straightforward installation wizard to install CMake, Ninja Build, Python 3.10, ARM GNU Toolchain, SEGGER J-Link and Support Files for Dialog Family. To set up your environment:
Open VS Code.
Navigate to the “Renesas” tab in VS Code. Then, click “Renesas Quick Install” in the “Environment” view.
Click the “Install” button for the “Dialog” device family. The Renesas Platform will now check the dependencies required by the Dialog Device Family. The Renesas Platform extension will check the local environment and CMake, Ninja Build, Python 3.10, ARM GNU Toolchain, SEGGER J-Link and Support Files for Dialog Family, then create an installation plan for them if necessary.
When your selection is ready, click the “Start Installations” button. The download and installation process will start automatically.
Most of the installations will be performed automatically, some installations may require manual interaction.
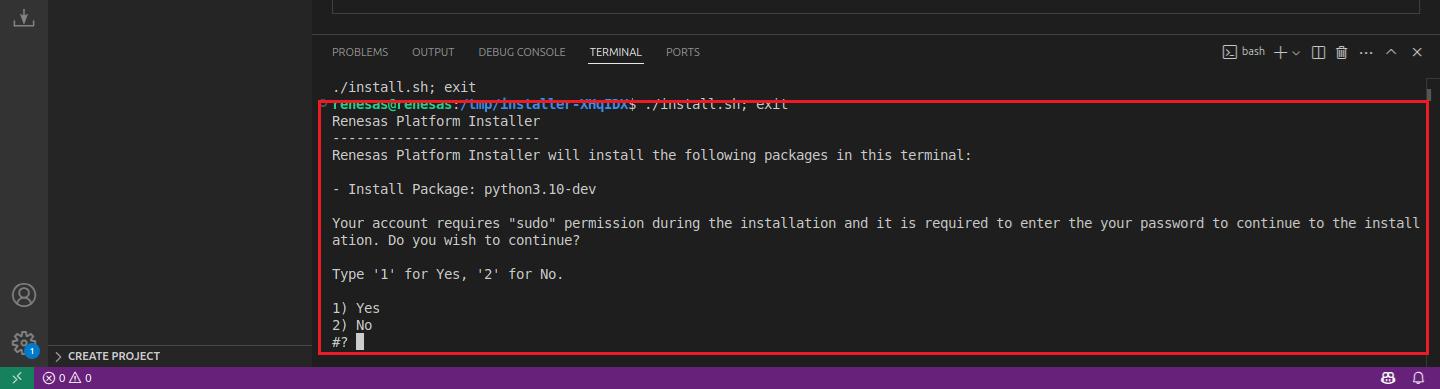
During the “Python 3.10” installation, the terminal wizard will appear for manual interaction. The terminal will show the execution plan and ask for confirmation before continuing. During the installation, it requires administrative rights to execute the installation, thus a password could be needed during the installation. Please make sure that the current user has “sudo” permissions and enter the password.
Getting the Dialog Audio Development Platform:
For Dialog projects, it is recommended to use the “Dialog Audio Development Platform” during project development. Customers can access the Audio Development Platform (ADP) software upon request.
1.4.2. Setup for RA
Renesas Platform, provides a complete installation wizard to start developing for Renesas RA Family. To set up your environment:
Open VS Code.
Navigate to the “Renesas” tab in VS Code. Then, click “Renesas Quick Install” in the “Environment” view.
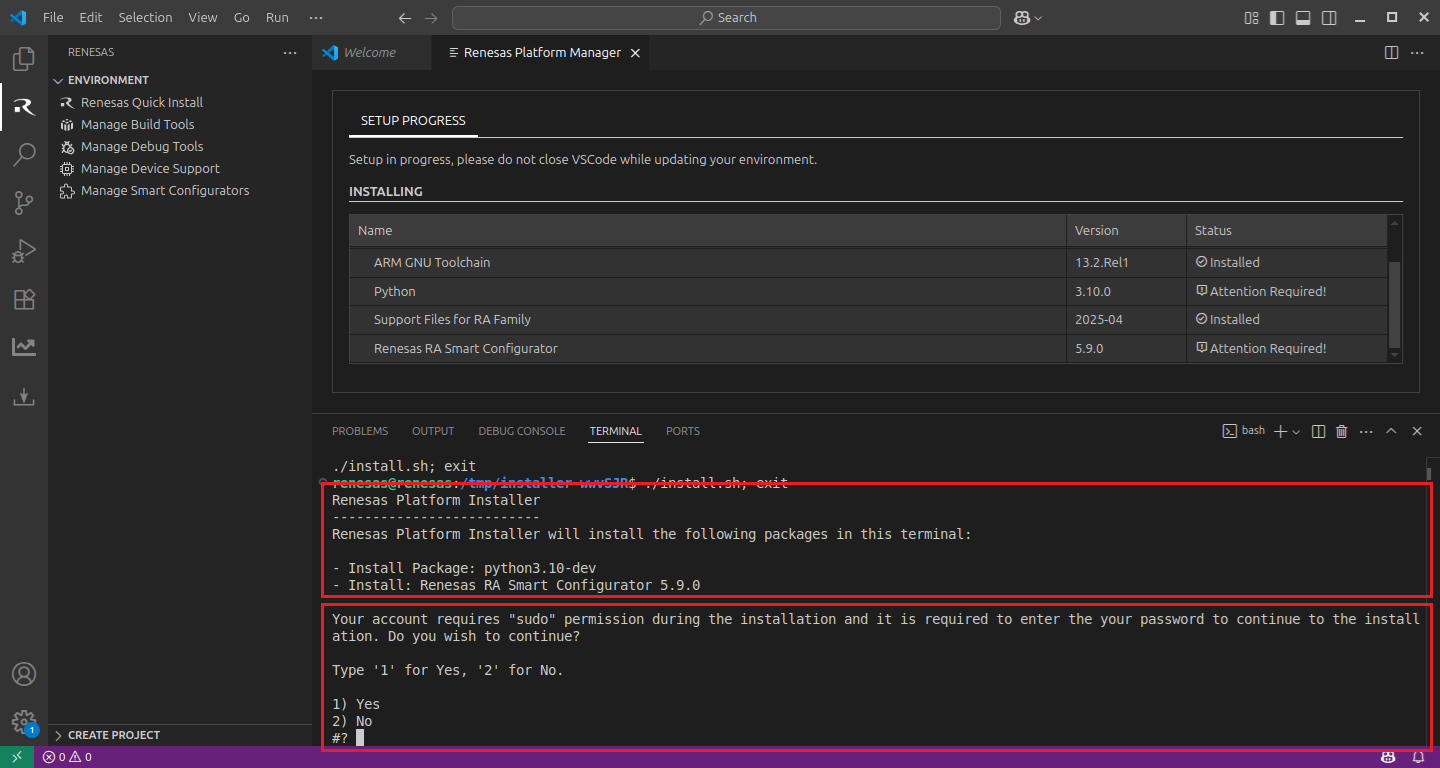
Click the “Install” button for the “Renesas RA” device family. The Renesas Platform will now check the dependencies required by the Renesas RA Device Family. The Renesas Platform extension will check the local environment and CMake, Ninja Build, Python 3.10, ARM GNU Toolchain, SEGGER J-Link, Support Files for RA Family and the Renesas RA Smart Configurator installations, then create an installation plan for them if necessary.
The installation plan automatically includes all the prerequisites. Moreover, you can also select additional tools or toolchain versions by checking the “Build Tools”, “Debug Tools”, “Device Support” and the “Smart Configurators” tabs.
When your selection is ready, click the “Start Installations” button. The download and installation process will start automatically.
Most of the installations will be performed automatically, some installations may require manual interaction.
During the “Python 3.10” and the “Renesas RA Smart Configurator” installations, the terminal wizard will appear for manual interaction. The terminal will show the execution plan and ask for confirmation before continuing. During the installation, it may require administrative rights to execute the installation, thus a password could be needed during the installation. Please make sure that the current user has “sudo” permissions and enter the password.
Installing Additional Emulator Drivers
For some debug emulators, you may need to download and install additional USB drivers for establishing a connection with the emulators and devices.
Using Renesas E2/E2Lite Emulators:
If you are using Renesas Emulators, please install the latest drivers before starting your debug session. Use the following links to download the drivers suitable for your operating system and device:
1.4.3. Setup for R-Car
For debugging in device family R-Car:
Install Python 2.7 libraries for debugging in R-Car device family. Use the following command to install the required libraries:
sudo apt install python2.7-dev
1.4.4. Setup for RH850
For the Renesas RH850 Family, Renesas Platform provides a straightforward installation wizard to install the CMake, Ninja, Python and the Support Files for RH850 Family. To set up your environment:
Open VS Code.
Navigate to the “Renesas” tab in VS Code. Then, click “Renesas Quick Install” in the “Environment” view.
Click the “Install” button for the “Renesas RH850” device family. The Renesas Platform will now check the dependencies required by the Renesas RH850 Device Family. The Renesas Platform extension will check the local environment and CMake, Ninja, Python and the Support Files for RH850 Family, then create an installation plan for them if necessary.
When your selection is ready, click the “Start Installations” button. The download and installation process will start automatically.
Most of the installations will be performed automatically, some installations may require manual interaction.
During the “Python 3.10” installation, the terminal wizard will appear for manual interaction. The terminal will show the execution plan and ask for confirmation before continuing. During the installation, it requires administrative rights to execute the installation, thus a password could be needed during the installation. Please make sure that the current user has “sudo” permissions and enter the password.
Installing “CC-RH” toolchains for RH850 Project Build:
For RH850 projects, it is recommended to install “CC-RH” toolchain. For installing “CC-RH”:
Download and install the latest toolchain:
https://www.renesas.com/us/en/software-tool/c-compiler-package-rh850-family
Installing Additional Emulator Drivers
You may need to download and install additional USB drivers for establishing a connection with the emulators and devices. Please install the latest drivers before starting your debug session. Use the following links to download the drivers suitable for your operating system and device:
1.4.5. Setup for RISC-V MCU
For the Renesas RISC-V MCU Family, Renesas Platform provides a straightforward installation wizard to install the CMake, Ninja, Python and the Support Files for RISC-V MCU Family. To set up your environment:
Open VS Code.
Navigate to the “Renesas” tab in VS Code. Then, click “Renesas Quick Install” in the “Environment” view.
Click the “Install” button for the “Renesas RISC-V MCU” device family. The Renesas Platform will now check the dependencies required by the Renesas RISC-V MCU Device Family. The Renesas Platform extension will check the local environment and CMake, Ninja, Python and the Support Files for RISC-V MCU Family, then create an installation plan for them if necessary.
When your selection is ready, click the “Start Installations” button. The download and installation process will start automatically.
Most of the installations will be performed automatically, some installations may require manual interaction.
During the “Python 3.10” installation, the terminal wizard will appear for manual interaction. The terminal will show the execution plan and ask for confirmation before continuing. During the installation, it requires administrative rights to execute the installation, thus a password could be needed during the installation. Please make sure that the current user has “sudo” permissions and enter the password.
Installing the latest RISC-V MCU Smart Configurator (RISC-V MCU SC):
Download and install the latest version of RISC-V MCU Smart Configurator:
After installing the Renesas RISC-V MCU Smart Configurator, you should register the Renesas Smart Configurator installation in VS Code. In order to register the Renesas RISC-V MCU Smart Configurator, perform the following steps:
Click to “Manage Smart Configurators” and check the Renesas RISC-V MCU Smart Configurators. Use the “Register SC” button to register the Smart Configurator manually by selecting the path of the Smart Configurator.
Once it is registered, the Smart Configurator will be visible in the Renesas RISC-V MCU Smart Configurators list.
Installing “LLVM for Renesas RISC-V MCU” toolchain for RISC-V MCU Project Build:
For RISC-V MCU projects, it is recommended to use “LLVM for Renesas RISC-V MCU” toolchain.
Download and install the latest toolchain:
https://llvm-gcc-renesas.com/riscv/riscv-download-toolchains
Add the bin folder of the toolchain as “RENESAS_RISCV_LLVM_TOOLCHAIN_PATH” to the environment variables.
Guide for Configuring RENESAS_RISCV_LLVM_TOOLCHAIN_PATH environment variable
For adding RENESAS_RISCV_LLVM_TOOLCHAIN_PATH variable to environment variables, open .bashrc file in the home folder of the current user, then add the following line:
export RENESAS_RISCV_LLVM_TOOLCHAIN_PATH="<bin folder of the LLVM for Renesas RISC-V MCU Toolchain>"
For instance:
export RENESAS_RISCV_LLVM_TOOLCHAIN_PATH="/home/renesas/toolchains/llvm_19.1.7.202501_riscv-elf/bin"
1.4.6. Setup for RL78
For the Renesas RL78 Family, Renesas Platform provides a straightforward installation wizard to install the CMake, Ninja, Python and the Support Files for RL78 Family. To set up your environment:
Open VS Code.
Navigate to the “Renesas” tab in VS Code. Then, click “Renesas Quick Install” in the “Environment” view.
Click the “Install” button for the “Renesas RL78” device family. The Renesas Platform will now check the dependencies required by the Renesas RL78 Device Family. The Renesas Platform extension will check the local environment and CMake, Ninja, Python and the Support Files for RL78 Family, then create an installation plan for them if necessary.
When your selection is ready, click the “Start Installations” button. The download and installation process will start automatically.
Most of the installations will be performed automatically, some installations may require manual interaction.
During the “Python 3.10” installation, the terminal wizard will appear for manual interaction. The terminal will show the execution plan and ask for confirmation before continuing. During the installation, it requires administrative rights to execute the installation, thus a password could be needed during the installation. Please make sure that the current user has “sudo” permissions and enter the password.
Installing Toolchains for RL78 Development:
Install one of the preferred toolchains for RL78 Project Build. It is recommended to use either “CC-RL” or “LLVM for Renesas RL78”.
Installing and Configuring “CC-RL” toolchain
For installing “CC-RL”:
Download and install the latest toolchain:
https://www.renesas.com/us/en/software-tool/c-compiler-package-rl78-family
Installing and Configuring “LLVM for Renesas RL78” toolchain
For installing “LLVM for Renesas RL78”:
Download and install the latest toolchain:
Installing Additional Emulator Drivers
You may need to download and install additional USB drivers for establishing a connection with the emulators and devices. Please install the latest drivers before starting your debug session. Use the following links to download the drivers suitable for your operating system and device:
For other Renesas emulators, please check for any recommended drivers:
1.4.7. Setup for RX
For the Renesas RX Family, Renesas Platform provides a straightforward installation wizard to install the CMake, Ninja, Python and the Support Files for RX Family. To set up your environment:
Open VS Code.
Navigate to the “Renesas” tab in VS Code. Then, click “Renesas Quick Install” in the “Environment” view.
Click the “Install” button for the “Renesas RX” device family. The Renesas Platform will now check the dependencies required by the Renesas RX Device Family. The Renesas Platform extension will check the local environment and CMake, Ninja, Python and the Support Files for RX Family, then create an installation plan for them if necessary.
When your selection is ready, click the “Start Installations” button. The download and installation process will start automatically.
Most of the installations will be performed automatically, some installations may require manual interaction.
During the “Python 3.10” installation, the terminal wizard will appear for manual interaction. The terminal will show the execution plan and ask for confirmation before continuing. During the installation, it requires administrative rights to execute the installation, thus a password could be needed during the installation. Please make sure that the current user has “sudo” permissions and enter the password.
Installing Toolchains for RX Development:
Install one of the preferred toolchains for RX Project Build. It is recommended to use either “CC-RX” or “GCC for Renesas GNURX”.
Installing and Configuring “CC-RX” toolchain
For installing “CC-RX”:
Download and install the latest toolchain:
https://www.renesas.com/us/en/software-tool/cc-compiler-package-rx-family
Installing and Configuring “GCC for Renesas GNURX” toolchain
For installing “GCC for Renesas GNURX”:
Download and install the latest toolchain:
Installing Additional Emulator Drivers
You may need to download and install additional USB drivers for establishing a connection with the emulators and devices. Please install the latest drivers before starting your debug session. Use the following links to download the drivers suitable for your operating system and device:
For other Renesas emulators, please check for any recommended drivers:
1.4.8. Setup for RZ
For the Renesas RZ Family, Renesas Platform provides a straightforward installation wizard to install the CMake, Ninja, Python, SEGGER J-Link and the Support Files for RZ Family. To set up your environment:
Open VS Code.
Navigate to the “Renesas” tab in VS Code. Then, click “Renesas Quick Install” in the “Environment” view.
Click the “Install” button for the “Renesas RZ” device family. The Renesas Platform will now check the dependencies required by the Renesas RZ Device Family. The Renesas Platform extension will check the local environment and CMake, Ninja, Python, SEGGER J-Link and the Support Files for RZ Family, then create an installation plan for them if necessary.
When your selection is ready, click the “Start Installations” button. The download and installation process will start automatically.
Most of the installations will be performed automatically, some installations may require manual interaction.
During the “Python 3.10” installation, the terminal wizard will appear for manual interaction. The terminal will show the execution plan and ask for confirmation before continuing. During the installation, it requires administrative rights to execute the installation, thus a password could be needed during the installation. Please make sure that the current user has “sudo” permissions and enter the password.
Installing the “Arm GNU Toolchain” toolchains for RZ Development
For installing “Arm GNU Toolchain”:
Download and install the latest toolchain:
https://developer.arm.com/downloads/-/arm-gnu-toolchain-downloads
1.5. Setup for Ubuntu 24.04
Renesas extensions support a variety of device and tool combinations for embedded development. It is essential to set up your development environment properly before starting your work. For Ubuntu 24.04 operating systems, please follow this guide to set up your environment. It is recommended to check the device-specific setup guide to complete the required setup steps.
1.5.1. Setup for Dialog
For the Dialog Family, Renesas Platform provides a straightforward installation wizard to install CMake, Ninja Build, Python 3.10, ARM GNU Toolchain, SEGGER J-Link and Support Files for Dialog Family. To set up your environment:
Open VS Code.
Navigate to the “Renesas” tab in VS Code. Then, click “Renesas Quick Install” in the “Environment” view.
Click the “Install” button for the “Dialog” device family. The Renesas Platform will now check the dependencies required by the Dialog Device Family. The Renesas Platform extension will check the local environment and CMake, Ninja Build, Python 3.10, ARM GNU Toolchain, SEGGER J-Link and Support Files for Dialog Family, then create an installation plan for them if necessary.
When your selection is ready, click the “Start Installations” button. The download and installation process will start automatically.
Most of the installations will be performed automatically, some installations may require manual interaction.
During the “Python 3.10” installation, the terminal wizard will appear for manual interaction. The terminal will show the execution plan and ask for confirmation before continuing. During the installation, it requires administrative rights to execute the installation, thus a password could be needed during the installation. Please make sure that the current user has “sudo” permissions and enter the password.
Getting the Dialog Audio Development Platform:
For Dialog projects, it is recommended to use the “Dialog Audio Development Platform” during project development. Customers can access the Audio Development Platform (ADP) software upon request.
1.5.2. Setup for RA
Renesas Platform, provides a complete installation wizard to start developing for Renesas RA Family. To set up your environment:
Open VS Code.
Navigate to the “Renesas” tab in VS Code. Then, click “Renesas Quick Install” in the “Environment” view.
Click the “Install” button for the “Renesas RA” device family. The Renesas Platform will now check the dependencies required by the Renesas RA Device Family. The Renesas Platform extension will check the local environment and CMake, Ninja Build, Python 3.10, ARM GNU Toolchain, SEGGER J-Link, Support Files for RA Family and the Renesas RA Smart Configurator installations, then create an installation plan for them if necessary.
The installation plan automatically includes all the prerequisites. Moreover, you can also select additional tools or toolchain versions by checking the “Build Tools”, “Debug Tools”, “Device Support” and the “Smart Configurators” tabs.
When your selection is ready, click the “Start Installations” button. The download and installation process will start automatically.
Most of the installations will be performed automatically, some installations may require manual interaction.
During the “Python 3.10” and the “Renesas RA Smart Configurator” installations, the terminal wizard will appear for manual interaction. The terminal will show the execution plan and ask for confirmation before continuing. During the installation, it may require administrative rights to execute the installation, thus a password could be needed during the installation. Please make sure that the current user has “sudo” permissions and enter the password.
Installing Additional Emulator Drivers
For some debug emulators, you may need to download and install additional USB drivers for establishing a connection with the emulators and devices.
Using Renesas E2/E2Lite Emulators:
If you are using Renesas Emulators, please install the latest drivers before starting your debug session. Use the following links to download the drivers suitable for your operating system and device:
1.5.3. Setup for RH850
For the Renesas RH850 Family, Renesas Platform provides a straightforward installation wizard to install the CMake, Ninja, Python and the Support Files for RH850 Family. To set up your environment:
Open VS Code.
Navigate to the “Renesas” tab in VS Code. Then, click “Renesas Quick Install” in the “Environment” view.
Click the “Install” button for the “Renesas RH850” device family. The Renesas Platform will now check the dependencies required by the Renesas RH850 Device Family. The Renesas Platform extension will check the local environment and CMake, Ninja, Python and the Support Files for RH850 Family, then create an installation plan for them if necessary.
When your selection is ready, click the “Start Installations” button. The download and installation process will start automatically.
Most of the installations will be performed automatically, some installations may require manual interaction.
During the “Python 3.10” installation, the terminal wizard will appear for manual interaction. The terminal will show the execution plan and ask for confirmation before continuing. During the installation, it requires administrative rights to execute the installation, thus a password could be needed during the installation. Please make sure that the current user has “sudo” permissions and enter the password.
Installing “CC-RH” toolchains for RH850 Project Build:
For RH850 projects, it is recommended to install “CC-RH” toolchain. For installing “CC-RH”:
Download and install the latest toolchain:
https://www.renesas.com/us/en/software-tool/c-compiler-package-rh850-family
Installing Additional Emulator Drivers
You may need to download and install additional USB drivers for establishing a connection with the emulators and devices. Please install the latest drivers before starting your debug session. Use the following links to download the drivers suitable for your operating system and device:
1.5.4. Setup for RL78
For the Renesas RL78 Family, Renesas Platform provides a straightforward installation wizard to install the CMake, Ninja, Python and the Support Files for RL78 Family. To set up your environment:
Open VS Code.
Navigate to the “Renesas” tab in VS Code. Then, click “Renesas Quick Install” in the “Environment” view.
Click the “Install” button for the “Renesas RL78” device family. The Renesas Platform will now check the dependencies required by the Renesas RL78 Device Family. The Renesas Platform extension will check the local environment and CMake, Ninja, Python and the Support Files for RL78 Family, then create an installation plan for them if necessary.
When your selection is ready, click the “Start Installations” button. The download and installation process will start automatically.
Most of the installations will be performed automatically, some installations may require manual interaction.
During the “Python 3.10” installation, the terminal wizard will appear for manual interaction. The terminal will show the execution plan and ask for confirmation before continuing. During the installation, it requires administrative rights to execute the installation, thus a password could be needed during the installation. Please make sure that the current user has “sudo” permissions and enter the password.
Installing Toolchains for RL78 Development:
Install one of the preferred toolchains for RL78 Project Build. It is recommended to use either “CC-RL” or “LLVM for Renesas RL78”.
Installing and Configuring “CC-RL” toolchain
For installing “CC-RL”:
Download and install the latest toolchain:
https://www.renesas.com/us/en/software-tool/c-compiler-package-rl78-family
Installing and Configuring “LLVM for Renesas RL78” toolchain
For installing “LLVM for Renesas RL78”:
Download and install the latest toolchain:
Installing Additional Emulator Drivers
You may need to download and install additional USB drivers for establishing a connection with the emulators and devices. Please install the latest drivers before starting your debug session. Use the following links to download the drivers suitable for your operating system and device:
For other Renesas emulators, please check for any recommended drivers:
1.5.5. Setup for RX
For the Renesas RX Family, Renesas Platform provides a straightforward installation wizard to install the CMake, Ninja, Python and the Support Files for RX Family. To set up your environment:
Open VS Code.
Navigate to the “Renesas” tab in VS Code. Then, click “Renesas Quick Install” in the “Environment” view.
Click the “Install” button for the “Renesas RX” device family. The Renesas Platform will now check the dependencies required by the Renesas RX Device Family. The Renesas Platform extension will check the local environment and CMake, Ninja, Python and the Support Files for RX Family, then create an installation plan for them if necessary.
When your selection is ready, click the “Start Installations” button. The download and installation process will start automatically.
Most of the installations will be performed automatically, some installations may require manual interaction.
During the “Python 3.10” installation, the terminal wizard will appear for manual interaction. The terminal will show the execution plan and ask for confirmation before continuing. During the installation, it requires administrative rights to execute the installation, thus a password could be needed during the installation. Please make sure that the current user has “sudo” permissions and enter the password.
Installing Toolchains for RX Development:
Install one of the preferred toolchains for RX Project Build. It is recommended to use either “CC-RX” or “GCC for Renesas GNURX”.
Installing and Configuring “CC-RX” toolchain
For installing “CC-RX”:
Download and install the latest toolchain:
https://www.renesas.com/us/en/software-tool/cc-compiler-package-rx-family
Installing and Configuring “GCC for Renesas GNURX” toolchain
For installing “GCC for Renesas GNURX”:
Download and install the latest toolchain:
Installing Additional Emulator Drivers
You may need to download and install additional USB drivers for establishing a connection with the emulators and devices. Please install the latest drivers before starting your debug session. Use the following links to download the drivers suitable for your operating system and device:
For other Renesas emulators, please check for any recommended drivers:
1.5.6. Setup for RZ
For the Renesas RZ Family, Renesas Platform provides a straightforward installation wizard to install the CMake, Ninja, Python, SEGGER J-Link and the Support Files for RZ Family. To set up your environment:
Open VS Code.
Navigate to the “Renesas” tab in VS Code. Then, click “Renesas Quick Install” in the “Environment” view.
Click the “Install” button for the “Renesas RZ” device family. The Renesas Platform will now check the dependencies required by the Renesas RZ Device Family. The Renesas Platform extension will check the local environment and CMake, Ninja, Python, SEGGER J-Link and the Support Files for RZ Family, then create an installation plan for them if necessary.
When your selection is ready, click the “Start Installations” button. The download and installation process will start automatically.
Most of the installations will be performed automatically, some installations may require manual interaction.
During the “Python 3.10” installation, the terminal wizard will appear for manual interaction. The terminal will show the execution plan and ask for confirmation before continuing. During the installation, it requires administrative rights to execute the installation, thus a password could be needed during the installation. Please make sure that the current user has “sudo” permissions and enter the password.
Installing the “Arm GNU Toolchain” toolchains for RZ Development
For installing “Arm GNU Toolchain”:
Download and install the latest toolchain:
https://developer.arm.com/downloads/-/arm-gnu-toolchain-downloads
1.6. Setup for macOS
Renesas Extensions support a variety of device and tools combinations for embedded development. It is essential to set-up your development environment properly before starting your development. For macOS operating systems, please follow this guide to set-up your environment. It is suggested to:
Firstly, follow the instructions at section “Prerequisites for macOS”,
Then, depending on the target device family please follow the “Setup for …” sections to install device family specific requirements.
Note
Limitation in the macOS support
Renesas embedded development for VS Code on the macOS operating system is only supported for Apple Silicon processor devices, and available for Dialog, RA, RL78 and RX device families.
1.6.1. Prerequisites for macOS
To utilise the Renesas extensions on macOS, it’s necessary to install:
Homebrew
XZ Archive Utilities
First, install Homebrew (brew), which is an open-source software package management system that manages the installation of software for macOS. For installation and more information about Homebrew, please refer to https://brew.sh/.
After installing the Homebrew, install the “XZ Archive Utilities” by using brew install xz command.
$ brew install xz
1.6.2. Setup for Dialog
For the Dialog Family, Renesas Platform provides a straightforward installation wizard to install CMake, Ninja Build, Python 3.10, ARM GNU Toolchain, SEGGER J-Link and Support Files for Dialog Family. To set up your environment:
Open VS Code.
Navigate to the “Renesas” tab in VS Code. Then, click “Renesas Quick Install” in the “Environment” view.
Click the “Install” button for the “Dialog” device family. The Renesas Platform will now check the dependencies required by the Dialog Device Family. The Renesas Platform extension will check the local environment and CMake, Ninja Build, Python 3.10, ARM GNU Toolchain, SEGGER J-Link and Support Files for Dialog Family, then create an installation plan for them if necessary.
When your selection is ready, click the “Start Installations” button. The download and installation process will start automatically.
Most of the installations will be performed automatically, some installations may require manual interaction.
During the “Python 3.10” installation, the terminal wizard will appear for manual interaction. The terminal will show the execution plan and ask for confirmation before continuing. During the installation, it requires administrative rights to execute the installation, thus a password could be needed during the installation. Please make sure that the current user has “sudo” permissions and enter the password.
Getting the Dialog Audio Development Platform:
For Dialog projects, it is recommended to use the “Dialog Audio Development Platform” during project development. Customers can access the Audio Development Platform (ADP) software upon request.
1.6.3. Setup for RA
Renesas Platform, provides a complete installation wizard to start developing for Renesas RA Family. To set up your environment:
Open VS Code.
Navigate to the “Renesas” tab in VS Code. Then, click “Renesas Quick Install” in the “Environment” view.
Click the “Install” button for the “Renesas RA” device family. The Renesas Platform will now check the dependencies required by the Renesas RA Device Family. The Renesas Platform extension will check the local environment and CMake, Ninja Build, Python 3.10, ARM GNU Toolchain, SEGGER J-Link, Support Files for RA Family and the Renesas RA Smart Configurator installations, then create an installation plan for them if necessary.
The installation plan automatically includes all the prerequisites. Moreover, you can also select additional tools or toolchain versions by checking the “Build Tools”, “Debug Tools”, “Device Support” and the “Smart Configurators” tabs.
When your selection is ready, click the “Start Installations” button. The download and installation process will start automatically.
Most of the installations will be performed automatically, some installations may require manual interaction.
During the “Python 3.10” and the “Renesas RA Smart Configurator” installations, the terminal wizard will appear for manual interaction. The terminal will show the execution plan and ask for confirmation before continuing. During the installation, it may require administrative rights to execute the installation, thus a password could be needed during the installation. Please make sure that the current user has “sudo” permissions and enter the password.
1.6.4. Setup for RL78
For the Renesas RL78 Family, Renesas Platform provides a straightforward installation wizard to install the CMake, Ninja, Python and the Support Files for RL78 Family. To set up your environment:
Open VS Code.
Navigate to the “Renesas” tab in VS Code. Then, click “Renesas Quick Install” in the “Environment” view.
Click the “Install” button for the “Renesas RL78” device family. The Renesas Platform will now check the dependencies required by the Renesas RL78 Device Family. The Renesas Platform extension will check the local environment and CMake, Ninja, Python and the Support Files for RL78 Family, then create an installation plan for them if necessary.
When your selection is ready, click the “Start Installations” button. The download and installation process will start automatically.
Most of the installations will be performed automatically, some installations may require manual interaction.
During the “Python 3.10” installation, the terminal wizard will appear for manual interaction. The terminal will show the execution plan and ask for confirmation before continuing. During the installation, it requires administrative rights to execute the installation, thus a password could be needed during the installation. Please make sure that the current user has “sudo” permissions and enter the password.
Installing Toolchains for RL78 Development:
Install the “LLVM for Renesas RL78” toolchain for RL78 project development in macOS operating system. For installing “LLVM for Renesas RL78”:
Download and install the latest toolchain:
Installing Additional Emulator Drivers
You may need to download and install additional USB drivers for establishing a connection with the emulators and devices. Please install the latest drivers before starting your debug session. Please check for the recommended drivers:
1.6.5. Setup for RX
For the Renesas RX Family, Renesas Platform provides a straightforward installation wizard to install the CMake, Ninja, Python and the Support Files for RX Family. To set up your environment:
Open VS Code.
Navigate to the “Renesas” tab in VS Code. Then, click “Renesas Quick Install” in the “Environment” view.
Click the “Install” button for the “Renesas RX” device family. The Renesas Platform will now check the dependencies required by the Renesas RX Device Family. The Renesas Platform extension will check the local environment and CMake, Ninja, Python and the Support Files for RX Family, then create an installation plan for them if necessary.
When your selection is ready, click the “Start Installations” button. The download and installation process will start automatically.
Most of the installations will be performed automatically, some installations may require manual interaction.
During the “Python 3.10” installation, the terminal wizard will appear for manual interaction. The terminal will show the execution plan and ask for confirmation before continuing. During the installation, it requires administrative rights to execute the installation, thus a password could be needed during the installation. Please make sure that the current user has “sudo” permissions and enter the password.
Installing Toolchains for RX Development:
Install the “GCC for Renesas GNURX” toolchain for RX project development in macOS operating system. For installing “GCC for Renesas GNURX”:
Download and install the latest toolchain:
Installing Additional Emulator Drivers
You may need to download and install additional USB drivers for establishing a connection with the emulators and devices. Please install the latest drivers before starting your debug session. Please check for the recommended drivers:
1.7. Supported Toolchains
Install the latest (or suggested) toolchains for a target device family and add the path of the desired toolchain’s bin folder to the “PATH” environment variable.
Device Family |
Toolchain |
|---|---|
Dialog |
|
RA |
|
RH850 |
|
RISC-V MCU |
|
RL78 |
|
RX |
|
RZ |
1.8. Drivers for Debugging Connection
Both for Windows, Linux and macOS operating systems, you may need to download and install additional USB drivers for establishing a proper connection with the emulators and devices.
1.8.1. Using Renesas Emulators:
If you are using Renesas Emulators, please install the latest drivers before starting your debug session. Use the following link to download the drivers suitable for your operating system and device:
For other Renesas emulators, please check for any recommended drivers:
1.8.2. Using SEGGER J-Link Connection:
Install the latest SEGGER J-Link drivers before starting your debug session. Use the following link to download the J-Link drivers suitable for your operating system: